


免加密卡,鲲鹏TEE内生国密高性价比参考实践
发表于 2026/03/10
0
1 非商用声明
该文档提供的内容为参考实践,仅供用户参考使用,用户可参考实践文档构建自己的软件,按需进行安全、可靠性加固,但不建议直接将相关Demo或镜像文件集成到商用产品中。
2 方案介绍
2.1 背景介绍
数字化转型背景下,数据加密已成为各行业安全运营的核心要求,广泛适用于通用数据防护、VPN 网关链路安全、证券交易、银行与监管机构(人行、证监)数据交互及应用核心数据加密等场景。此类场景需要保障数据机密性与完整性的同时,亦需满足国家密码标准的合规要求。
长期以来,上述国密合规加密需求主要依赖外置密码卡、密码机等硬件设备实现,但传统方案存在显著痛点:一是部署成本高,设备采购、适配及后期维护投入大;二是集成复杂度高,需定制化开发适配业务系统,影响上线效率;三是扩展灵活性不足,难以快速响应业务扩容需求;四是运维管理繁琐,需专业团队保障设备运行与密钥管理。
在此背景下,市场亟需一种兼具国密合规性、高性价比与便捷部署特性的加密解决方案,突破传统外置硬件设备的应用局限,满足各行业数字化转型中对安全、高效、低成本加密技术的迫切需求。
2.2 方案简介
概述
鲲鹏安全计算密码模块是基于华为自研可信执行环境操作系统(Trusted Execution Environment OS, TEE OS)提供的一个密码模块套件,该模块分为CA/TA两部分,TA部分内置于TEE OS中,CA部分包括API接口库和密钥管理工具,旨在为安全业务提供便捷、安全的密码算法能力。
方案优势
本密码模块符合GM/T 0018-2012和2023标准,已通过国密二级认证要求,为公钥密码基础设施应用中的通用密码服务层提供基础密码服务,包括密钥生成,单一的密码运算,文件管理等服务。本密码设备内嵌于服务器,可在不新增密码卡、密码机的前提下提供标准密码接口,具有高可靠、低成本、高易用的特点。
软件架构
TEE OS是基于TrustZone架构的可信安全隔离执行环境,密码模块管理单元随TEE OS启动而加载运行。密码运算运行在安全侧,REE侧提供标准SDF接口支持和调用。
图1 鲲鹏安全计算密码模块架构图
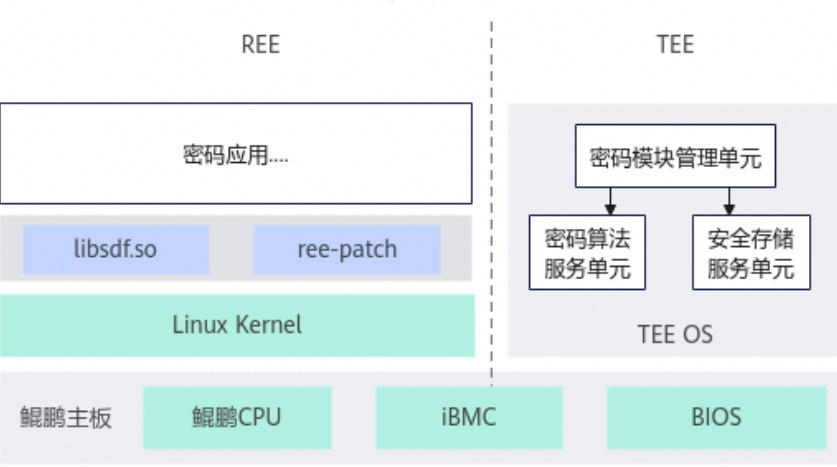
libsdf.so:部署在REE侧,提供标准的SDF接口。将密码应用的密码运算请求转发到TEE OS上的密码模块管理单元中运行。
华为TEE OS架构详见系统架构。
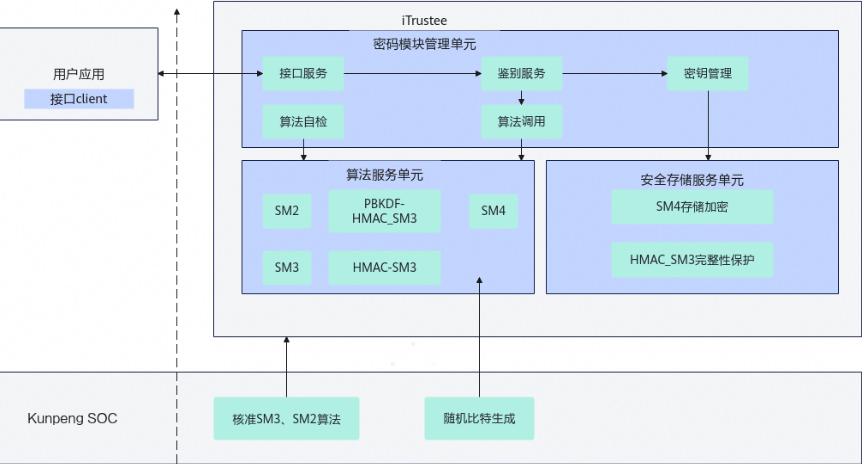
原理描述
鲲鹏安全计算密码模块运行在华为自研的安全TEE OS基础之上,REE侧提供符合GM/T 0018-2012和2023标准规范的接口库文件libsdf.so,用户应用调用libsdf.so接口后,请求被转发到TEE侧,由密码模块管理单元进行处理,算法服务单元基于TEE OS底层实现具体的密码运算,安全存储服务单元提供数据加密保存。
图2 SDF架构原理
3 使用指导
3.1 环境要求
鲲鹏安全计算密码模块支持的机型及配套版本如表1 硬件环境要求所示。
表1 硬件环境要求
| 配套项 | 说明 |
|---|---|
| CPU | 鲲鹏920新型号处理器( 7270Z、5253Z、5252Z、5235Z、5230Z等) |
| BIOS固件 | 21.23版本及以上 获取链接 |
| BMC固件 | 5.05.12.11版本及以上 获取链接 |
| CCOS固件 | 1.0版本及以上,请参见表 软件包获取 获取TEE OS hpm固件包解压后获取该固件包,固件包名称为ccos_image_*.hpm。 |
| License支持 | 需要激活Kunpeng TEE Function |
| 操作系统 | 内核版本4.19、5.10的openEuler和麒麟系统 |
相关软件包获取方式如表2 软件包获取所示。
表2 软件包获取
| 软件包名称 | 版本(分支)要求 | 软件包说明 | 获取方法 |
| itrustee_tzdriver | iTrustee_7.9.1_release | iTrustee REE侧Patch包源码。 | 获取链接 |
| itrustee_client | iTrustee_7.9.1_release | iTrustee REE侧Patch包源码。 | 获取链接 |
| libboundscheck | master | 内存边界检查的工具库。 | 获取链接 |
| BoostKit-boostcc-ccos-1.2.zip | 1.2 | TEE OS hpm固件包,适用于鲲鹏主板S920X20机型升级。 | 获取链接 |
3.2 部署流程
请参考鲲鹏BoostKit机密计算>商密应用>开发指南>准备环境章节: 链接
3.3 接口说明及示例
请参考鲲鹏BoostKit机密计算>商密应用>开发指南章节:链接
4 典型场景参考实践
4.1 银行与三方机构数据交互场景
4.1.1 场景需求
该场景使用物理机部署TEE套件并且使用SM4算法进行加解密开发。
4.1.2 环境信息说明
本参考实践的调优验证所涉及的详细软硬件信息如表1 软件信息和表2 硬件信息。
表1 软件信息
| 类别 | 软件版本 |
| OS | OpenEuler 22.03 LTS-SP4 |
| BMC固件 | 5.05.12.25 |
| TEE OS固件 | 1.2 |
| BIOS固件 | 21.23 |
| itrustee_tzdriver | 7.9.1 |
| itrustee_client | 7.9.1 |
表2 硬件信息
| 类别 | 硬件描述 |
| CPU | 鲲鹏7270z |
| 内存 | 384GB |
| 硬盘 | 4*1.5TB NVMe硬盘 |
| 主板 | S920X20 |
4.1.3 部署流程
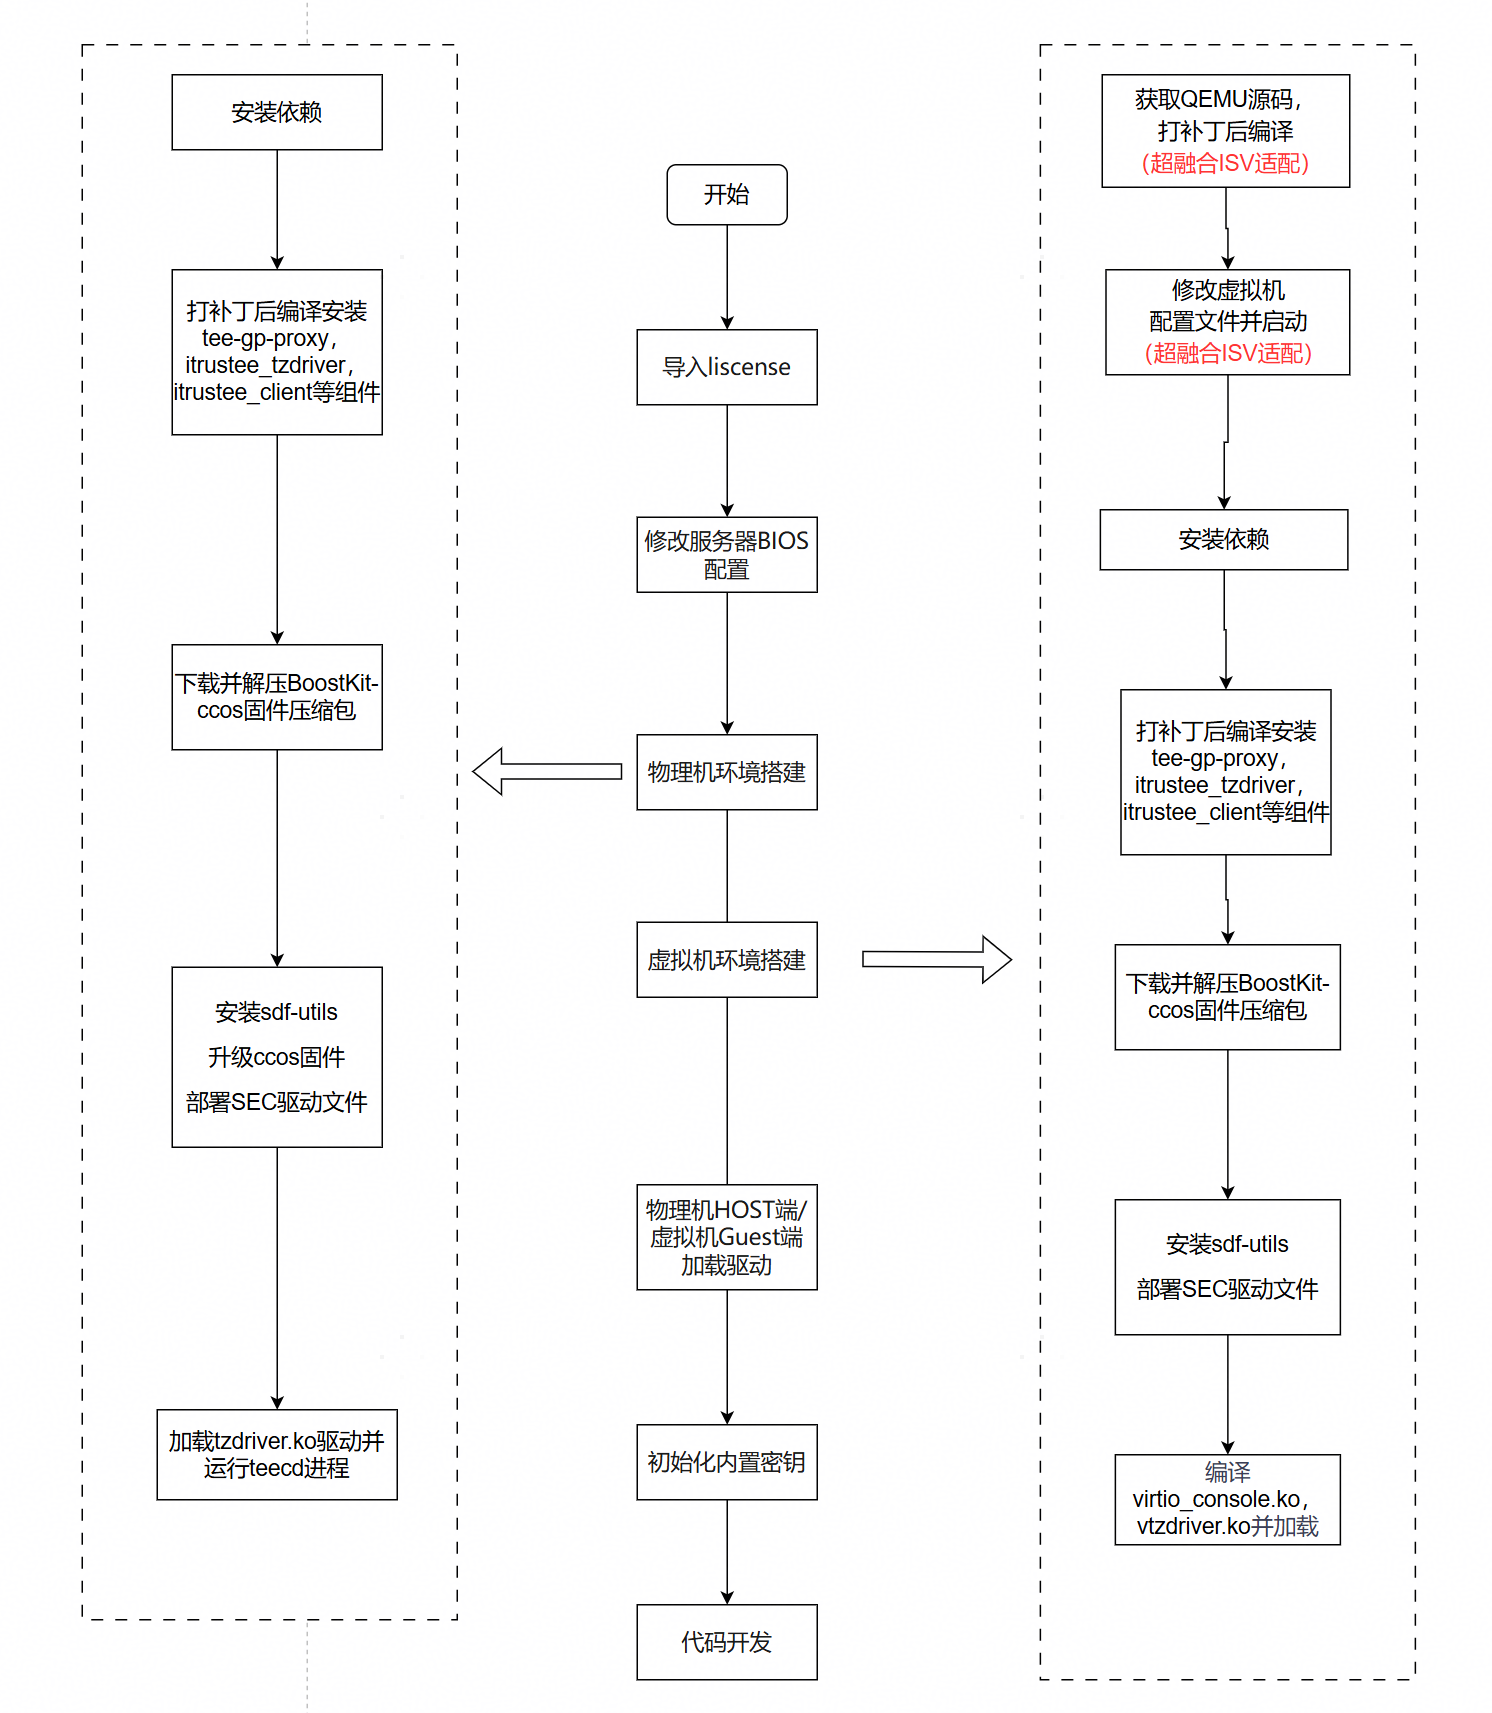
部署流程图如下:
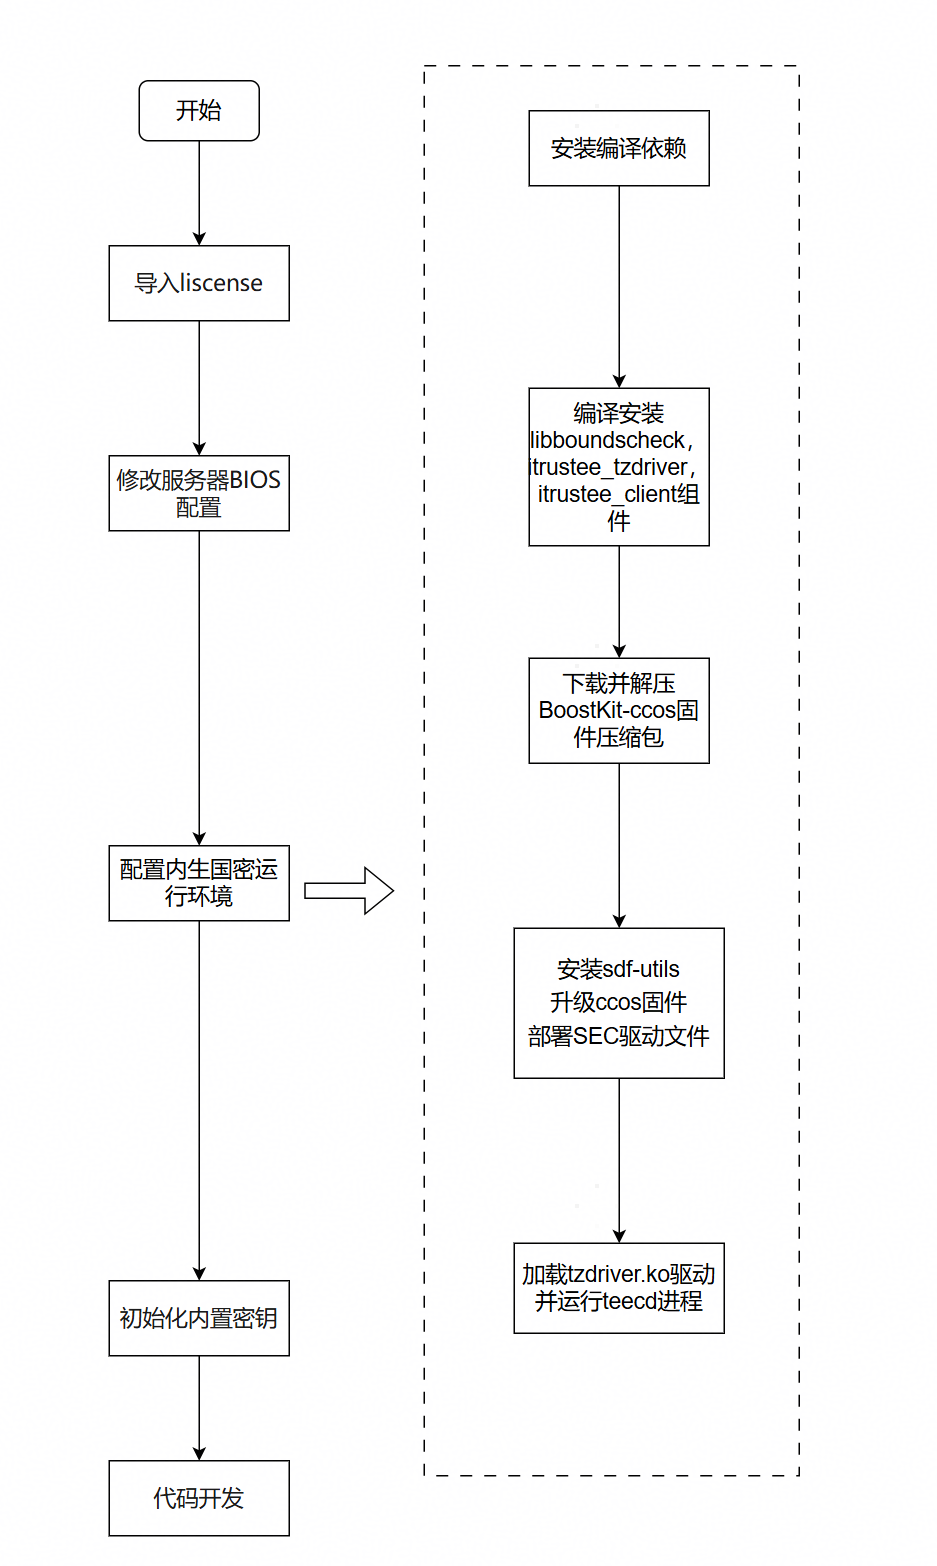
4.1.3.1 导入liscense
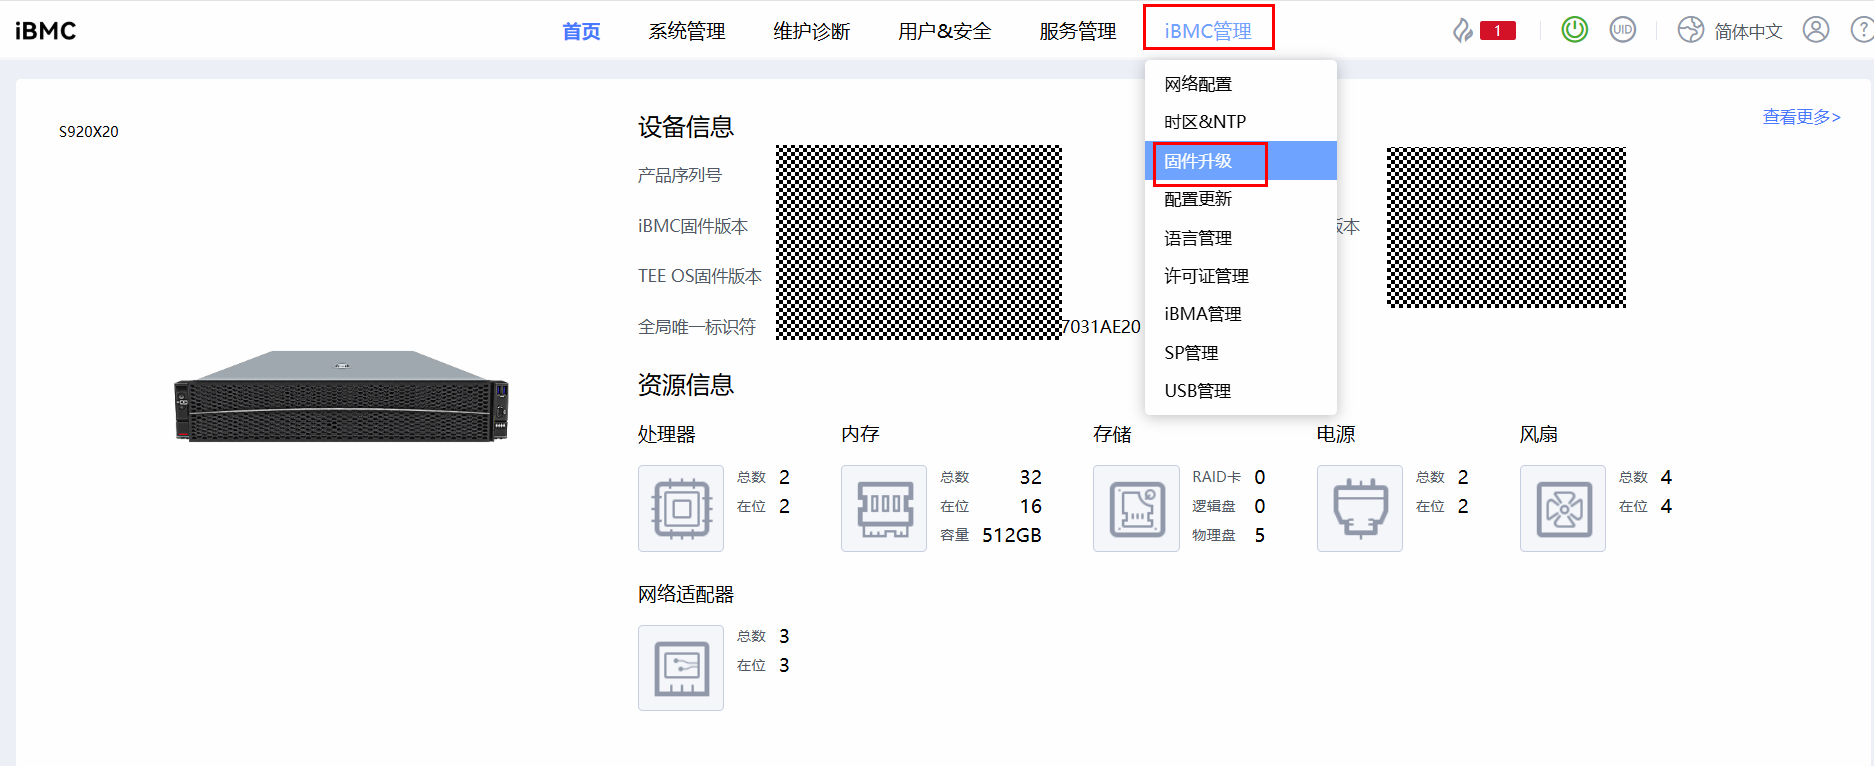
TEE特性启用受License控制,本章节主要介绍如何在iBMC导入License。
在特性使用前请确认iBMC许可证管理界面中“Kunpeng TEE Function”和“Kunpeng accelerator* Function”已处于开启状态。
说明:如果测试使用需要申请License,请联系华为业务负责人申请。对于商业项目使用,需要购买TEE License
步骤1 登录iBMC网页,iBMC管理>许可证信息>设备ESN码。
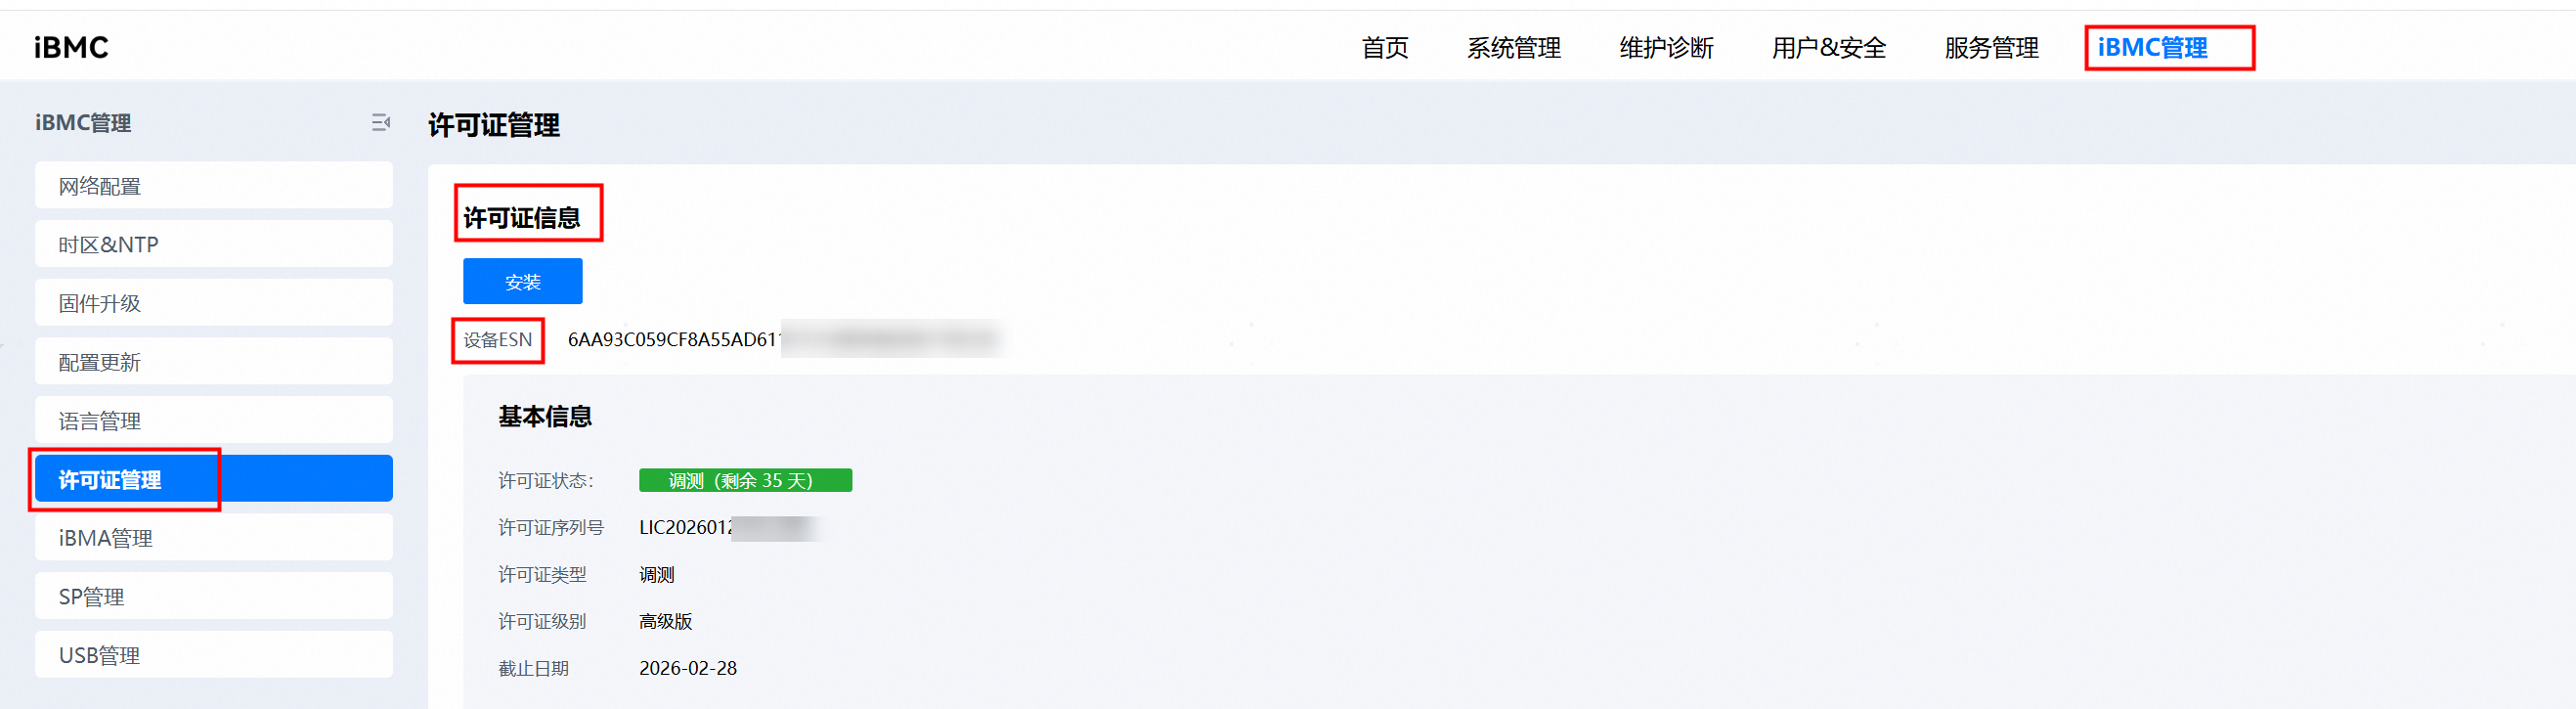
将设备ESN码反馈给华为业务负责人并获取License文件
步骤2 登录iBMC网页,iBMC管理>许可证信息。
在未导入License的情况下,Kunpeng TEE Function和Kunpeng accelerator* Function处于“已关闭”状态。
步骤3 单击“安装”,选择获取的License。
成功导入License后,Kunpeng TEE Function和Kunpeng accelerator* 处于"已开启"状态,并显示对应截止日期。
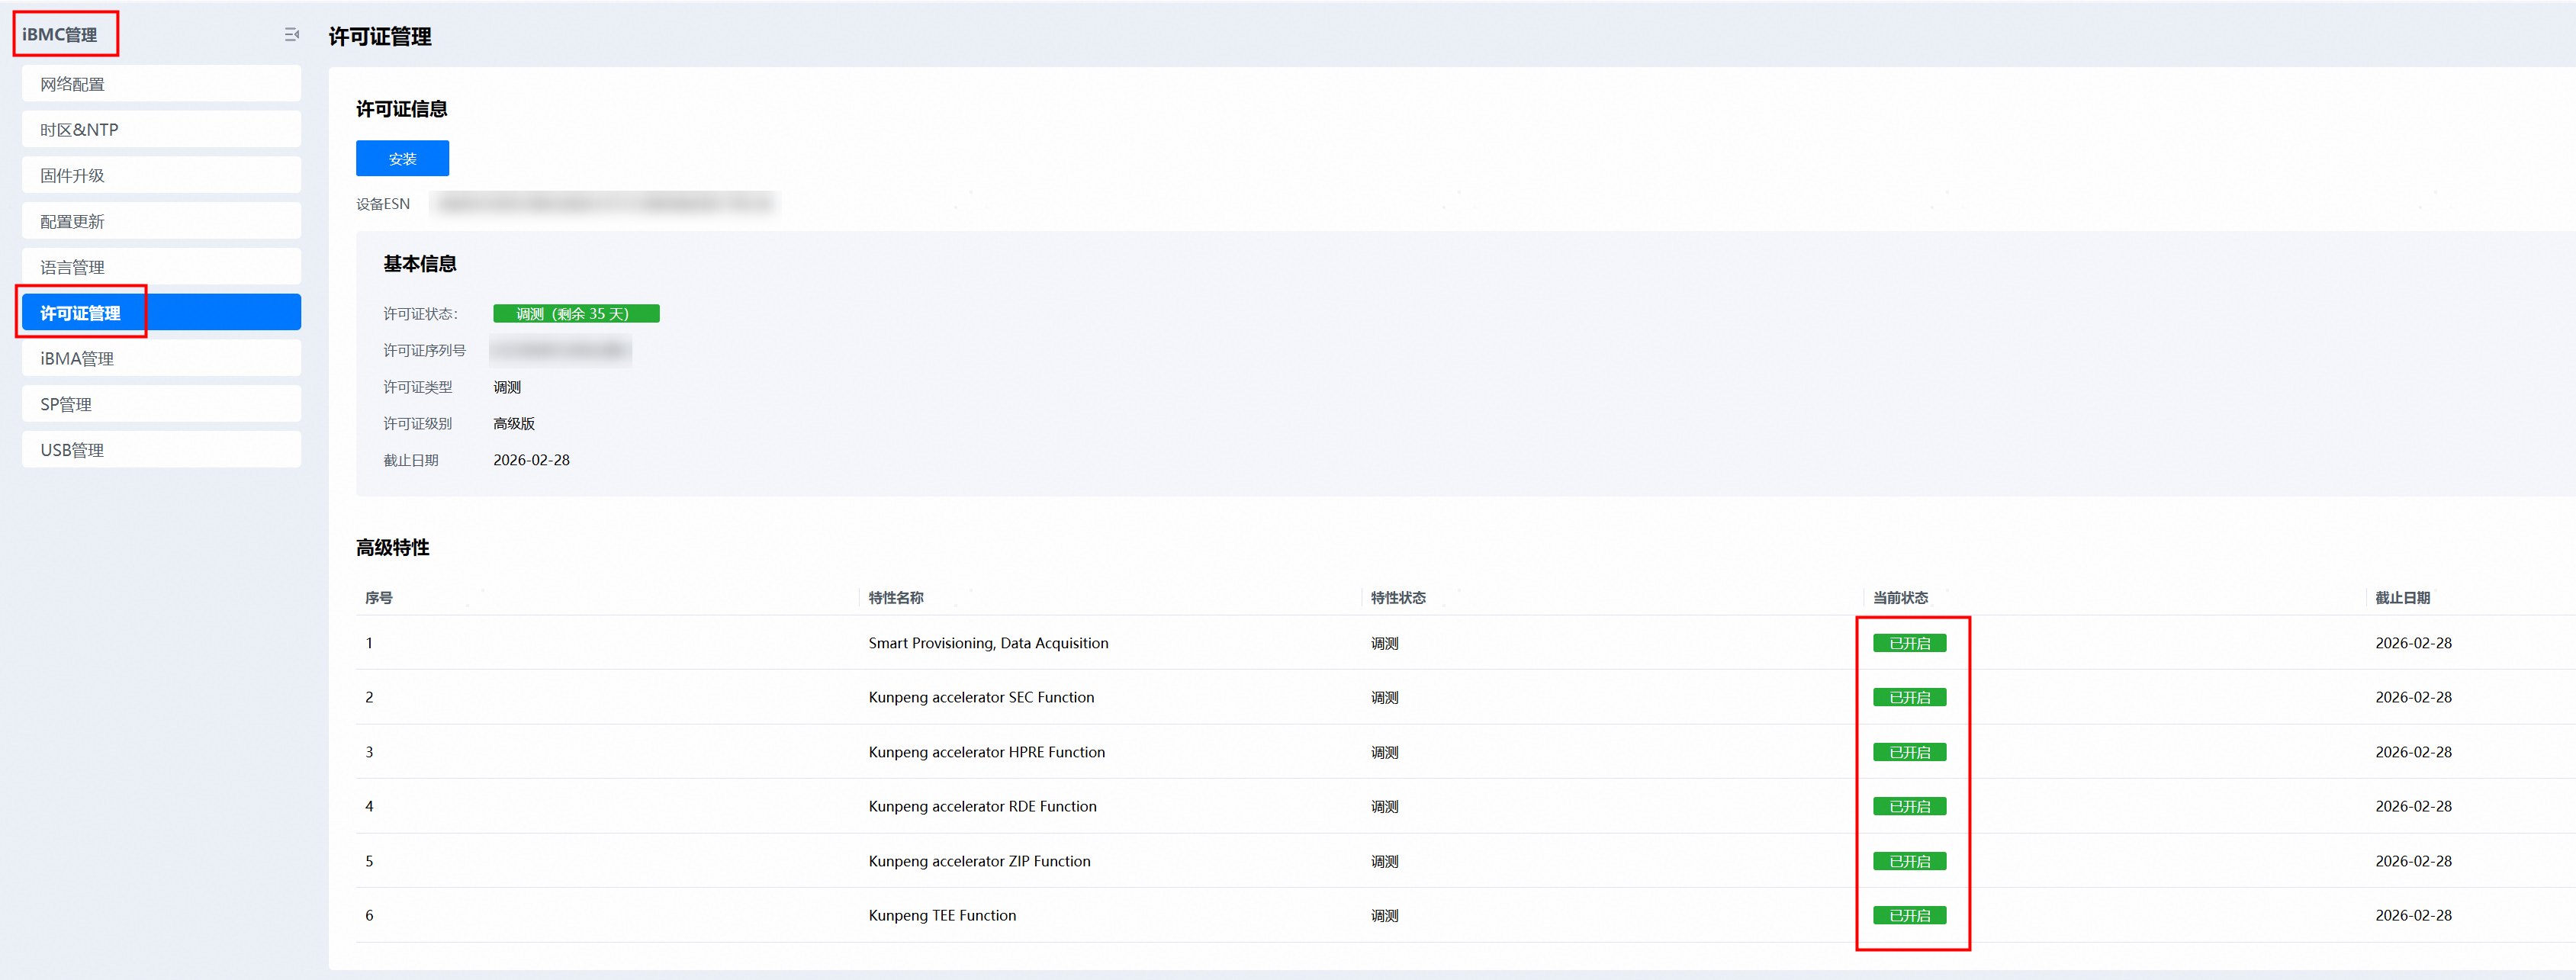
----结束
4.1.3.2 修改服务器BIOS配置
当前TEE与BIOS特性"超线程","内存3路通道交织"不兼容,且TEE默认是关闭的。若需使用TEE,则需在BIOS菜单中关闭以上特性并打开"TEE Support"特性。
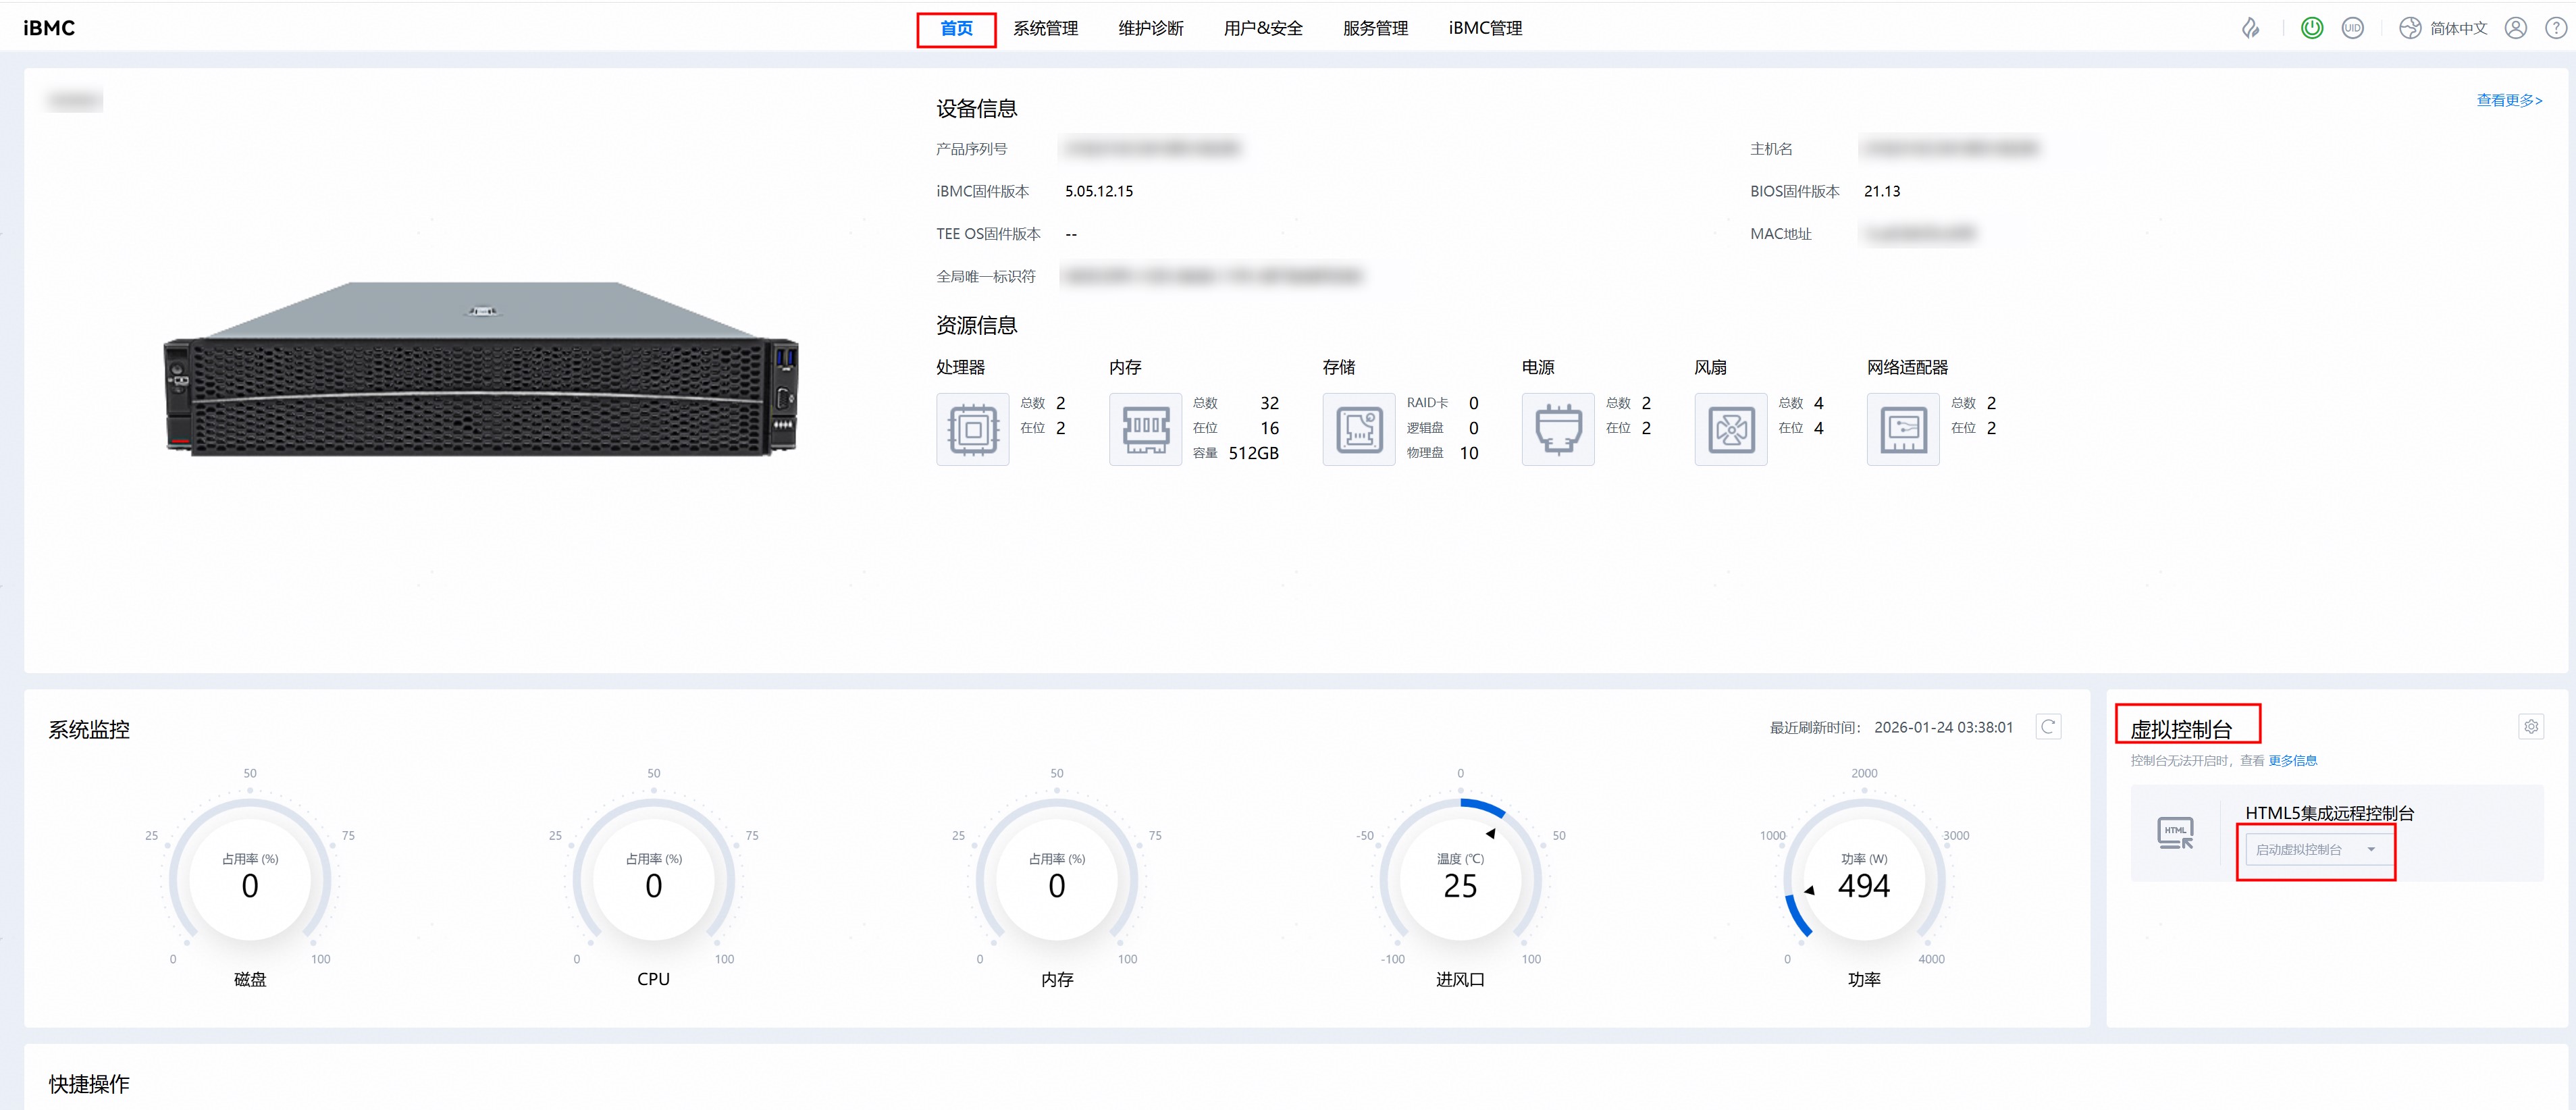
步骤1 进入iBMC首页>虚拟控制台>启动虚拟控制台
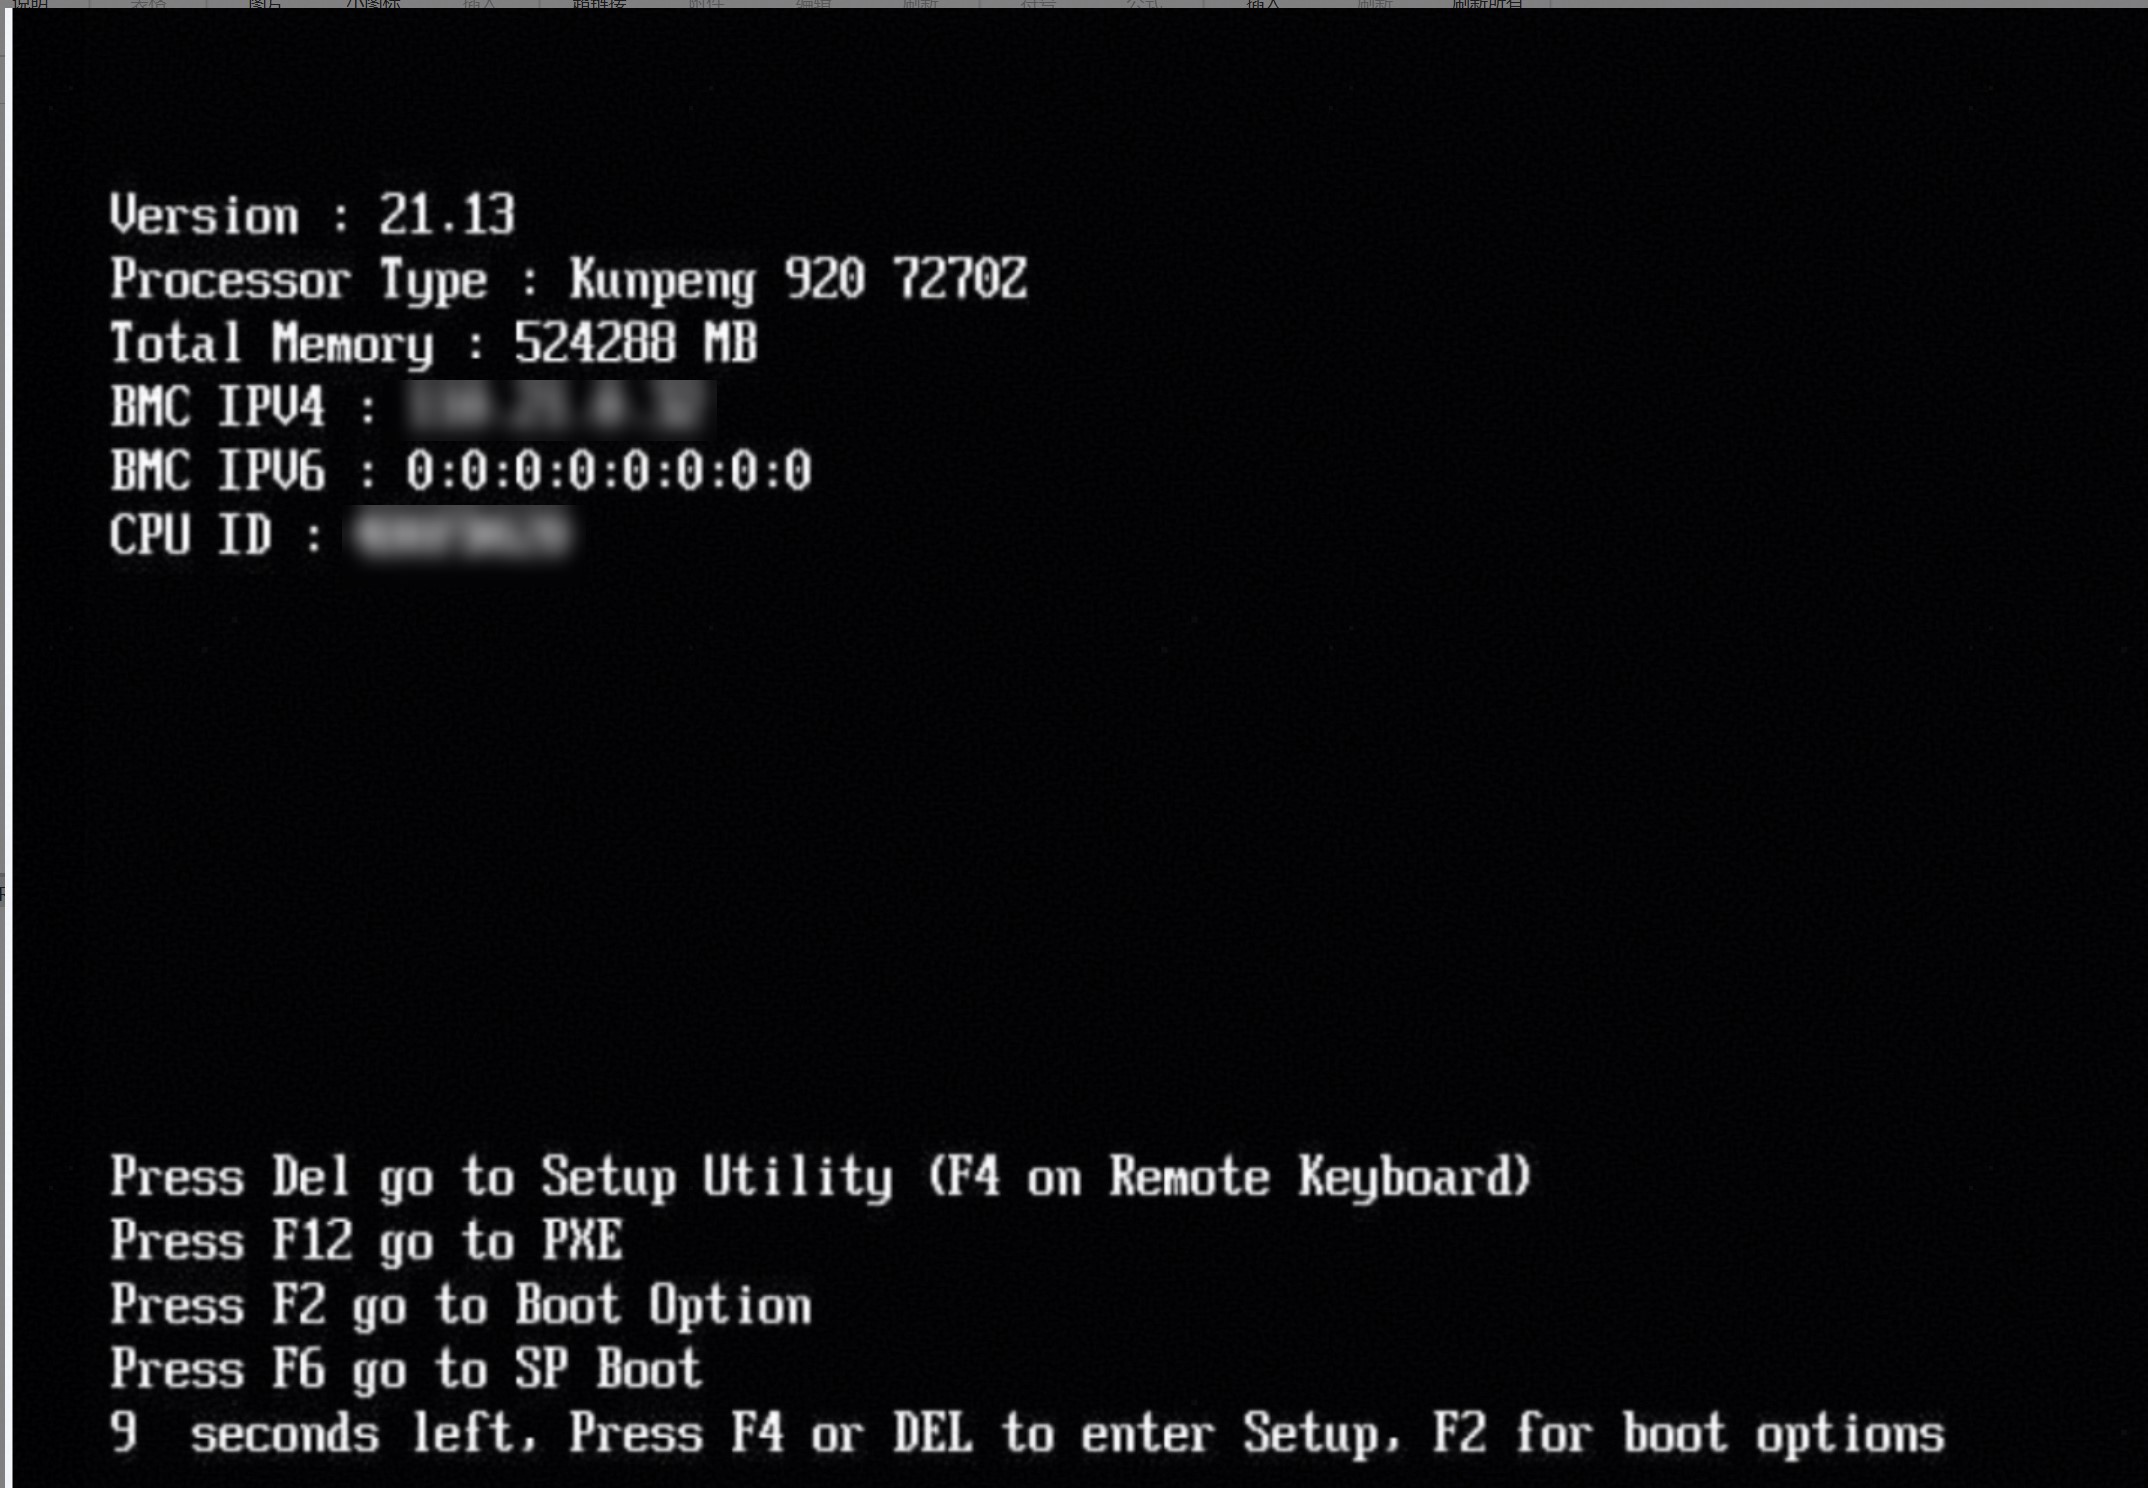
步骤2 重启服务器,按照提示按"Del"后输入BIOS密码进入BIOS界面。
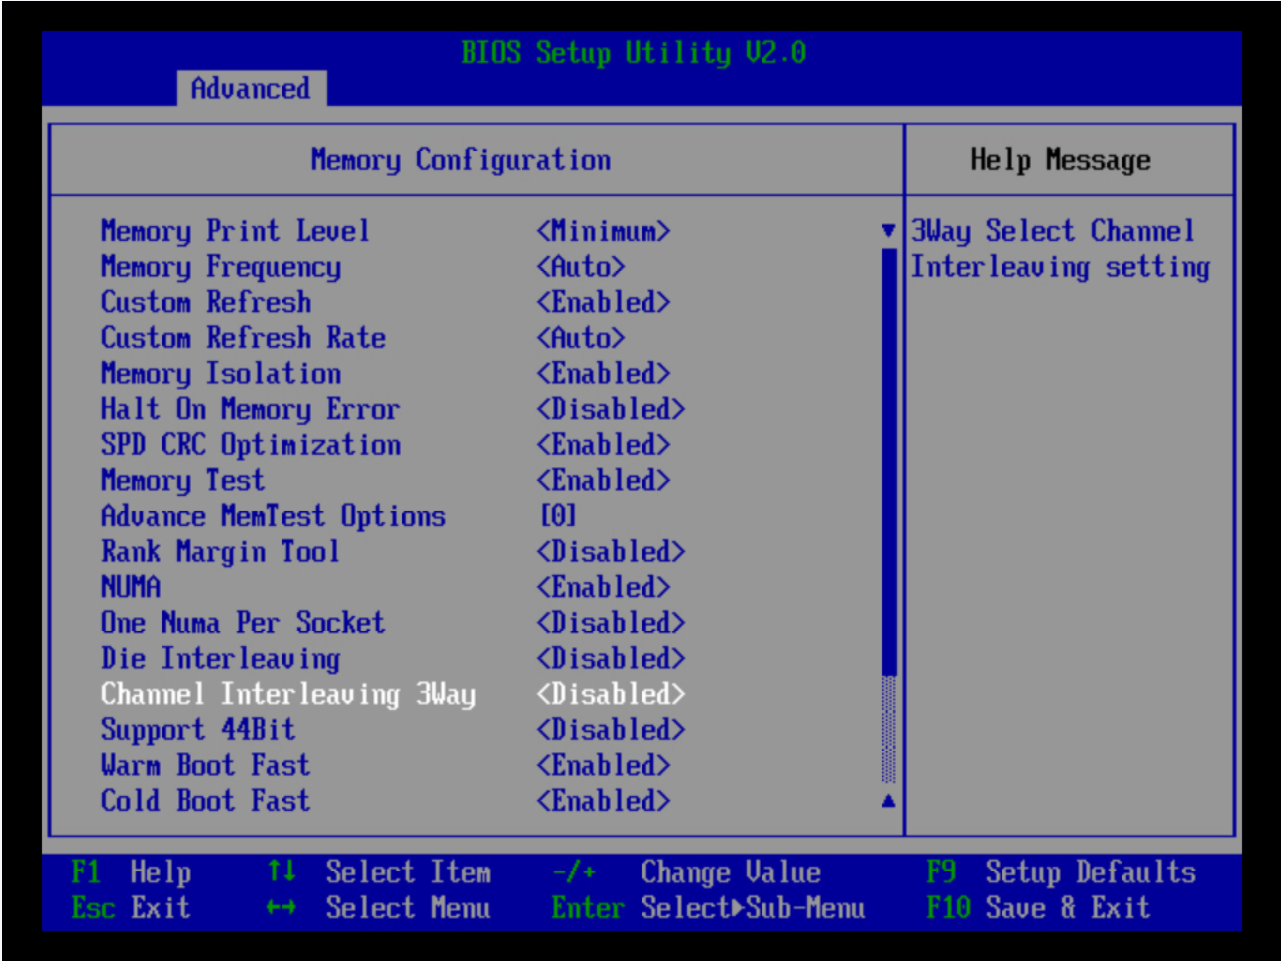
步骤3 关闭3路通道交织。
1. 在BIOS界面中依次选择Advanced>Memory Configuration,按"Enter"键进入Memory Configuration界面。
2. 在Memory Configuration界面,选择"Channel Interleaving 3Way",将其设置为"Disabled"。
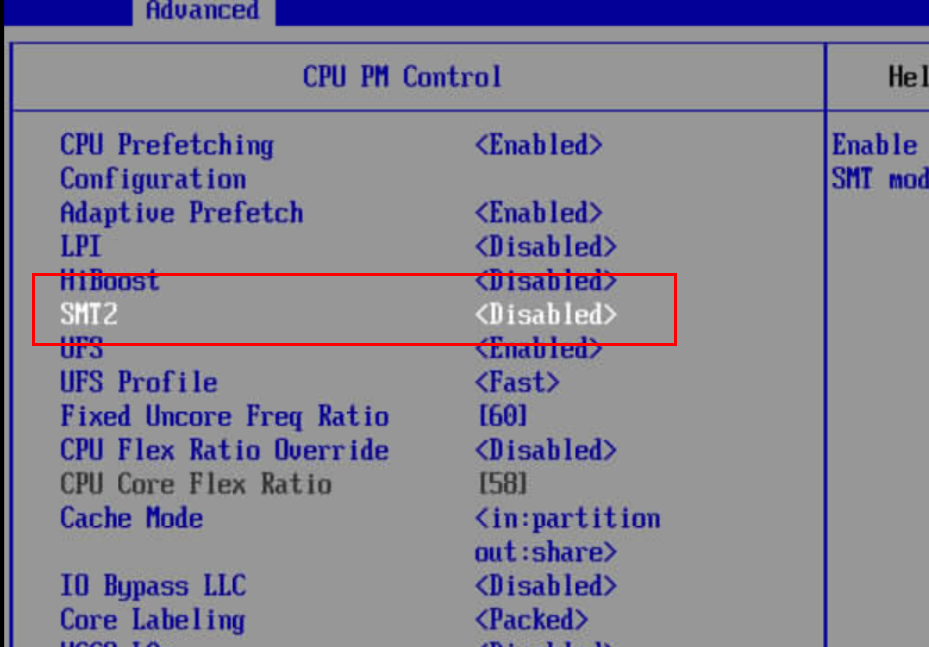
步骤4 关闭SMT2。
1. 在BIOS界面中依次单击"Advanced>Power And Performance Configuration>CPU PM Control",按"Enter"键进入CPU PM Control界面。
2. 在CPU PM Control界面将"SMT2"设置为"Disabled"。
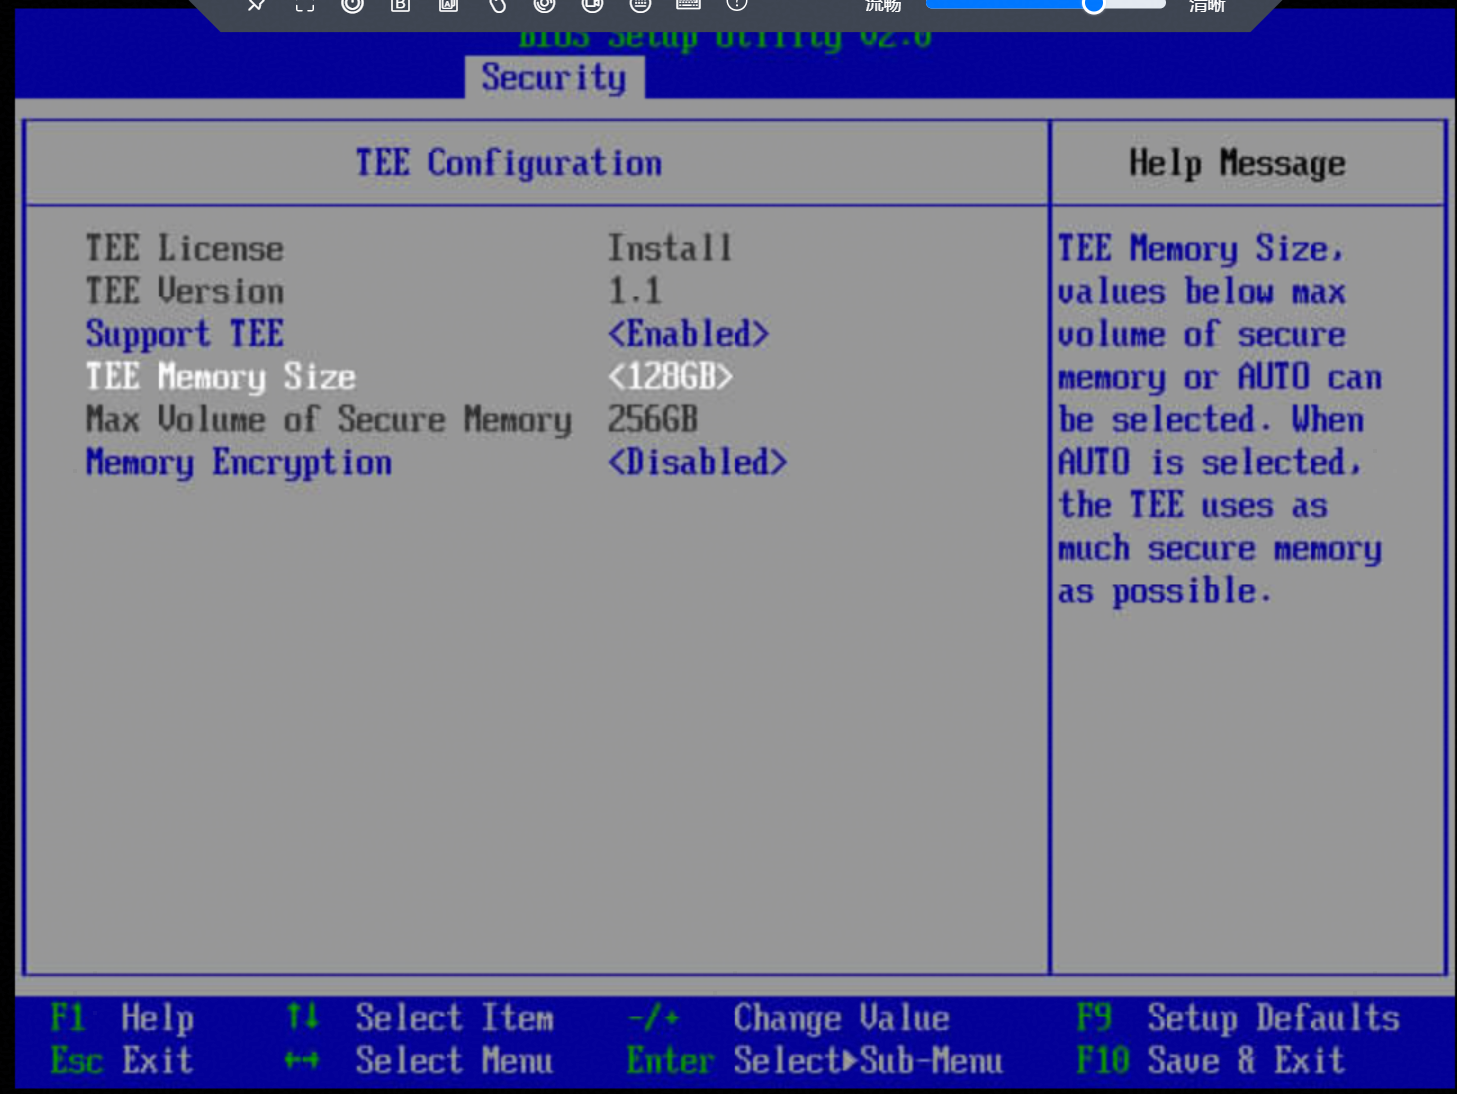
步骤5 打开TEE。
1. 在BIOS界面中依次单击"Security>TEE Configuration",进入TEE Configuration界面。
2. 在TEE Configuration界面中选择"Support TEE",并将其设置为"Enabled"。
3. TEE Memoty Size按照实际业务进行设置,本参考实践及对应应用场景该配置设置为128GB。
----结束
4.1.3.3 配置内生国密运行环境
步骤1 获取itrustee_client源码。
git clone https://gitcode.com/openeuler/itrustee_client.git -b iTrustee_7.9.1_release步骤2 获取itrustee_tzdriver源码。
git clone https://gitcode.com/openeuler/itrustee_tzdriver.git -b iTrustee_7.9.1_release步骤3 获取libboundscheck源码。
git clone https://gitcode.com/openeuler/libboundscheck.git步骤4 将libboundscheck源码分别复制到“itrustee_client/”目录和“itrustee_tzdriver/”目录下,用于itrustee_tzdriver,itrustee_client中的makefile编译时候的调用。
cp -rf libboundscheck itrustee_client
cp -rf libboundscheck itrustee_tzdriver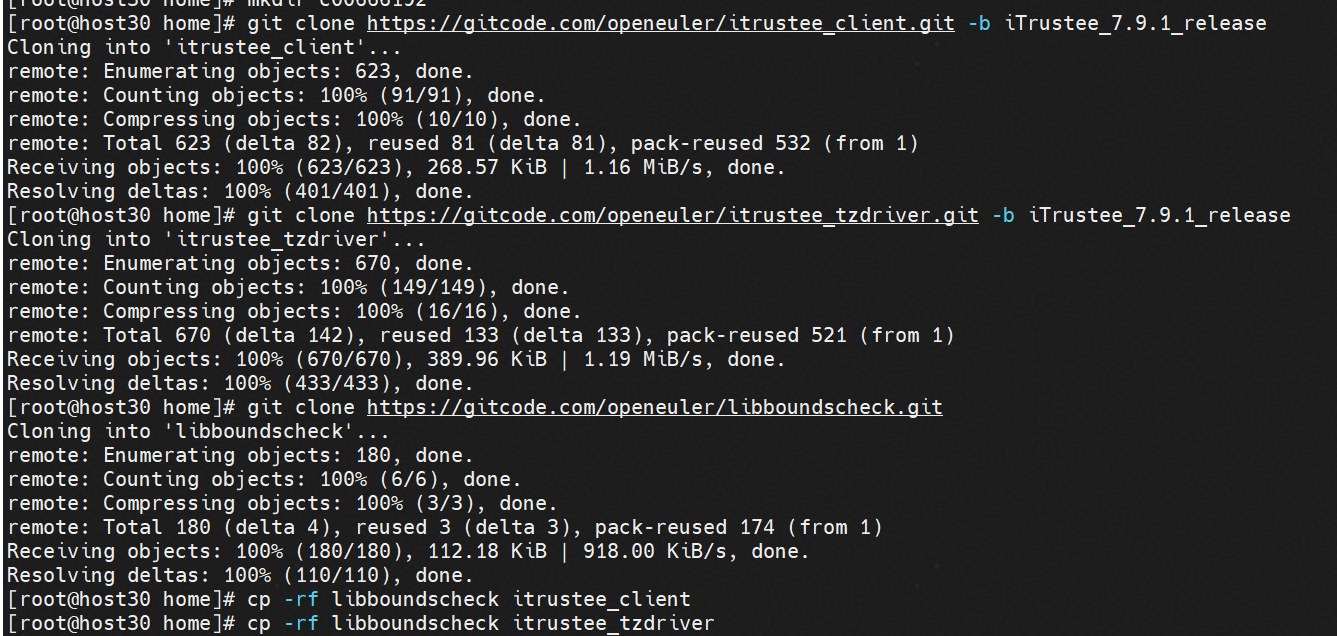
步骤5 安装编译依赖。
yum install openssl-devel zlib-devel kernel-devel-$(uname -r)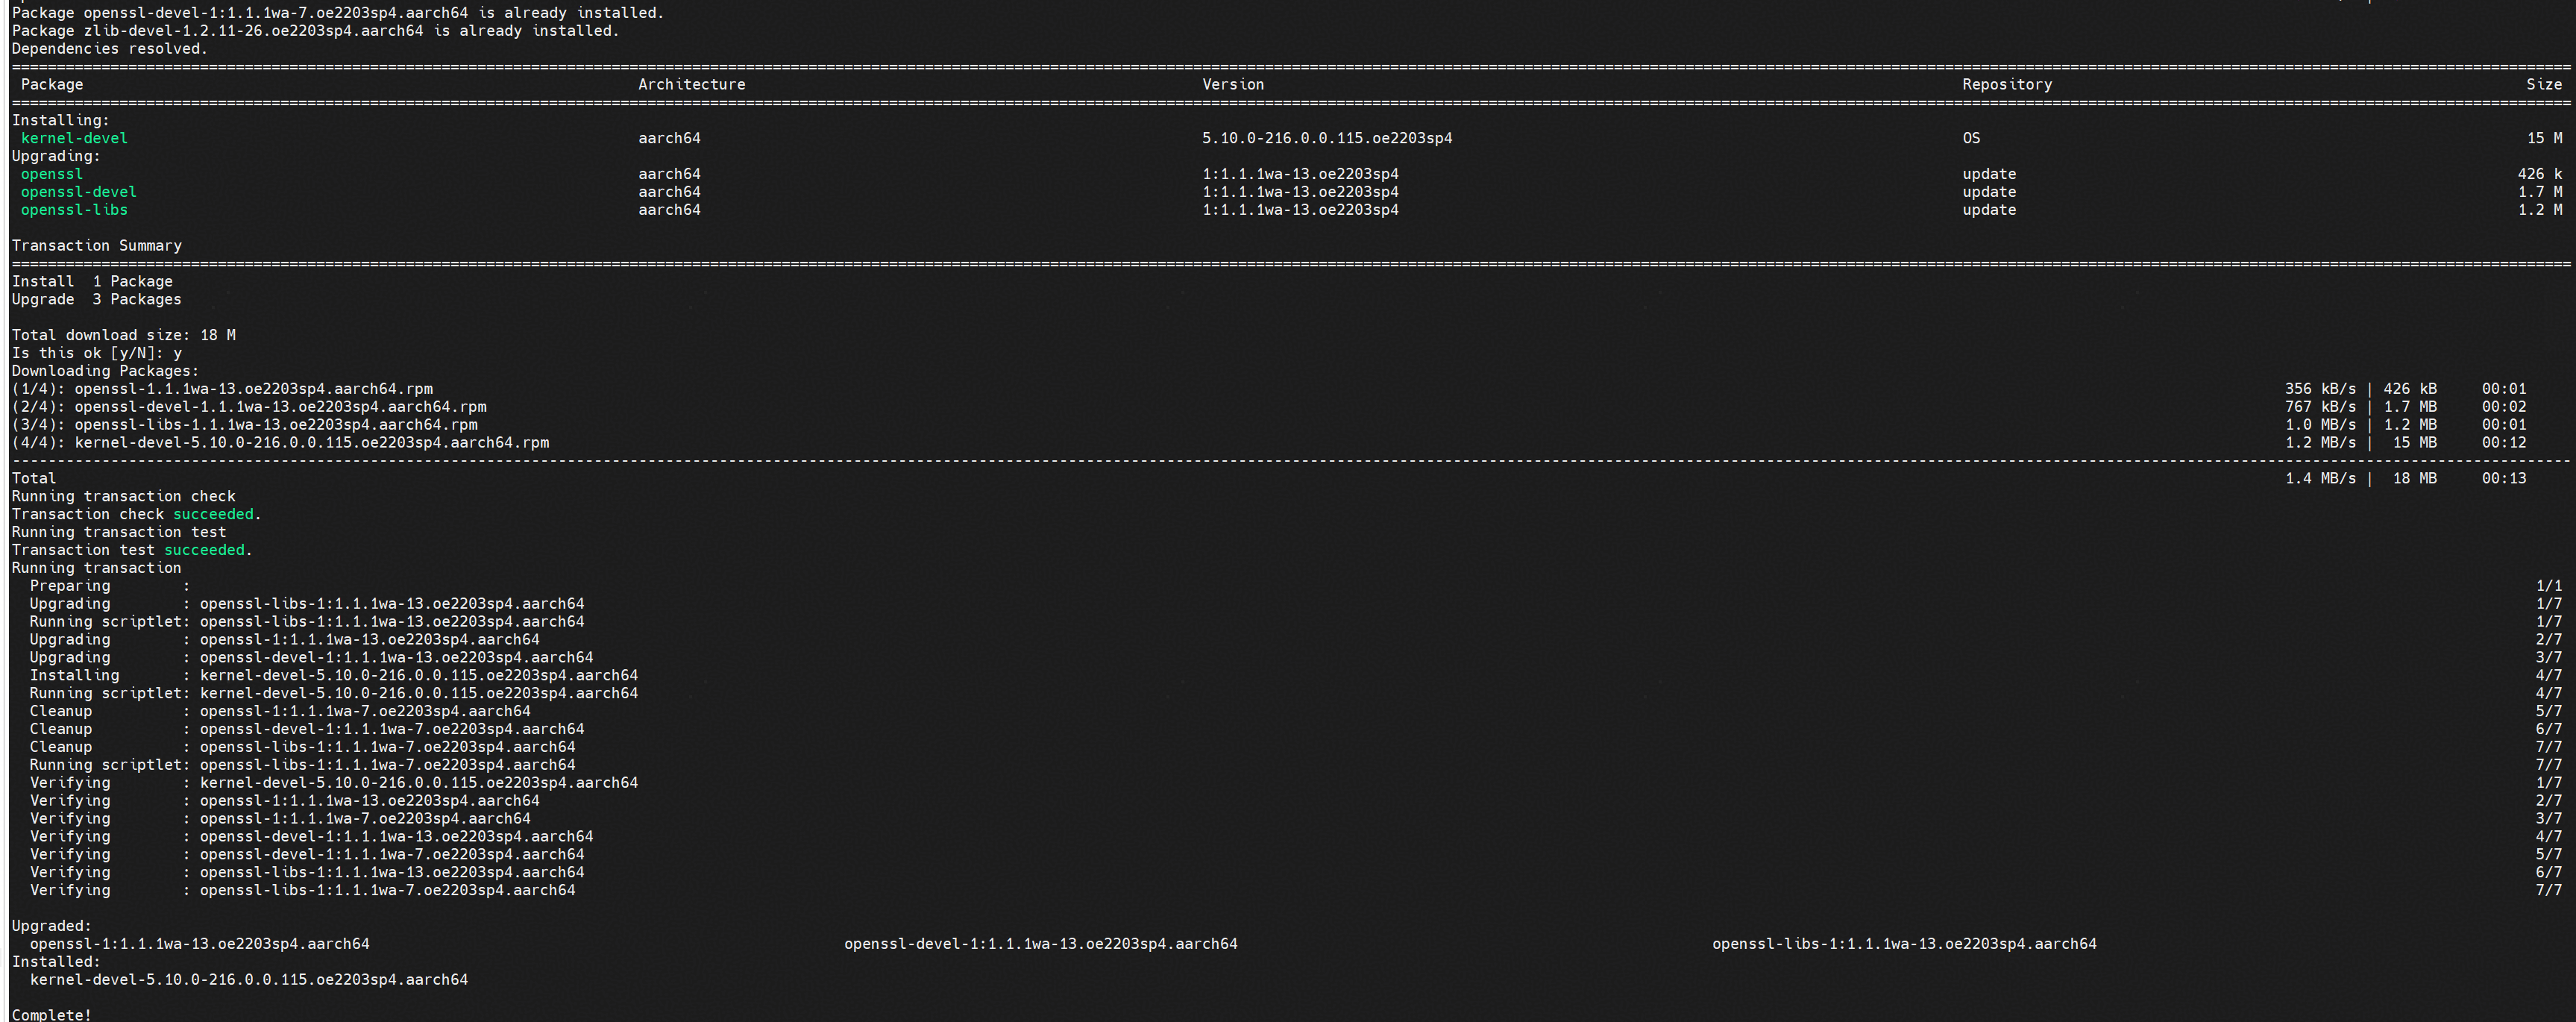
步骤6 编译itrustee_tzdriver。
cd itrustee_tzdriver && make CPU_GROUP_BINDING=y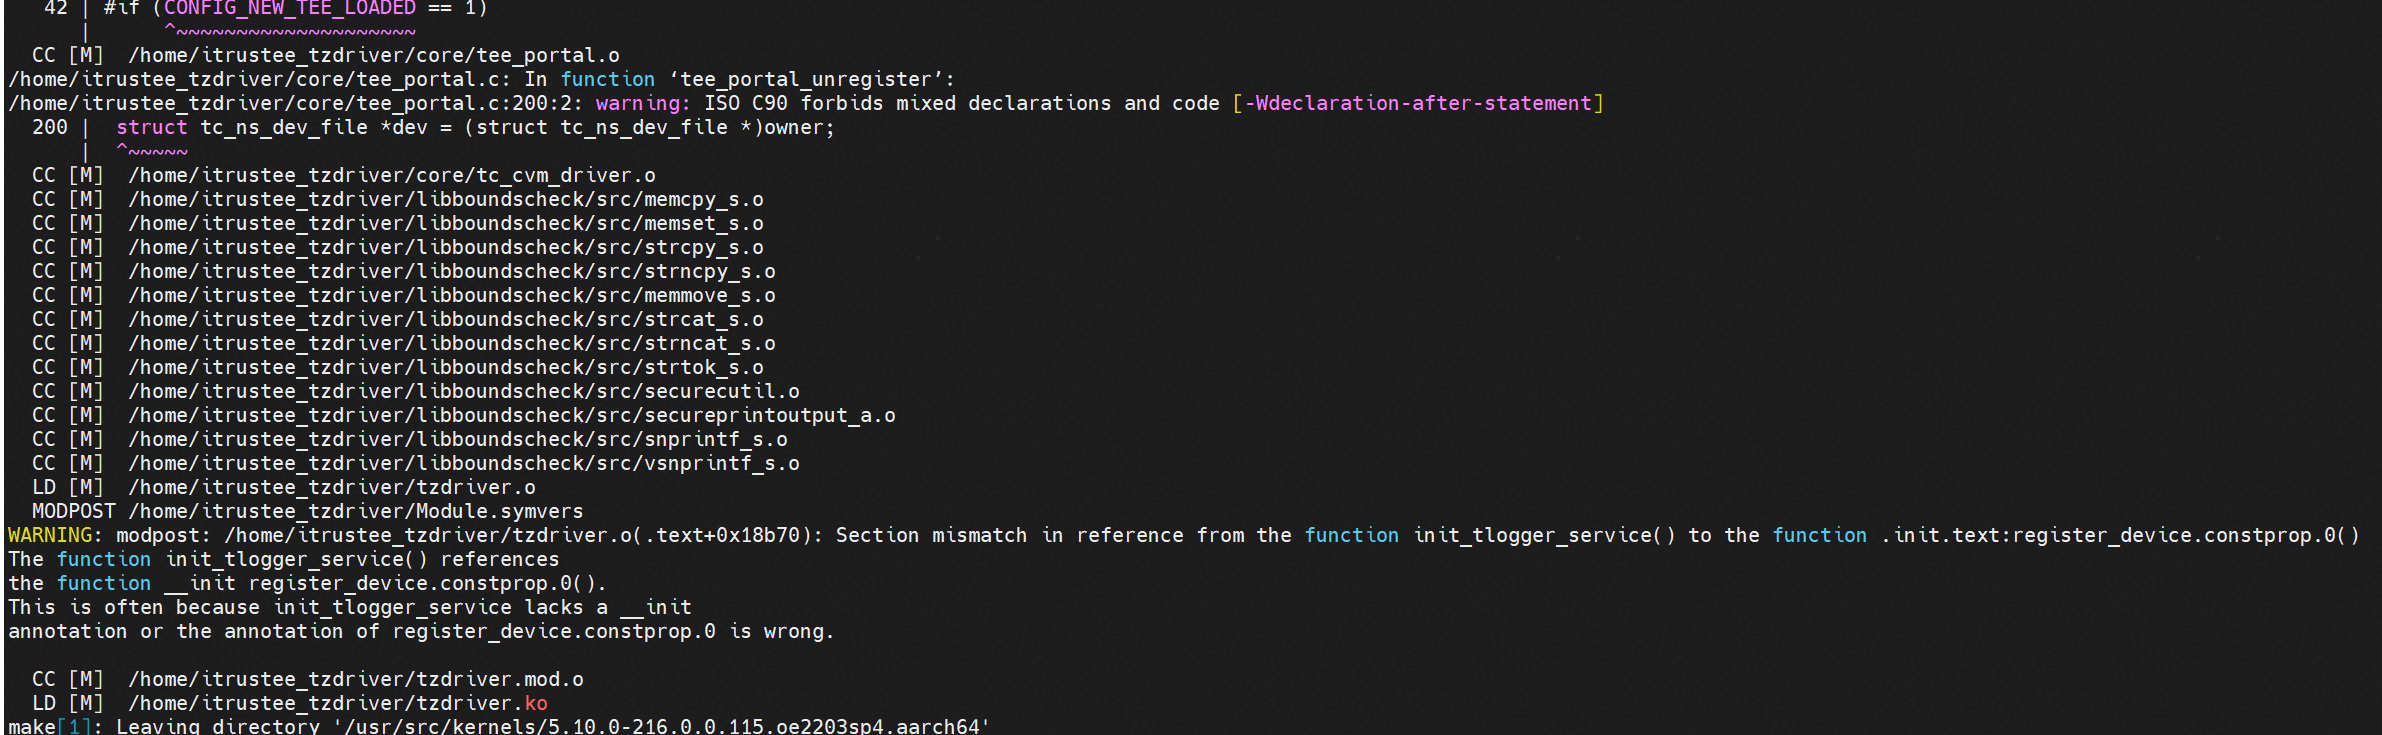
步骤7 在编译tzdriver后,将tzdriver.ko复制到指定目录。
mkdir -p "/lib/modules/$(uname -r)/kernel/drivers/trustzone/"
cp tzdriver.ko /lib/modules/$(uname -r)/kernel/drivers/trustzone
步骤8 编译itrustee_client。
cd ..
cd itrustee_client
make
make install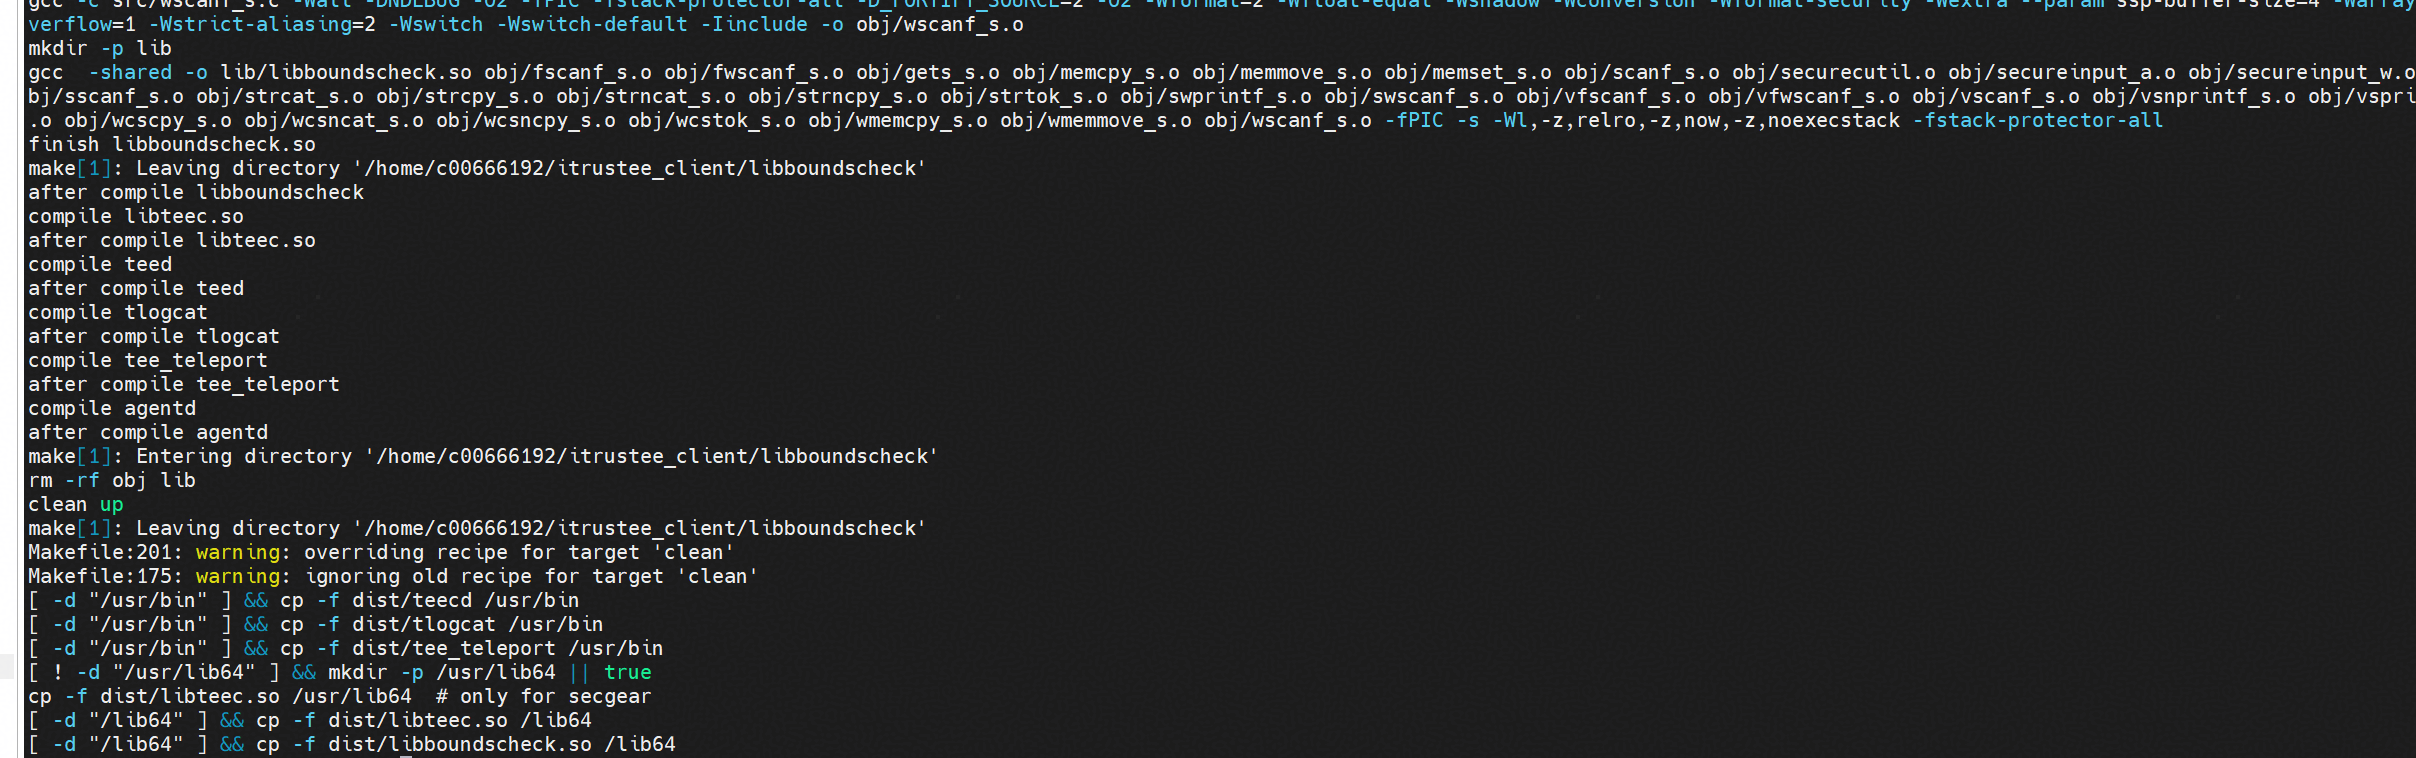
步骤9 根据获取链接获取BoostKit-boostcc-ccos-1.2.zip,解压zip包后获得hpm固件、kunpeng_sec_drv.sec和sdf-utils*.rpm。
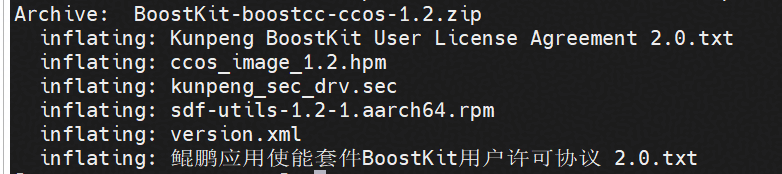
步骤10 安装sdf-utils。
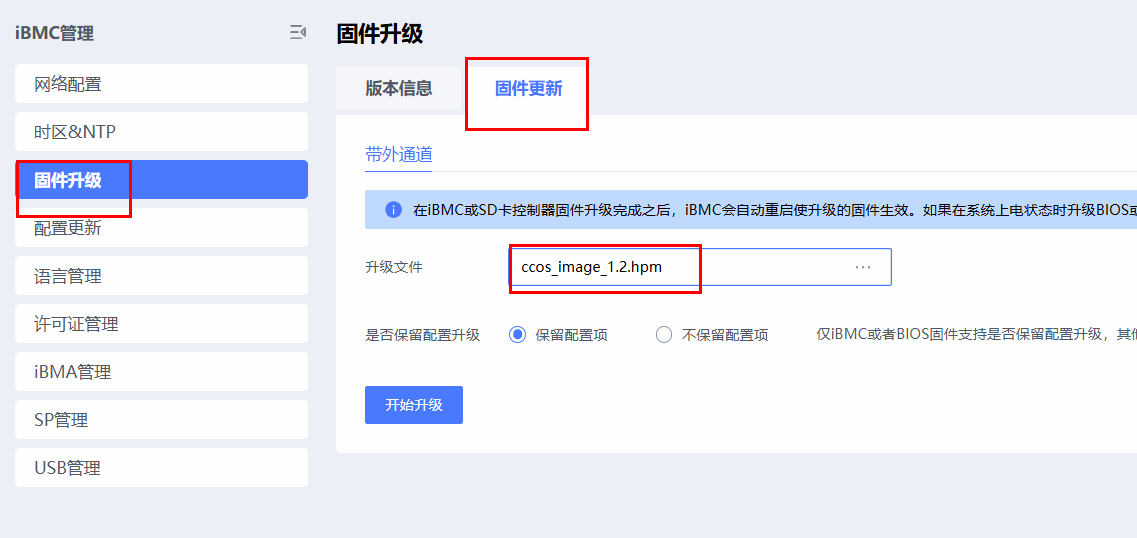
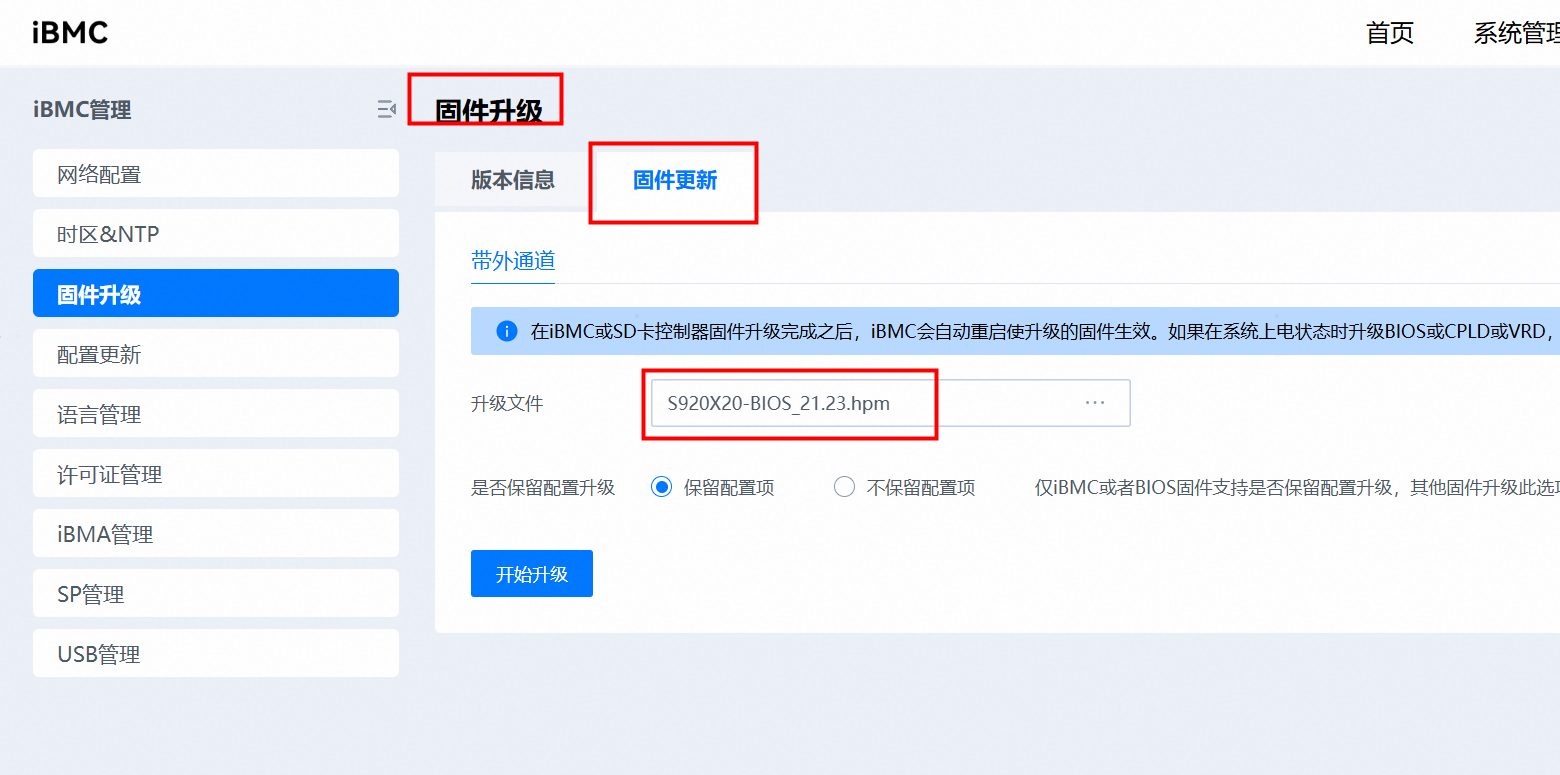
rpm -ivh sdf-utils*.rpm步骤11 升级ccos固件,将解压后的ccos_image_1.2.hpm上传到iBMC进行固件升级。

步骤12 部署SEC驱动文件。
mkdir -p /var/itrustee/tee_dynamic_drv/crypto/
cp kunpeng_sec_drv.sec /var/itrustee/tee_dynamic_drv/crypto/
步骤13 加载tzdriver.ko。
insmod /lib/modules/$(uname -r)/kernel/drivers/trustzone/tzdriver.ko步骤14 运行teecd进程。
nohup /usr/bin/teecd &
----结束
4.1.3.4 初始化内置密钥
用户应用调用libsdf.so接口访问内置密钥前需要先生成内置密钥。
为了方便用户创建和管理内置密钥,该模块提供了密钥管理工具,支持密钥创建,删除,修改、查询,导入,导出,恢复出厂设置等。
以下是密钥创建的流程展示:
步骤1 使用sudo执行,进入密钥管理工具首页。
sudo /usr/bin/tee_key_manage 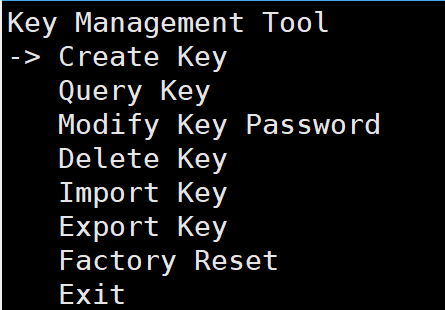
步骤2 可按上下方向键将箭头移动到想要执行的选项上,然后按“Enter”键选中进入。
- 密钥创建演示。以加密密钥为例,选择“Create Key>Encryption Key”后输入下标和密码。
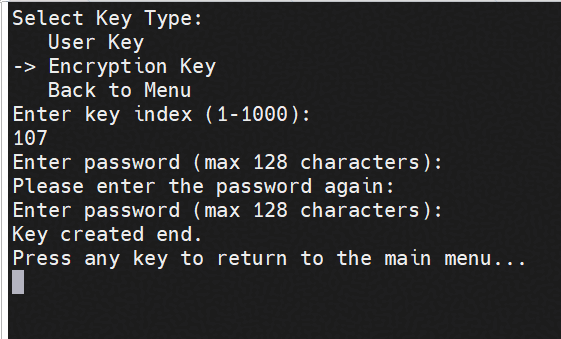
说明:创建内置密钥时会对密码复杂度进行校验,需要至少包含大写字母、小写字母、数字、特殊字符中的至少两种,长度大于8位。为提升安全性,密码需要定期修改。
----结束
说明:若内置密钥配置成功则说明SDF接口调用成功,内生国密开发运行环境配置完成。
4.1.3.5 常见报错及解决
问题1:银河麒麟V10SP3 执行insmod /lib/modules/$(uname -r)/kernel/drivers/trustzone/tzdriver.ko指令报错insmod: ERROR: could not insert module /lib/modules/4.19.90-89.11.v2401.ky10.aarch64/kernel/drivers/trustzone/tzdriver.ko: Unknown symbol in module
原因:查看dmesg日志
[11328.394516] tzdriver: Unknown symbol __stack_chk_guard (err -2)
[11328.394580] tzdriver: Unknown symbol __stack_chk_fail (err -2)
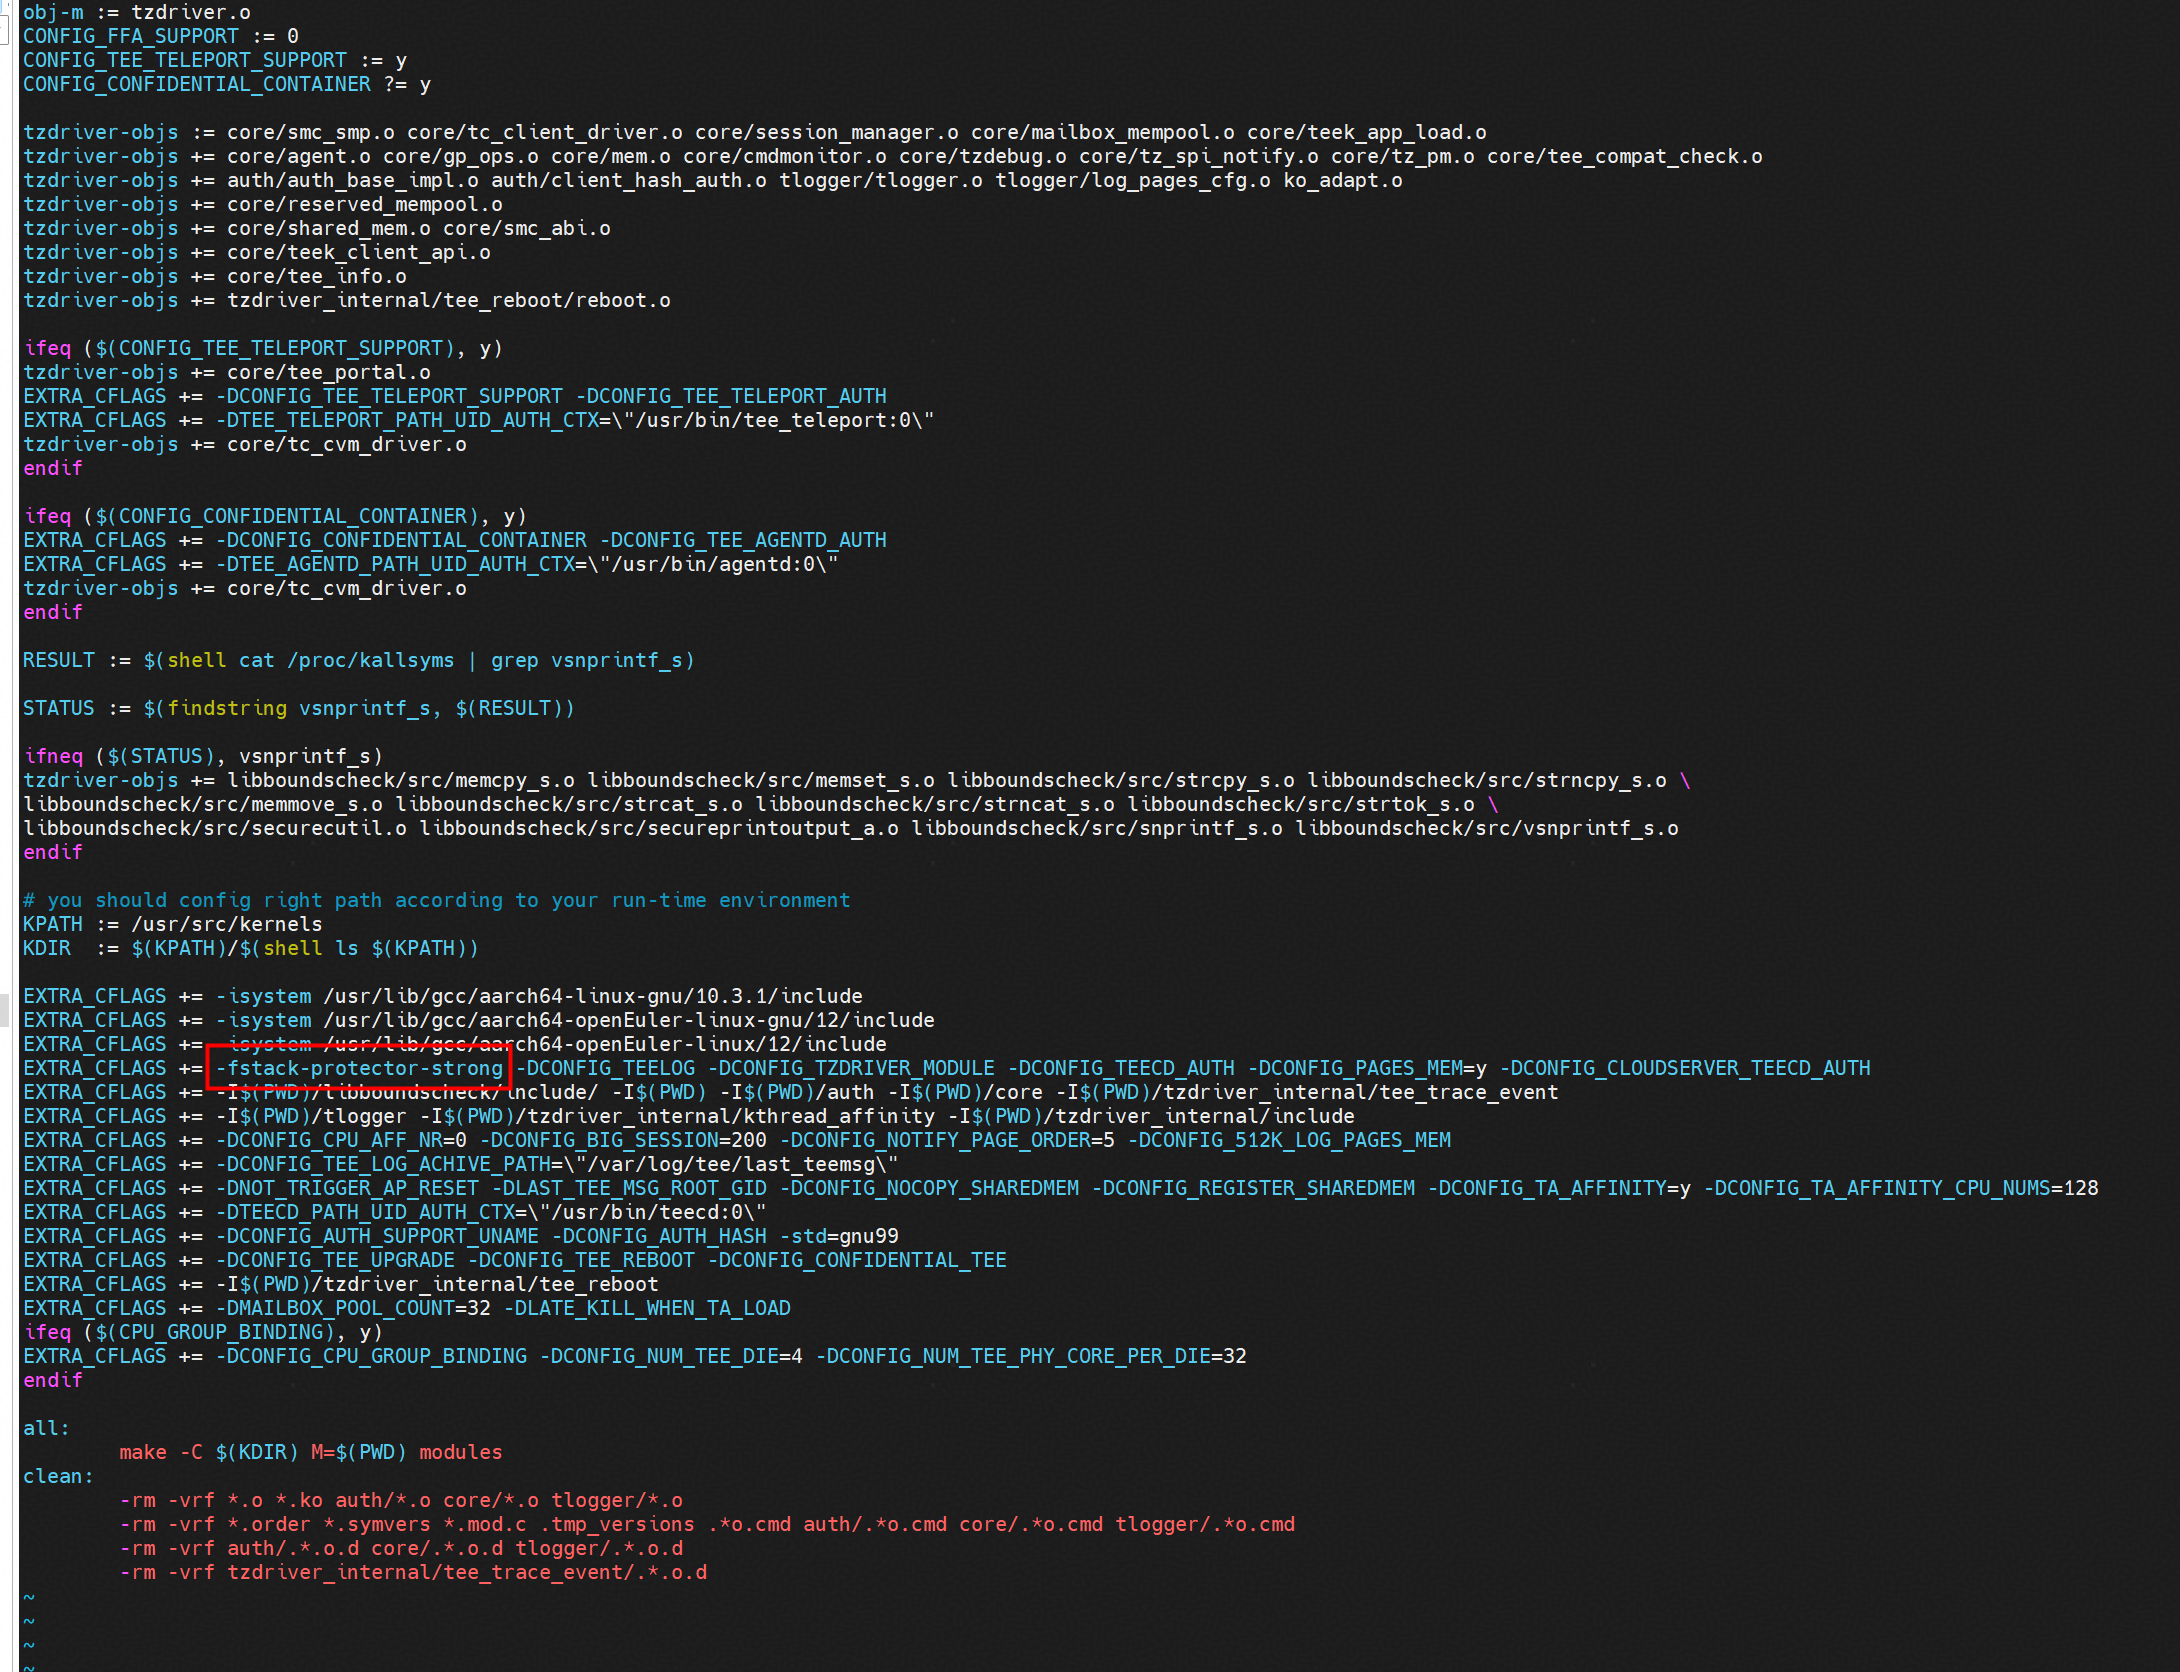
该问题实际是编译环境与运行环境在堆栈保护机制上的不匹配导致:tzdriver.ko模块在编译时启用了堆栈保护,但当前运行的内核环境中没有导出这两个符号,导致模块加载失败。
解决方案:进入到itrustee_tzdriver以及itrustee_client目录,编辑Makefile文件,查询-fstack-protector-strong选项并去除,去除后重新编译
问题2:执行加载tzdriver.ko步骤报错
[root@host30 c00666192]# insmod /lib/modules/$(uname -r)/kernel/drivers/trustzone/tzdriver.ko
insmod: ERROR: could not insert module /lib/modules/5.10.0-216.0.0.115.oe2203sp4.aarch64/kernel/drivers/trustzone/tzdriver.ko: Operation not permitted
原因:固件/CCOS等固件版本不配套
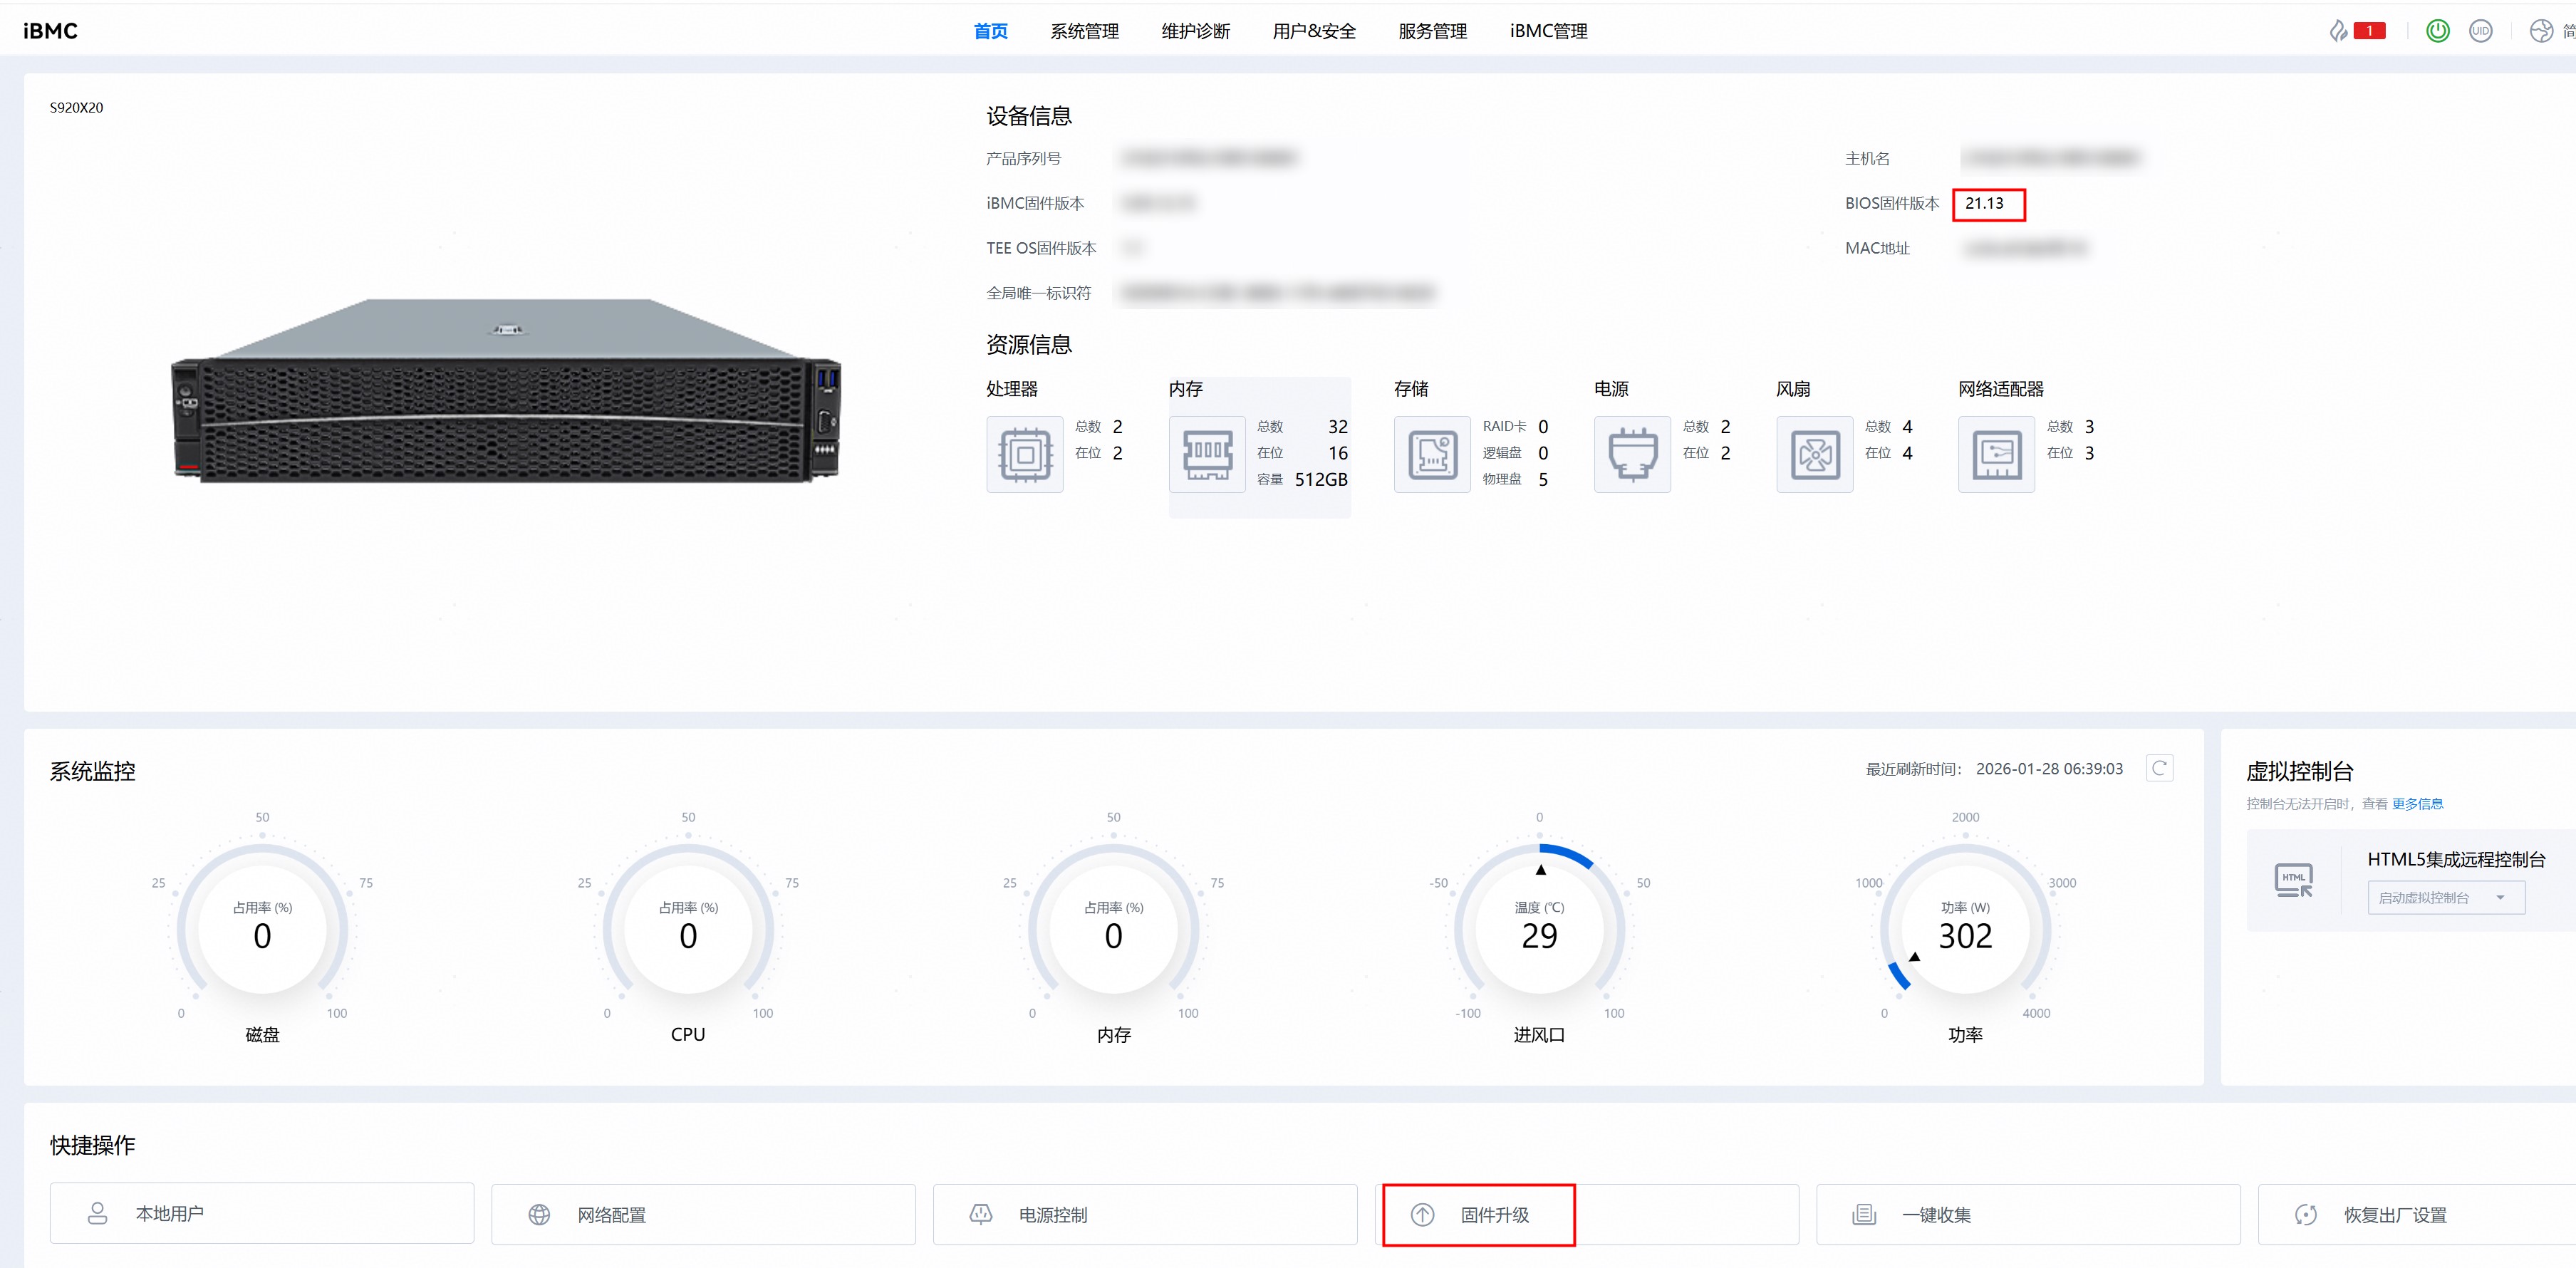
解决方案:需要升级BIOS固件版本至21.23,获取链接
需要升级ccos固件版本至1.2,获取链接
直接在BMC首页点击固件升级(使用每个包后缀为.hpm的文件进行升级),进入升级页面
4.1.4 开发示例
接口调用示例
如下提供示例代码演示了接口的调用,以SM4加密密钥为例,包括密钥的创建、密钥标识码的修改、密钥访问权限路径添加与删除、导出导入密钥,删除密钥。
示例1代码:
#include <stdio.h>
#include <stdlib.h>
#include <string.h>
#include <openssl/sha.h>
#include "sdf.h"
#define MAX_KEY_FILE_SIZE (1024 * 1024)
#define EXPORT_SALT "123456789"
#define CA_PATH "./test_sdf"
#define USER_NAME "root"
#define PASSWD "Huawei123." //密码用于测试使用
#define NEWPASSWD "Huawei321." //密码用于测试使用
#define ALG_FLAG_OFFSET 20
int generate_sm4_key(void *session, unsigned int key_id, unsigned char *password) {
    int ret;
    // SM4加密密钥
    unsigned int enc_info = SDF_SM4 << ALG_FLAG_OFFSET | key_id;
    ret = ECM_GenerateKey(session, enc_info, password, strlen(password));
    if (ret != SDR_OK) {
        printf("ECM_GenerateKey SM4 key failed, ret = 0x%x\n", ret);
        return ret;
    }
    return ret;
}
int delete_sm4_key(void *session, unsigned int key_id) {
    int ret;
    unsigned int enc_info = SDF_SM4 << ALG_FLAG_OFFSET | key_id;
    ret = ECM_DeleteKey(session, enc_info);
    if (ret != SDR_OK) {
        printf("ECM_DeleteKey SM4 key_index %d failed, ret = 0x%x\n", key_id, ret);
    }
    return ret;
}
int export_import_sm4_key(void *session, unsigned int key_id1, unsigned int key_id2) {
    int ret = -1;
    uint8_t *key_data = NULL;
    uint32_t key_data_len = MAX_KEY_FILE_SIZE;
    unsigned int enc_key_info1 = SDF_SM4 << ALG_FLAG_OFFSET | key_id1;
    unsigned int enc_key_info2 = SDF_SM4 << ALG_FLAG_OFFSET | key_id2;

    key_data = (uint8_t *)malloc(key_data_len);
    if (key_data == NULL) {
        printf("malloc failed\n");
        return -1;
    }

    // 导出导入SM4加密密钥
    ret = ECM_ExportKey(session, enc_key_info1, key_data, &key_data_len, EXPORT_SALT);
    if (ret) {
        printf("ECM_ExportKey SM4 key failed, ret = 0x%x, %d\n", ret, key_data_len);
        goto free;
    }

    ret = ECM_ImportKey(session, enc_key_info2, key_data, key_data_len, EXPORT_SALT);
    if (ret) {
        printf("ECM_ImportKey SM4 key failed, ret = 0x%x\n", ret);
        goto free;
    }

free:
    free(key_data);
    return ret;
}
int change_sm4_passwd(void *session, unsigned int key_id, char *passwd, char *new_passwd) {
    int ret;
    unsigned int enc_info = SDF_SM4 << ALG_FLAG_OFFSET | key_id;
    ret = ECM_ChangePassword(session, enc_info, passwd, strlen(passwd), new_passwd, strlen(new_passwd));
    if (ret != SDR_OK) {
        printf("ECM_ChangePassword SM4 key failed, ret = 0x%x\n", ret);
    }
    return ret;
}
void calculate_cainfo(const char *ca_path, const char *user_name, unsigned char hash[32]) {
    char plan[256] = {0};
    memcpy(plan, user_name, strlen(user_name));
    SHA256_CTX sha256;
    SHA256_Init(&sha256);
    SHA256_Update(&sha256, ca_path, strlen(ca_path));
    SHA256_Update(&sha256, plan, 256);
    SHA256_Final(hash, &sha256);
    for (size_t i = 0; i < 32; i++) {
        printf("%02x", hash[i]);
    }
    printf("\n");
}
int main() {
    int ret = -1;
    int key_idx1 = 106, key_idx2 = 102; // SM4密钥索引建议使用101-200范围
    void *device = NULL, *session = NULL;

    ret = SDF_OpenDevice(&device);
    if (ret != SDR_OK) {
        printf("sdf open device failed, ret = 0x%x\n", ret);
        return ret;
    }

    ret = ECM_OpenSession(device, &session);
    if (ret != SDR_OK) {
        printf("sdf open session failed, ret = 0x%x\n", ret);
        goto close;
    }

    // 生成SM4密钥
    ret = generate_sm4_key(session, key_idx1, PASSWD);
    if (ret != SDR_OK) {
        printf("generate_sm4_key failed, ret = 0x%x\n", ret);
        goto close;
    }
    printf("generate SM4 key success\n");

    // 修改SM4密钥密码
    ret = change_sm4_passwd(session, key_idx1, PASSWD, NEWPASSWD);
    if (ret != SDR_OK) {
        printf("change SM4 key passwd failed, ret = 0x%x\n", ret);
        goto close;
    }
    printf("change SM4 key passwd success\n");

    // 导出导入SM4密钥
    ret = export_import_sm4_key(session, key_idx1, key_idx2);
    if (ret != SDR_OK) {
        printf("export_import_sm4_key failed, ret = 0x%x\n", ret);
        goto close;
    }
    printf("export SM4 key %d, import to key %d success\n", key_idx1, key_idx2);

    // 删除SM4密钥
    ret = delete_sm4_key(session, key_idx1);
    if (ret != SDR_OK) {
        printf("delete SM4 key %d failed, ret = 0x%x\n", key_idx1, ret);
        goto close;
    }

    ret = delete_sm4_key(session, key_idx2);
    if (ret != SDR_OK) {
        printf("delete SM4 key %d failed, ret = 0x%x\n", key_idx2, ret);
        goto close;
    }
    printf("delete SM4 key success\n");

    // 重新设置SM4密钥
    // 将下面代码注释去掉后,可以再次生成SM4密钥,可以用于示例2代码中使用SM4算法的接口调用,用于SM4算法单包加解密,多包加解密等操作
    /* ret = generate_sm4_key(session, key_idx1, PASSWD);
    if (ret != SDR_OK) {
        printf("generate_sm4_key failed, ret = 0x%x\n", ret);
        goto close;
    }
    printf("generate SM4 key success\n"); */

close:
    if (session != NULL) {
        (void)SDF_CloseSession(session);
    }
    if (device != NULL) {
        (void)SDF_CloseDevice(device);
    }
    return ret;
}
如下提供示例代码演示了接口的调用,以SM4算法为例,包括了设备和会话管理,单包加解密,多包加解密等操作
示例2代码:
#include <stdio.h>
#include <stdlib.h>
#include <string.h>
#include <time.h>
#include <pthread.h>
#include "sdf.h"
// 配置参数结构体
typedef struct {
    int jobs;          // 进程数
    int threads;       // 线程数
    char* work_dir;    // 结果输出目录
    int time_limit;    // 压测时长(秒)
    int data_size;     // 数据处理长度(bytes)
    unsigned int alg_id; // 算法ID
    unsigned int key_index; // 密钥索引
    char* password;    // 密钥密码
} Config;
// 线程参数结构体
typedef struct {
    Config* config;
    int thread_id;
} ThreadArgs;
// 生成随机数据
void generate_random_data(unsigned char* data, int size) {
    for(int i = 0; i < size; i++) {
        data[i] = rand() % 256;
    }
}
// 初始化SDF会话
static int init_sdf_session(void** hDevice, void** hSession) {
    int ret = SDF_OpenDevice(hDevice);
    if (ret != SDR_OK) return ret;
    return SDF_OpenSession(*hDevice, hSession);
}
// 释放SDF资源
static void cleanup_sdf(void* hSession, void* hDevice) {
    if (hSession) SDF_CloseSession(hSession);
    if (hDevice) SDF_CloseDevice(hDevice);
}
// 获取密钥权限
static int get_key_access(void* hSession, unsigned int keyIndex, const char* password) {
    return SDF_GetKEKAccessRight(hSession, keyIndex,
                               (unsigned char*)password, strlen(password));
}
// 生成密钥
static int generate_key(void* hSession, unsigned int keyBits,
                       unsigned int algId, unsigned int kekIndex,
                       unsigned char* keyData, unsigned int* keyLength,
                       void** hKey) {
    return SDF_GenerateKeyWithKEK(hSession, keyBits, algId,
                                 kekIndex, keyData, keyLength, hKey);
}
// 单包加解密测试
void* single_packet_test(void* arg) {
    ThreadArgs* args = (ThreadArgs*)arg;
    Config* config = args->config;

    printf("Thread %d: 开始单包加解密测试 [数据大小: %d字节]\n",
           args->thread_id, config->data_size);

    srand(time(NULL));

    unsigned char* data = malloc(config->data_size);
    unsigned char* enc_data = malloc(config->data_size);
    unsigned char* dec_data = malloc(config->data_size);

    generate_random_data(data, config->data_size);

    void* hDevice = NULL;
    void* hSession = NULL;
    void* hKey = NULL;
    int ret = init_sdf_session(&hDevice, &hSession);
    if (ret != SDR_OK) goto cleanup;

    ret = get_key_access(hSession, config->key_index, config->password);
    if (ret != SDR_OK) {
        printf("Thread %d: 获取密钥权限失败, 错误码: 0x%x\n", args->thread_id, ret);
        goto cleanup;
    }

    unsigned char keyData[16];
    unsigned int keyLength = sizeof(keyData);
    ret = generate_key(hSession, 128, config->alg_id, 106,
                      keyData, &keyLength, &hKey);
    if (ret != SDR_OK || hKey == NULL) {
        printf("Thread %d: 生成密钥失败\n", args->thread_id);
        goto cleanup;
    }

    unsigned char iv[16] = {0};  // 直接声明并初始化
    unsigned char* pIV = (config->alg_id == SGD_SM4_CBC) ? iv : NULL;
    unsigned int enc_data_len = config->data_size;

    ret = SDF_Encrypt(hSession, hKey, config->alg_id, iv,
                     data, config->data_size, enc_data, &enc_data_len);
    if (ret != SDR_OK) {
        printf("Thread %d: 加密失败, 错误码: 0x%x\n", args->thread_id, ret);
        goto cleanup;
    }

    unsigned int dec_data_len = config->data_size;
    ret = SDF_Decrypt(hSession, hKey, config->alg_id, iv,
                     enc_data, enc_data_len, dec_data, &dec_data_len);
    if (ret != SDR_OK) {
        printf("Thread %d: 解密失败, 错误码: 0x%x\n", args->thread_id, ret);
        goto cleanup;
    }

    printf("Thread %d: %s\n", args->thread_id,
          memcmp(data, dec_data, config->data_size) == 0 ?
          "单包加解密测试成功" : "解密结果不匹配");

cleanup:
    free(data);
    free(enc_data);
    free(dec_data);
    if (hKey) SDF_DestroyKey(hSession, hKey);
    cleanup_sdf(hSession, hDevice);
    return NULL;
}
// 多包加解密测试
void* multi_packet_test(void* arg) {
    ThreadArgs* args = (ThreadArgs*)arg;
    Config* config = args->config;

    printf("Thread %d: 开始多包加解密测试 [数据大小: %d字节]\n",
           args->thread_id, config->data_size);

    srand(time(NULL));

    unsigned char* data = malloc(config->data_size);
    unsigned char* enc_data = malloc(config->data_size * 2);
    unsigned char* dec_data = malloc(config->data_size);
    unsigned char iv[16] = {0};

    generate_random_data(data, config->data_size);

    void* hDevice = NULL;
    void* hSession = NULL;
    void* hKey = NULL;
    int ret = init_sdf_session(&hDevice, &hSession);
    if (ret != SDR_OK) goto cleanup;

    ret = get_key_access(hSession, config->key_index, config->password);
    if (ret != SDR_OK) {
        printf("Thread %d: 获取密钥权限失败, 错误码: 0x%x\n", args->thread_id, ret);
        goto cleanup;
    }

    unsigned char keyData[16];
    unsigned int keyLength = sizeof(keyData);
    ret = generate_key(hSession, 128, config->alg_id, 106,
                      keyData, &keyLength, &hKey);
    if (ret != SDR_OK || hKey == NULL) {
        printf("Thread %d: 生成密钥失败\n", args->thread_id);
        goto cleanup;
    }

    // 加密处理
    unsigned int total_enc_len = 0;
    unsigned int chunk_size = config->data_size / 4;

    ret = SDF_EncryptInit(hSession, hKey, config->alg_id, iv, sizeof(iv));
    if (ret != SDR_OK) {
        printf("Thread %d: 加密初始化失败, 错误码: 0x%x\n", args->thread_id, ret);
        goto cleanup;
    }

    for (int i = 0; i < 4; i++) {
        unsigned int chunk_enc_len = chunk_size;
        ret = SDF_EncryptUpdate(hSession, data + i * chunk_size,
                               chunk_size, enc_data + total_enc_len,
                               &chunk_enc_len);
        if (ret != SDR_OK) {
            printf("Thread %d: 加密块%d失败, 错误码: 0x%x\n", args->thread_id, i+1, ret);
            goto cleanup;
        }
        total_enc_len += chunk_enc_len;
    }

    unsigned int last_enc_len = 0;
    ret = SDF_EncryptFinal(hSession, enc_data + total_enc_len, &last_enc_len);
    if (ret != SDR_OK) {
        printf("Thread %d: 最后加密块失败, 错误码: 0x%x\n", args->thread_id, ret);
        goto cleanup;
    }
    total_enc_len += last_enc_len;

    // 解密处理
    unsigned int total_dec_len = 0;

    ret = SDF_DecryptInit(hSession, hKey, config->alg_id, iv, sizeof(iv));
    if (ret != SDR_OK) {
        printf("Thread %d: 解密初始化失败, 错误码: 0x%x\n", args->thread_id, ret);
        goto cleanup;
    }

    for (int i = 0; i < 4; i++) {
        unsigned int chunk_dec_len = chunk_size;
        ret = SDF_DecryptUpdate(hSession, enc_data + i * chunk_size,
                               chunk_size, dec_data + total_dec_len,
                               &chunk_dec_len);
        if (ret != SDR_OK) {
            printf("Thread %d: 解密块%d失败, 错误码: 0x%x\n", args->thread_id, i+1, ret);
            goto cleanup;
        }
        total_dec_len += chunk_dec_len;
    }

    unsigned int last_dec_len = 0;
    ret = SDF_DecryptFinal(hSession, dec_data + total_dec_len, &last_dec_len);
    if (ret != SDR_OK) {
        printf("Thread %d: 最后解密块失败, 错误码: 0x%x\n", args->thread_id, ret);
        goto cleanup;
    }
    total_dec_len += last_dec_len;

    printf("Thread %d: %s\n", args->thread_id,
          memcmp(data, dec_data, config->data_size) == 0 ?
          "多包加解密测试成功" : "解密结果不匹配");

cleanup:
    free(data);
    free(enc_data);
    free(dec_data);
    if (hKey) SDF_DestroyKey(hSession, hKey);
    cleanup_sdf(hSession, hDevice);
    return NULL;
}
int main(int argc, char** argv) {
    Config config = {
        .data_size = 1024,
        .time_limit = 30,
        .threads = 1,
        .key_index = 106,
        .password = "Huawei123.",
        .alg_id = SGD_SM4_ECB
    };
    pthread_t thread;
    ThreadArgs args = {&config, 0};

    // 执行单包测试
    pthread_create(&thread, NULL, single_packet_test, &args);
    pthread_join(thread, NULL);

    // 执行多包测试
    pthread_create(&thread, NULL, multi_packet_test, &args);
    pthread_join(thread, NULL);

    return 0;
}
测试代码执行示例
步骤1 下载本模块的接口头文件。
git clone https://gitcode.com/openeuler/itrustee_sdk.git步骤2 在代码中引用sdf.h头文件,即可进行应用开发,参考上文示例。
步骤3 完毕后可参考如下命令编译:本实践接口头文件所在目录为/home/itrustee_sdk/include/SDF,可根据下载头文件时的目录替换成实际路径。
gcc -o sm4_create_password sm4_create_password.c -I /home/itrustee_sdk/include/SDF/ -lsdf  -lcrypto #示例1 参考编译指令
gcc -o sm4_test sm4_test.c -I /home/itrustee_sdk/include/SDF/ -lsdf -ldl -lpthread  #示例2 参考编译指令
步骤4 执行应用,可成功执行SM4算法的加解密,签名验证等测试。
./sm4_test----结束
注意:使用SM4算法的接口调用的时候,要注意使用的索引跟密钥是对应SM4算法的而非SM2算法的,这里有两种设置索引以及密钥的方式
方式1:参考3.1.4开发示例中"示例1代码"进行设置,将"重新设置SM4密钥"下面代码注释去掉并运行示例1代码,即可完成SM4密钥的设置。
方式2:参考3.1.3.4初始化内置密钥,执行sudo /usr/bin/tee_key_manage命令进入密钥管理工具首页后,选择"Create Key>Encryption Key" 进行设置
4.2 金融安全网关
4.2.1 场景需求
该场景使用虚拟机部署TEE套件并且使用SM2算法进行加解密开发。
4.2.2 环境信息说明
本参考实践的调优验证所涉及的详细软硬件信息如表1 软件信息和表2 硬件信息。
表1 软件信息
| 类别 | 软件版本 |
|---|---|
| 物理机OS | OpenEuler 22.03 LTS-SP4 |
| 虚拟机OS | OpenEuler 22.03 LTS-SP4 |
| BMC固件 | 5.05.12.25 |
| TEE OS固件 | 1.2 |
| BIOS固件 | 21.23 |
| itrustee_tzdriver | 7.9.1 |
| itrustee_client | 7.9.1 |
| qemu | 6.2.0 |
| tee-gp-proxy | 源码tag 25.3.0 |
表2 硬件信息
| 类别 | 硬件描述 |
|---|---|
| CPU | 鲲鹏7270Z |
| 内存 | 384GB |
| 硬盘 | 4*1.5TB NVMe硬盘 |
| 主板 | S920X20 |
4.2.3 部署流程
部署流程图如下:
4.2.3.1 导入license
请参考章节3.1.3.1 导入license
4.2.3.2 修改服务器BIOS配置
请参考章节3.1.3.2 修改服务器BIOS配置
4.2.3.3 物理机环境搭建
步骤1 安装依赖
yum install git gcc patch make  kernel-devel-$(uname -r) ninja-build
yum install glib2 glib2-devel pixman-devel
yum install openssl-devel zlib-devel
yum install libxml2-devel libvirt-devel
步骤2 编译libboundscheck
获取libboundscheck源码
git clone https://gitcode.com/openeuler/libboundscheck.git步骤3 编译vtzb_proxy
获取vtzb_proxy源码
git clone -b 25.3.0 https://gitcode.com/openeuler/tee-gp-proxy.git #使用25.3.0版本与下文itrustee_tzdriver,itrustee_client 7.9.1版本进行配套
cp -rf libboundscheck tee-gp-proxy/trustzone-awared-vm/Host/vtzb_proxy
【注意】此处tee-gp-proxy使用tag为25.3.0的版本,与下文itrustee_tzdriver,itrustee_client源码分支iTrustee_7.9.1_release配套使用
修改tee-gp-proxy/trustzone-awared-vm/Host/vtzb_proxy/serial_port.h中的SERIAL_PORT_NUM参数,默认值为64,修改成实际串口数量,一个VM对应一个虚拟串口
#define SERIAL_PORT_NUM 15编译tee-gp-proxy
cd tee-gp-proxy/trustzone-awared-vm/Host/vtzb_proxy
make
sudo cp ./vtz_proxy /usr/bin/vtz_proxy
步骤4 编译安装itrustee_tzdriver
获取itrustee_tzdriver源码
git clone https://gitcode.com/openeuler/itrustee_tzdriver.git -b iTrustee_7.9.1_release进入itrustee_tzdriver的根目录,使能补丁文件,补丁文件路径按照实际路径修改
cd itrustee_tzdriver
git am ../tee-gp-proxy/trustzone-awared-vm/Host/tzdriver-0001-support-virtual-machine.patch
git am ../tee-gp-proxy/trustzone-awared-vm/Host/tzdriver-0002-support-get-uid-from-vm.patch 
回到上层目录,将libboundscheck源码复制到“itrustee_tzdriver/”目录下,用于itrustee_tzdriver中打补丁后的makefile编译时候的调用
cd ..
cp -rf libboundscheck itrustee_tzdriver
编译itrustee_tzdriver。
cd itrustee_tzdriver && make CPU_GROUP_BINDING=y在编译tzdriver后,将tzdriver.ko复制到指定目录。
mkdir -p "/lib/modules/$(uname -r)/kernel/drivers/trustzone/"
cp tzdriver.ko /lib/modules/$(uname -r)/kernel/drivers/trustzone
步骤5 编译安装itrustee_client
获取itrustee_client源码
git clone https://gitcode.com/openeuler/itrustee_client.git -b iTrustee_7.9.1_release进入itrustee_client的根目录,使能补丁文件,补丁文件路径按照实际路径修改
cd itrustee_client
git am ../tee-gp-proxy/trustzone-awared-vm/Host/client-0001-add-vm-uid-in-TC_NS_ClientContext.patch
回到上层目录,将libboundscheck源码复制到“itrustee_client/”目录下,用于itrustee_client中打补丁后的makefile编译时候的调用
cd ..
cp -rf libboundscheck itrustee_client
编译itrustee_client。
cd itrustee_client
make
make install
步骤6 根据获取链接获取BoostKit-boostcc-ccos-1.2.zip,解压zip包后获得hpm固件、kunpeng_sec_drv.sec和sdf-utils*.rpm

步骤7 安装sdf-utils。
rpm -ivh sdf-utils*.rpm步骤8 升级ccos固件,将解压后的ccos_image_1.2.hpm上传到iBMC进行固件升级

步骤9 部署SEC驱动文件
mkdir -p /var/itrustee/tee_dynamic_drv/crypto/
cp kunpeng_sec_drv.sec /var/itrustee/tee_dynamic_drv/crypto/
----结束
4.2.3.4 虚拟机环境搭建
以下步骤以采用开源OS虚拟化平台为示例,对于使用超融合虚拟化平台需要有一定的适配工作,详见下文章节中的"注意"部分。
4.2.3.4.1 编译qemu
注意:此处若使用超融合平台部署虚拟化则需要超融合厂商进行适配,使用源码编译打补丁的方式编译安装qemu
步骤1 获取qemu v6.2.0源码
git clone -b v6.2.0 https://git.qemu.org/git/qemu.git若gitlab源下载缓慢,则可以考虑使用gitee源进行下载
git clone -b v6.2.0 https://gitee.com/nothing-wrong/qemu.git由于编译的时候代码会主动使用gitlab的源进行拉取其他模块,因此手动将 .gitmodules 文件中的克隆地址换成 gitee 源的地址再编译。
以下文本为替换源后的 .gitmodules 文件文本,复制代码后将其重命名为 .gitmodules ,上传到 qemu 文件夹下替换原来的.gitmodules文件
[submodule "roms/seabios"]
	path = roms/seabios
	url = https://gitee.com/nothing-wrong/seabios.git
[submodule "roms/SLOF"]
	path = roms/SLOF
	url = https://gitee.com/nothing-wrong/SLOF.git
[submodule "roms/ipxe"]
	path = roms/ipxe
	url = https://gitee.com/nothing-wrong/ipxe.git
[submodule "roms/openbios"]
	path = roms/openbios
	url = https://gitee.com/nothing-wrong/openbios.git
[submodule "roms/qemu-palcode"]
	path = roms/qemu-palcode
	url = https://gitee.com/nothing-wrong/qemu-palcode.git
[submodule "roms/sgabios"]
	path = roms/sgabios
	url = https://gitee.com/nothing-wrong/sgabios.git
[submodule "dtc"]
	path = dtc
	url = https://gitee.com/nothing-wrong/dtc.git
[submodule "roms/u-boot"]
	path = roms/u-boot
	url = https://gitee.com/nothing-wrong/u-boot.git
[submodule "roms/skiboot"]
	path = roms/skiboot
	url = https://gitee.com/nothing-wrong/skiboot.git
[submodule "roms/QemuMacDrivers"]
	path = roms/QemuMacDrivers
	url = https://gitee.com/nothing-wrong/QemuMacDrivers.git
[submodule "ui/keycodemapdb"]
	path = ui/keycodemapdb
	url = https://gitee.com/nothing-wrong/keycodemapdb.git
[submodule "capstone"]
	path = capstone
	url = https://gitee.com/nothing-wrong/capstone.git
[submodule "roms/seabios-hppa"]
	path = roms/seabios-hppa
	url = https://gitee.com/nothing-wrong/seabios-hppa.git
[submodule "roms/u-boot-sam460ex"]
	path = roms/u-boot-sam460ex
	url = https://gitee.com/nothing-wrong/u-boot-sam460ex.git
[submodule "tests/fp/berkeley-testfloat-3"]
	path = tests/fp/berkeley-testfloat-3
	url = https://gitee.com/nothing-wrong/berkeley-testfloat-3.git
[submodule "tests/fp/berkeley-softfloat-3"]
	path = tests/fp/berkeley-softfloat-3
	url = https://gitee.com/nothing-wrong/berkeley-softfloat-3.git
[submodule "roms/edk2"]
	path = roms/edk2
	url = https://gitee.com/nothing-wrong/edk2.git
[submodule "slirp"]
	path = slirp
	url = https://gitee.com/nothing-wrong/libslirp.git
[submodule "roms/opensbi"]
	path = roms/opensbi
	url = https://gitee.com/nothing-wrong/opensbi.git
[submodule "roms/qboot"]
	path = roms/qboot
	url = https://gitee.com/nothing-wrong/qboot.git
[submodule "meson"]
	path = meson
	url = https://gitee.com/nothing-wrong/meson.git
[submodule "roms/vbootrom"]
	path = roms/vbootrom
	url = https://gitee.com/nothing-wrong/vbootrom.git
步骤2 应用补丁文件
进入目标目录 qemu 的根目录,补丁文件路径按照实际路径修改
cd qemu
git am ../tee-gp-proxy/trustzone-awared-vm/Host/qemu-00*.patch
步骤3 编译qemu
mkdir build
cd build
../configure --target-list=aarch64-softmmu --disable-werror
make -j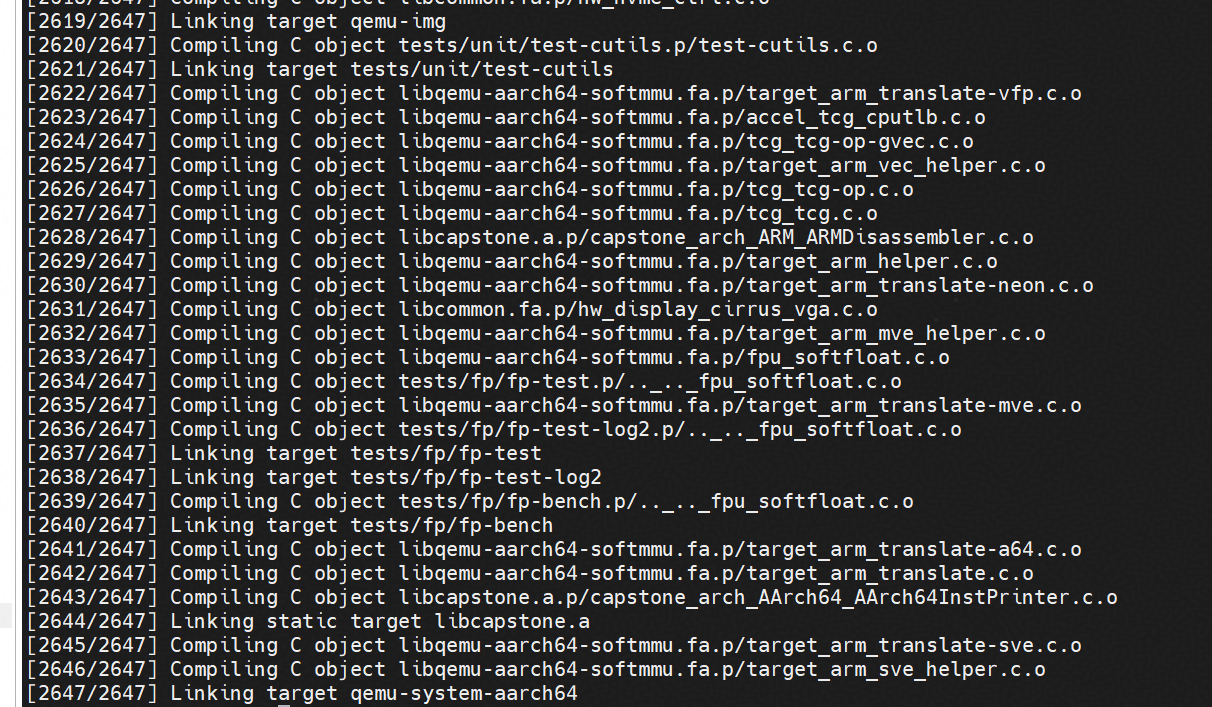
----结束
4.2.3.4.2 虚拟机配置
注意:此处若使用超融合平台部署虚拟化则需要超融合厂商进行适配,修改虚拟机配置文件,添加虚拟串口,映射路径
步骤1 安装依赖
yum -y install edk2-aarch64.noarch libvirt步骤2 下载虚拟机qcow2镜像, 本参考实践以openEuler22.03-LTS-SP4为例
解压镜像压缩包
yum install xz
unxz openEuler-22.03-LTS-SP4-aarch64.qcow2.xz
步骤3 启用libvirtd服务
systemctl start libvirtd.service
setenforce 0
步骤4 修改虚拟机配置文件
新建虚拟机配置文件
vim vm-libvirt.xml参考以下内容修改虚拟机配置文件
<domain type='kvm' xmlns:qemu='http://libvirt.org/schemas/domain/qemu/1.0'>
    <!-- 虚拟机名称 -->
    <name>nvm-ta-1</name>
    <!-- 虚拟机内存 -->
    <memory unit='GiB'>32</memory>
    <!-- 虚拟处理器的个数 -->
    <vcpu>16</vcpu>
    <os>
        <type arch='aarch64' machine='virt'>hvm</type>
        <!-- 这里是arm架构的 -->
        <loader readonly='yes' type='pflash'>/usr/share/edk2/aarch64/QEMU_EFI-pflash.raw</loader>
        <!-- 指定nvram文件路径,用于存储UEFI启动配置 保证文件名不冲突即可 -->
        <nvram>/var/lib/libvirt/qemu/nvram/openEulerVM.fd</nvram>
    </os>
    <features>
        <acpi/>
        <gic version='3'/>
    </features>
    <cpu mode='host-passthrough'>
    </cpu>
    <iothreads>1</iothreads>
    <clock offset='utc'/>
    <on_poweroff>destroy</on_poweroff>
    <on_reboot>restart</on_reboot>
    <on_crash>restart</on_crash>
    <devices>
        <!-- 创建软链接指向编译qemu后build目录下的qemu-system-aarch64 -->
            <emulator>/home/zhangqiang/qemu/build/aarch64-softmmu/qemu-system-aarch64</emulator>(修改成对应的路径)
        <disk type='file' device='disk'>
            <driver name='qemu' type='qcow2' iothread="1"/>
            <!-- 镜像路径 -->
            <source file='/home/zhangqiang/xunihua/openEuler-22.03-LTS-SP4-aarch64.qcow2'/>(修改成对应的路径)
            <target dev='vda' bus='virtio'/>
            <boot order='1'/>
        </disk>
        <!--
        <disk type='file' device='cdrom'>
            <driver name='qemu' type='raw'/>
            <source file='/home/z50040113/target/openEuler-22.03-LTS-SP1-aarch64-dvd.iso'/>
            <readonly/>
            <target dev='sdb' bus='scsi'/>
            <boot order='2'/>
        </disk>
        -->
        <interface type='network'>
            <!-- 建议配置network NAT网络模式 -->
            <source network='default'/>
            <model type='virtio'/>
        </interface>
        <console type='pty'/>
        <video>
               <model type='virtio'/>
        </video>
        <controller type='scsi' index='0' model='virtio-scsi'/>
        <controller type='usb' model='ehci'/>
        <input type='tablet' bus='usb'/>
        <input type='keyboard' bus='usb'/>
        <!-- port 为vnc连接端口,auth 为连接密码 -->
        <!--
        <graphics type='vnc' port='5901' listen='0.0.0.0' password='on' auth='passwd1234!'/>
        -->
    </devices>
    <qemu:commandline>
     <!-- 添加一个虚拟串口,映射到host路径/tmp/vm_vtzb_sock0 -->
     <qemu:arg value='-chardev'/>
     <qemu:arg value='socket,path=/tmp/vm_vtzb_sock1,server=on,wait=off,id=vm01_vtzb_sock'/>
     <qemu:arg value='-device'/>
     <qemu:arg value='virtio-serial'/>
     <qemu:arg value='-device'/>
     <qemu:arg value='virtserialport,chardev=vm01_vtzb_sock,name=vtzf_serialport0'/>
     <!--
     <qemu:arg value='-monitor'/>
     <qemu:arg value='telnet:127.0.0.1:5556,server=on,wait=off'/>
     -->
    </qemu:commandline>
    <seclabel type='dynamic' model='dac' relabel='yes'/>
</domain>
多虚机配置
 <qemu:arg value='-chardev'/>
 <qemu:arg value='socket,path=/var/vtzb/vm_vtzb_sock1,server=on,wait=off,id=vm01_vtzb_sock'/>
 <qemu:arg value='-device'/>
 <qemu:arg value='virtio-serial'/>
 <qemu:arg value='-device'/>
<qemu:arg value='virtserialport,chardev=vm01_vtzb_sock,name=vtzf_serialport0'/>- 在虚机配置文件中修改如上代码:path按照/var/vtzb/vm_vtzb_sock0,/var/vtzb/vm_vtzb_sock1,/var/vtzb/vm_vtzb_sock2且接着上一个虚机配置文件中的path有序递增,且数字不能大于配置文件中的 max_vm_count
- 修改id与chardev 一致且唯一
- name 恒为vtzf_serialport0
生效虚拟机配置文件
virsh define vm-libvirt.xml (名称与上面新建的配置文件保持一致)步骤5 启用虚拟机
virsh start nvm-ta-1(名称与配置文件保持一致)步骤6 登录虚拟机
openEuler镜像默认账号为root, 默认密码为openEuler12#$
virsh console nvm-ta-1----结束
4.2.3.4.3 配置虚拟机内生国密运行环境
以下步骤在虚拟机中执行
步骤1 安装依赖
yum install make kernel-devel-$(uname -r) git gcc openssl-devel步骤2 下载tee-gp-proxy仓库,其中包含vtzdriver与virtio(5.10内核)源码
git clone -b 25.3.0 https://gitcode.com/openeuler/tee-gp-proxy.git【注意】此处tee-gp-proxy使用tag为25.3.0的版本,与下文itrustee_tzdriver,itrustee_client源码分支iTrustee_7.9.1_release配套使用
步骤3 编译libboundscheck
获取libboundscheck源码
git clone https://gitcode.com/openeuler/libboundscheck.git复制到tee-gp-proxy下
cp -rf libboundscheck tee-gp-proxy/trustzone-awared-vm/VM/vtzdriver步骤4 编译安装itrustee_client
获取itrustee_client源码
git clone https://gitcode.com/openeuler/itrustee_client.git -b iTrustee_7.9.1_release进入itrustee_client的根目录,使能补丁文件,补丁文件路径按照实际路径修改
cd itrustee_client
git am ../tee-gp-proxy/trustzone-awared-vm/Host/client-0001-add-vm-uid-in-TC_NS_ClientContext.patch 
回到上层目录,将libboundscheck源码复制到“itrustee_client/”目录下,用于itrustee_client中打补丁后的makefile编译时候的调用
cd ..
cp -rf libboundscheck itrustee_client
编译itrustee_client。
cd itrustee_client
make
make install
步骤5 根据获取链接获取BoostKit-boostcc-ccos-1.2.zip,解压zip包后获得kunpeng_sec_drv.sec和sdf-utils*.rpm

步骤6 安装sdf-utils
rpm -ivh sdf-utils*.rpm步骤7 部署SEC驱动文件
mkdir -p /var/itrustee/tee_dynamic_drv/crypto/
cp kunpeng_sec_drv.sec /var/itrustee/tee_dynamic_drv/crypto/
步骤8 编译virtio_console.ko并加载(仅5.10内核需要执行此步骤)
cd ..
cd tee-gp-proxy/trustzone-awared-vm/VM/virtio/char
make
mkdir -p /lib/modules/$(uname -r)/kernel/drivers/trustzone
cp virtio_console.ko /lib/modules/$(uname -r)/kernel/drivers/trustzone
rmmod virtio_console
insmod /lib/modules/$(uname -r)/kernel/drivers/trustzone/virtio_console.ko
步骤9 编译vtzdriver并加载vtzfdriver.ko, vtzfdriver加载后不可卸载, 如需卸载请重启
cd tee-gp-proxy/trustzone-awared-vm/VM/vtzdriver
make
mkdir -p /lib/modules/$(uname -r)/kernel/drivers/trustzone
cp vtzfdriver.ko /lib/modules/$(uname -r)/kernel/drivers/trustzone
insmod /lib/modules/$(uname -r)/kernel/drivers/trustzone/vtzfdriver.ko
----结束
4.2.3.5 加载驱动
虚拟机使用TEE运行环境需要保证物理机HOST端以及虚拟机GUEST端都加载驱动,若重启则需要重新加载
步骤1 物理机Host端加载驱动
insmod /lib/modules/$(uname -r)/kernel/drivers/trustzone/tzdriver.ko
nohup /usr/bin/teecd &
nohup /usr/bin/vtz_proxy &
步骤2 虚拟机Guest端加载驱动
重新加载virtio_console模块(仅5.10内核需要执行此步骤)
rmmod virtio_console
insmod /lib/modules/$(uname -r)/kernel/drivers/trustzone/virtio_console.ko
加载vtzfdriver.ko和teecd
insmod /lib/modules/$(uname -r)/kernel/drivers/trustzone/vtzfdriver.ko
nohup /usr/bin/teecd &
----结束
说明:若加载驱动成功且teecd进行运行成功则说明环境配置是正常的,相应的组件以及驱动编译安装是成功的。
4.2.3.6 初始化内置密钥
参考章节3.1.3.4 初始化内置密钥
说明:若内置密钥配置成功则说明SDF接口调用成功,内生国密开发运行环境配置完成。
4.2.3.7 常见报错及解决
问题1:在进行物理机环境搭建执行步骤3编译itrustee_tzdriver时报错函数未定义
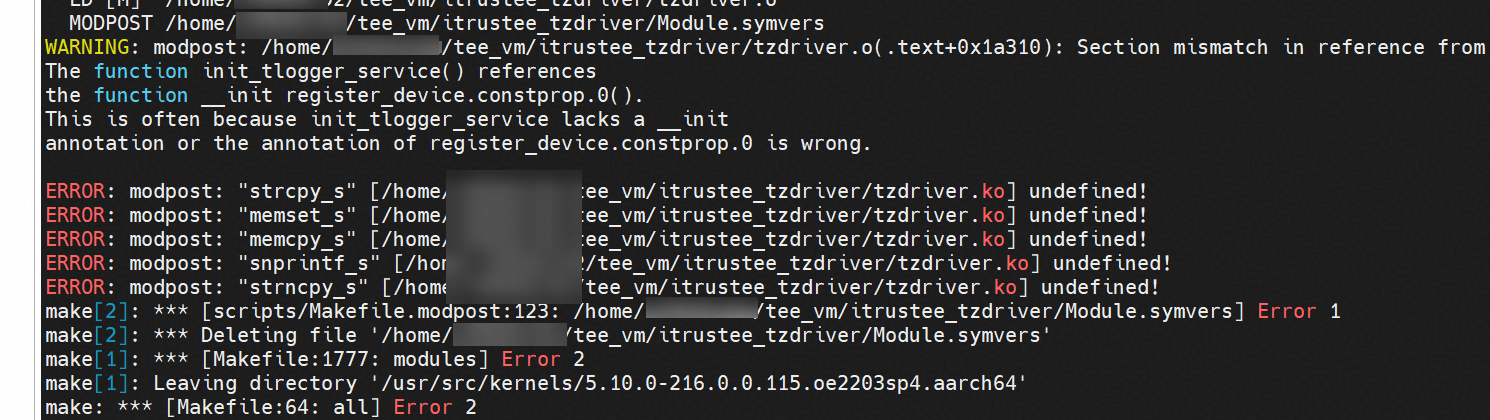
原因:makefile中存在条件判断逻辑,若系统已经内置了vsnprintf_s函数,则不使用本地 libboundscheck,若没有内置,则使用本地 libboundscheck
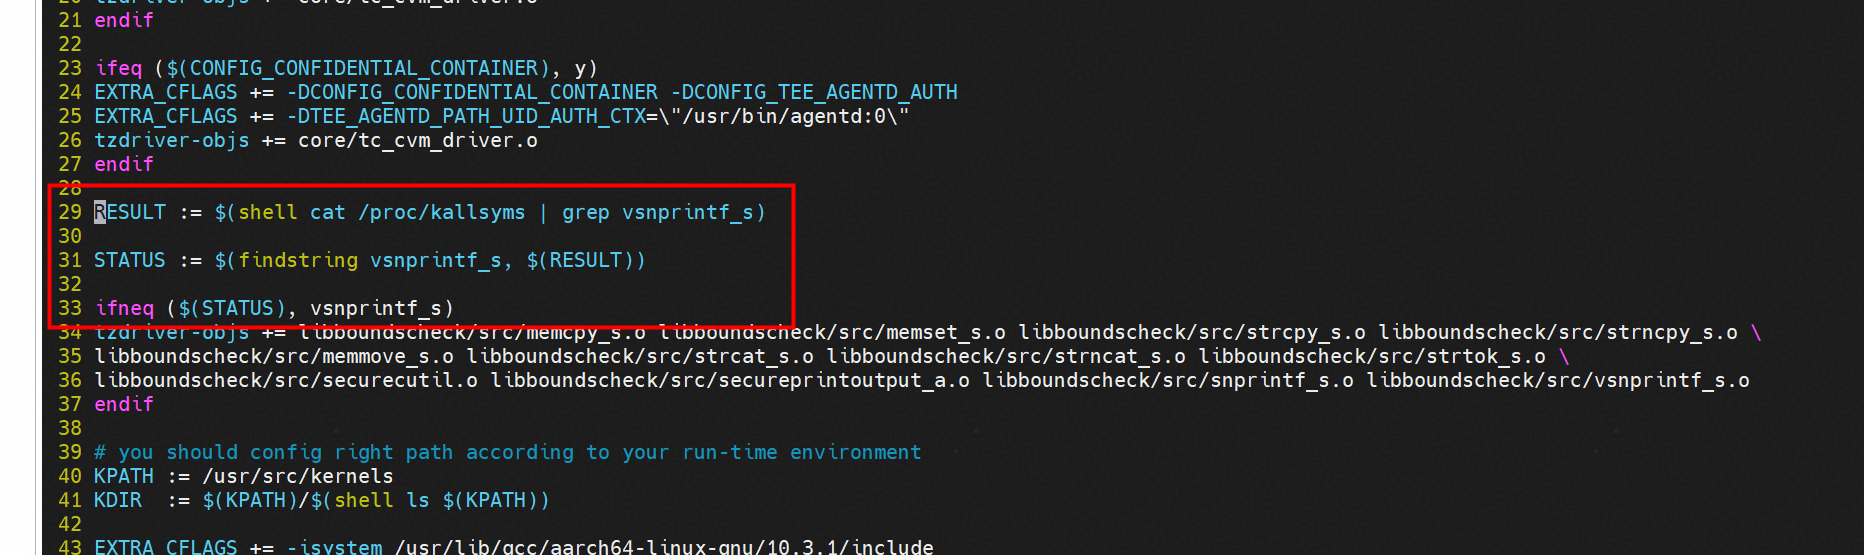
解决方案:进入itrustee_tzdriver源码目录,执行以下命令将条件判断逻辑注释掉
sed -i '29,33s/^/#/' Makefile
sed -i '37s/^/#/' Makefile
重新执行make进行编译
make CPU_GROUP_BINDING=y问题2:定义虚拟机配置文件后启动虚拟机报错 qemu-system-aarch64: -device virtio-net-pci,netdev=hostnet0,id=net0,mac=52:54:00:3e:fc:c2,bus=pci.2,addr=0x0: failed to find romfile "efi-virtio.rom"
原因:网络设备缺少 efi-virtio.rom文件
解决方案:使用指令find / -name "*virtio*.rom" 2>/dev/null | grep -i efi查询文件位置,若不存在,则使用yum install edk2-aarch64下载该文件。
编辑虚拟机xml配置文件,在网络设备添加 <rom file='/usr/share/qemu/efi-virtio.rom'/>(具体路径以文件在服务器的路径为准)

4.2.4 开发示例
接口调用示例
如下提供示例代码演示了接口的使用方式,以SM2用户密钥为例,包括密钥的创建、密钥标识码的修改、密钥访问权限路径添加与删除、导出导入密钥,删除密钥。
示例1代码:
#include <stdio.h>
#include <stdlib.h>
#include <string.h>
#include <openssl/sha.h>
#include "sdf.h"

#define MAX_KEY_FILE_SIZE (1024 * 1024)
#define EXPORT_SALT "123456789"
#define CA_PATH "./test_sdf"
#define USER_NAME "root"
#define PASSWD "Huawei123."
#define NEWPASSWD "Huawei321."
#define ALG_FLAG_OFFSET 20

int generate_key(void *session, unsigned int key_id, unsigned char *password)
{
    int ret;
    // sm2签名及加密密钥
    unsigned int sign_info = SDF_SM2_SIGN << ALG_FLAG_OFFSET | key_id;
    unsigned int enc_info = SDF_SM2_ENC << ALG_FLAG_OFFSET | key_id;
    ret = ECM_GenerateKey(session, sign_info, password, strlen(password));
    if (ret != SDR_OK) {
        printf("ECM_GenerateKey sign key failed, ret = 0x%x\n", ret);
        return ret;
    }

    ret = ECM_GenerateKey(session, enc_info, password, strlen(password));
    if (ret != SDR_OK) {
        printf("ECM_GenerateKey enc key failed, ret = 0x%x\n", ret);
        return ret;
    }
    return ret;
}
int delete_key(void *session, unsigned int key_id)
{
    int ret;
    unsigned int sign_info = SDF_SM2_SIGN << ALG_FLAG_OFFSET | key_id;
    unsigned int enc_info = SDF_SM2_ENC << ALG_FLAG_OFFSET | key_id;
    ret = ECM_DeleteKey(session, sign_info);
    if (ret != SDR_OK) {
        printf("ECM_DeleteKey key_index %d failed, ret = 0x%x\n", key_id, ret);
        return ret;
    }
    ret = ECM_DeleteKey(session, enc_info);
    if (ret != SDR_OK) {
        printf("ECM_DeleteKey key_index %d failed, ret = 0x%x\n", key_id, ret);
    }
    return ret;
}
int export_import_key(void *session, unsigned int key_id1, unsigned int key_id2)
{
    int ret = -1;
    uint8_t *key_data = NULL;
    uint32_t key_data_len = MAX_KEY_FILE_SIZE;
    unsigned int sign_key_info1 = SDF_SM2_SIGN << ALG_FLAG_OFFSET | key_id1;
    unsigned int sign_key_info2 = SDF_SM2_SIGN << ALG_FLAG_OFFSET | key_id2;
    unsigned int enc_key_info1 = SDF_SM2_ENC << ALG_FLAG_OFFSET | key_id1;
    unsigned int enc_key_info2 = SDF_SM2_ENC << ALG_FLAG_OFFSET | key_id2;
    key_data = (uint8_t *)malloc(key_data_len);
    if (key_data == NULL) {
        printf("malloc failed\n");
        return -1;
    }
    // 导出导入签名密钥
    ret = ECM_ExportKey(session, sign_key_info1, key_data, &key_data_len, EXPORT_SALT);
    if (ret) {
        printf("ECM_ExportKey sign key failed, ret = 0x%x, %d\n", ret, key_data_len);
        goto free;
    }
    ret = ECM_ImportKey(session, sign_key_info2, key_data, key_data_len, EXPORT_SALT);
    if (ret) {
        printf("ECM_ImportKey sign key failed, ret = 0x%x\n", ret);
        goto free;
    }
    // 导出导入加密密钥
    ret = ECM_ExportKey(session, enc_key_info1, key_data, &key_data_len, EXPORT_SALT);
    if (ret) {
        printf("ECM_ExportKey enc key failed, ret = 0x%x, %d\n", ret, key_data_len);
        goto free;
    }
    ret = ECM_ImportKey(session, enc_key_info2, key_data, key_data_len, EXPORT_SALT);
    if (ret) {
        printf("ECM_ImportKey enc key failed, ret = 0x%x\n", ret);
        goto free;
    }
free:
    free(key_data);
    return ret;
}
int change_passwd(void *session, unsigned int key_id, char *passwd, char *new_passwd)
{
    int ret;
    unsigned int sign_info = SDF_SM2_SIGN << ALG_FLAG_OFFSET | key_id;
    unsigned int enc_info = SDF_SM2_ENC << ALG_FLAG_OFFSET | key_id;
    ret = ECM_ChangePassword(session, sign_info, passwd, strlen(passwd), new_passwd, strlen(new_passwd));
    if (ret != SDR_OK) {
        printf("ECM_ChangePassword sign key failed, ret = 0x%x\n", ret);
        return ret;
    }
    ret = ECM_ChangePassword(session, enc_info, passwd, strlen(passwd), new_passwd, strlen(new_passwd));
    if (ret != SDR_OK) {
        printf("ECM_ChangePassword sign key failed, ret = 0x%x\n", ret);
    }
    return ret;
}
void calculate_cainfo(const char *ca_path, const char *user_name, unsigned char hash[32])
{
    char plan[256] = {0};
    memcpy(plan, user_name, strlen(user_name));
    SHA256_CTX sha256;
    SHA256_Init(&sha256);
    SHA256_Update(&sha256, ca_path, strlen(ca_path));
    SHA256_Update(&sha256, plan, 256);
    SHA256_Final(hash, &sha256);
    for (size_t i = 0; i < 32; i++) {
        printf("%02x", hash[i]);
    }
    printf("\n");
}
int main()
{
    int ret = -1;
    int key_idx1 = 1, key_idx2 = 2;
    void *device = NULL, *session = NULL;
    ret = SDF_OpenDevice(&device);
    if (ret != SDR_OK) {
        printf("sdf open device failed, ret = 0x%x\n", ret);
        return ret;
    }
    ret = ECM_OpenSession(device, &session);
    if (ret != SDR_OK) {
        printf("sdf open session failed, ret = 0x%x\n", ret);
        goto close;
    }
    ret = generate_key(session, key_idx1, PASSWD);
    if (ret != SDR_OK) {
        printf("generate_key failed, ret = 0x%x\n", ret);
        goto close;
    }
    printf("generate key success\n");
    // 修改密码
    ret = change_passwd(session, key_idx1, PASSWD, NEWPASSWD);
    if (ret != SDR_OK) {
        printf("change key passwd failed, ret = 0x%x\n", ret);
        goto close;
    }
    printf("change passwd success\n");

    // 导入密钥到key_idx2
    ret = export_import_key(session, key_idx1, key_idx2);
    if (ret != SDR_OK) {
        printf("export_import_key failed, ret = 0x%x\n", ret);
        goto close;
    }
    printf("export key %d, import to key %d success\n", key_idx1, key_idx2);
    ret = delete_key(session, key_idx1);
    if (ret != SDR_OK) {
        printf("ECM_DeleteKey failed, ret = 0x%x\n", ret);
        goto close;
    }
    ret = delete_key(session, key_idx2);
    if (ret != SDR_OK) {
        printf("ECM_DeleteKey failed, ret = 0x%x\n", ret);
        goto close;
    }
    printf("delete key success\n");
close:
    if (session != NULL) {
        (void)SDF_CloseSession(session);
    }
    if (device != NULL) {
        (void)SDF_CloseDevice(device);
    }
    return ret;
}
如下提供示例代码演示了接口的调用,以SM2算法为例,包括了设备和会话管理,加解密,验证签名等操作
示例2代码:
#include <stdio.h>
#include <stdlib.h>
#include <string.h>
#include <pthread.h>
#include "sdf.h"

// 定义配置结构体
typedef struct {
    unsigned int index; // 秘钥索引
    char* password;    // 秘钥密码
    int data_size;     // 数据处理长度(bytes)
    int test_type;     // 测试类型: 0-加密, 1-签名
} Config;

// 定义线程参数结构体
typedef struct {
    Config* config;
    int thread_id;
} ThreadArgs;

// 生成随机数据函数
static void generate_random_data(unsigned char* data, int size) {
    FILE* urandom = fopen("/dev/urandom", "r");
    if (urandom) {
        fread(data, 1, size, urandom);
        fclose(urandom);
    }
}

// 执行SM2加密测试
static void* perform_sm2_encryption(void* arg) {
    ThreadArgs* args = (ThreadArgs*)arg;
    Config* config = args->config;

    // 初始化测试数据
    unsigned char* data = malloc(config->data_size);
    generate_random_data(data, config->data_size);

    // 打开设备和会话
    void* hDevice = NULL;
    void* hSession = NULL;
    SDF_OpenDevice(&hDevice);
    SDF_OpenSession(hDevice, &hSession);
    SDF_GetPrivateKeyAccessRight(hSession, config->index,
                               (unsigned char*)config->password,
                               strlen(config->password));

    printf("Thread %d: 开始执行SM2加密测试 [数据大小: %d字节]\n",
           args->thread_id, config->data_size);

    // 执行加密和解密操作
    ECCCipher cipher;
    unsigned char decrypted[config->data_size];
    unsigned int decrypted_size = config->data_size;

    SDF_ExternalEncrypt_ECC(hSession, SDF_SM2_ENC, NULL, data, config->data_size, &cipher);
    SDF_ExternalDecrypt_ECC(hSession, SDF_SM2_ENC, NULL, &cipher, decrypted, &decrypted_size);

    printf("Thread %d: SM2加密测试完成\n", args->thread_id);

    // 释放资源
    SDF_ReleasePrivateKeyAccessRight(hSession, config->index);
    SDF_CloseSession(hSession);
    SDF_CloseDevice(hDevice);
    free(data);

    return NULL;
}

// 执行SM2签名验证测试
static void* perform_sm2_sign_verify(void* arg) {
    ThreadArgs* args = (ThreadArgs*)arg;
    Config* config = args->config;

    // 初始化测试数据
    unsigned char* data = malloc(config->data_size);
    generate_random_data(data, config->data_size);

    // 打开设备和会话
    void* hDevice = NULL;
    void* hSession = NULL;
    SDF_OpenDevice(&hDevice);
    SDF_OpenSession(hDevice, &hSession);
    SDF_GetPrivateKeyAccessRight(hSession, config->index,
                               (unsigned char*)config->password,
                               strlen(config->password));

    printf("Thread %d: 开始执行SM2签名验证测试 [数据大小: %d字节]\n",
           args->thread_id, config->data_size);

    // 执行签名和验证操作
    ECCSignature signature;
    SDF_InternalSign_ECC(hSession, config->index, data, config->data_size, &signature);
    SDF_InternalVerify_ECC(hSession, config->index, data, config->data_size, &signature);

    printf("Thread %d: SM2签名验证测试完成\n", args->thread_id);

    // 释放资源
    SDF_ReleasePrivateKeyAccessRight(hSession, config->index);
    SDF_CloseSession(hSession);
    SDF_CloseDevice(hDevice);
    free(data);

    return NULL;
}

// 设备检查函数
static int check_device() {
    void* hDeviceHandle = NULL;
    int ret = SDF_OpenDevice(&hDeviceHandle);
    if (ret != SDR_OK) {
        printf("设备检查失败, 错误码: 0x%X\n", ret);
        return -1;
    }
    printf("设备检查成功\n");
    SDF_CloseDevice(hDeviceHandle);
    return 0;
}

// 主函数
int main(int argc, char* argv[]) {
    // 添加设备检查
    if (check_device() != 0) {
        printf("请先检查设备驱动和权限设置\n");
        return 1;
    }

    // 初始化配置参数
    Config config = {0};
    config.index = 1;         // 默认秘钥索引
    config.password = "Huawei12#$"; // 默认密码
    config.data_size = 1024;  // 默认数据大小

    // 创建线程执行测试
    pthread_t thread;
    ThreadArgs args;
    args.config = &config;
    args.thread_id = 0;

    // 执行SM2加密测试
    config.test_type = 0;
    pthread_create(&thread, NULL, perform_sm2_encryption, &args);
    pthread_join(thread, NULL);

    // 执行SM2签名验证测试
    config.test_type = 1;
    pthread_create(&thread, NULL, perform_sm2_sign_verify, &args);
    pthread_join(thread, NULL);

    return 0;
}
测试代码执行示例
步骤1 下载本模块的接口头文件。
git clone https://gitcode.com/openeuler/itrustee_sdk.git步骤2 在代码中引用sdf.h头文件,即可进行应用开发,参考上文示例。
步骤3 完毕后可参考如下命令编译:
本实践接口头文件所在目录为/home/itrustee_sdk/include/SDF,可根据下载头文件时的目录替换成实际路径
gcc -o sm2_create_password sm2_create_password.c -I /home/itrustee_sdk/include/SDF/ -lsdf  -lcrypto #示例1 参考编译指令
gcc -o sm2_test sm2_test.c -I /home/itrustee_sdk/include/SDF/ -lsdf -ldl -lpthread  #示例2 参考编译指令
步骤4 执行应用,可成功执行SM2算法的加解密,签名验证等测试。
./sm2_test----结束