- 从DemoVideoEngine.tar.gz中解压cfct_config配置文件。
1
2
3
cd /home/kbox_video/
tar -xvf DemoVideoEngine.tar.gz cfct_config
chmod 644 cfct_config
- 核对BIOS配置参数及GPU工作模式,请参见配置BIOS和配置GPU工作模式。
- 通过BMC调整服务器的风扇转速百分比为100%。
- SSH登录BMC。
1ssh {BMC用户名}@{BMC IP地址}
- 将风扇模式设置为手动调速。
1ipmcset -d fanmode -v 1 0
回显信息如下:
1
2
3
Set fan mode successfully.
Current Mode:       manual
Time out    :       100000000 seconds
- 调整风扇转速百分比为100%。
1ipmcset -d fanlevel -v 100
回显信息如下:
1
2
3
Set fan level successfully.
Current Mode:              manual, timeout 100000000 seconds.
Global Manual Fan Level:   100%
- 查询风扇状态。
1ipmcget -d faninfo
回显信息如下:
1
2
3
Current Mode: manual, timeout 100000000 seconds.
Manual fan level:
Fan1: 100, Fan2: 100, Fan3: 100, Fan4: 100
- SSH登录BMC。
- GPU驱动进程绑定到空闲核,网卡中断绑定空闲核请参见《Kbox云手机容器 特性指南》中的“网卡绑定CPU”章节。该操作每次重启服务器后都需要执行。
- 查询GPU进程号。
1ps -ef |grep gfx
回显信息如下:1 2
root 1703 2 1 Aug31 ? 07:31:36 [gfx_0.0.0] root 1739 2 1 Aug31 ? 09:13:08 [gfx_0.0.0]
- 将第一个GPU进程绑定至空闲核。
1taskset -pc 32-33 1703
回显信息如下:1 2
pid 1703's current affinity list: 0-127 pid 1703's new affinity list: 32,33
- 将第二个GPU进程绑定至空闲核。
1taskset -pc 64-65 1739
回显信息如下:1 2
pid 1739's current affinity list: 0-127 pid 1739's new affinity list: 64,65
若查询出4个GPU驱动进程,则将前2个驱动进程绑到32-33核,后2个驱动进程绑到64-65核。
- 查询GPU进程号。
- 单队列网卡中断散列。对单队列网卡可以使用RPS将中断分散到多个core处理,避免软中断集中到一个core导致该core软中断过高形成性能瓶颈。具体的方法是输入如下内容,本文以网卡enp125s0f1为例进行说明。以下命令将该网卡设备中断绑定到前八个CPU核,同时优化了其他RPS设置,使网卡性能在该场景达到最优。该操作每次重启服务器后都需要执行。
1 2 3 4 5
systemctl stop irqbalance.service systemctl disable irqbalance.service echo ff000000 > /sys/class/net/enp125s0f1/queues/rx-0/rps_cpus echo 4096 > /sys/class/net/enp125s0f1/queues/rx-0/rps_flow_cnt echo 32768 > /proc/sys/net/core/rps_sock_flow_entries
- 关闭NUMA均衡以及SWAP。该操作每次重启服务器后都需要执行。
1
2
echo 0 > /proc/sys/kernel/numa_balancing swapoff -a
- 将cfct_config配置文件中“CPU_BIND_MODE”字段设置为如表1所示值(“1”表示绑定NUMA的绑核方式)。
- 修改cfct_config配置文件中的MODE0_CPU0、MODE0_CPU1、MODE0_CPU2、MODE0_CPU3,将绑核方式均修改为6核一路,此处以MODE0_CPU0为例。
MODE0_CPUS0=("2,3,4,5,6,7" "8,9,10,11,12,13" "14,15,16,17,18,19" "20,21,22,23,24,25" "26,27,28,29,30,31") - 使用cfct_video脚本启动多路容器,此处启动容器的数量需要根据7中表1具体测试规格决定,这里以72路为例,依次输入如下命令。
进行多路测试时,需要先登录一路游戏,进入新手关(首次开始游戏后不做任何操作即可),进行对应的画质设置后退出登录,并按照制作基础数据卷中介绍的方法制作基础数据卷,保证后续启动的容器均为对应画质。
- 启动云手机。
1./cfct_video start 1 72
- 打开地铁跑酷游戏。
1./cfct_video start_game 1 72
- 截图。
1./cfct_video screencap 1 72
待截图完成后,将截图下载至本地。若看到截图全为地铁跑酷新手关,即证明已成功启动。
- 启动云手机。
- 测试客户端连接服务端后的性能。
- 在本机或另一台服务器上解压压测工具VideoClientEmulator.tar.gz。
1
2
tar -xvpf VideoClientEmulator.tar.gz cd VideoClientEmulator
- 执行以下命令连接服务端。如果在本机测试,IP地址可以使用127.0.0.1,命令示例如下。./test.sh connect命令后参数依次为服务器IP地址、开始端口、结束端口。
1./test.sh connect 127.0.0.1 8001 8036
确认工具回显中客户端数量显示正确,例如:1 2
[INFO] checking current client num ... [INFO] current client process num: =36
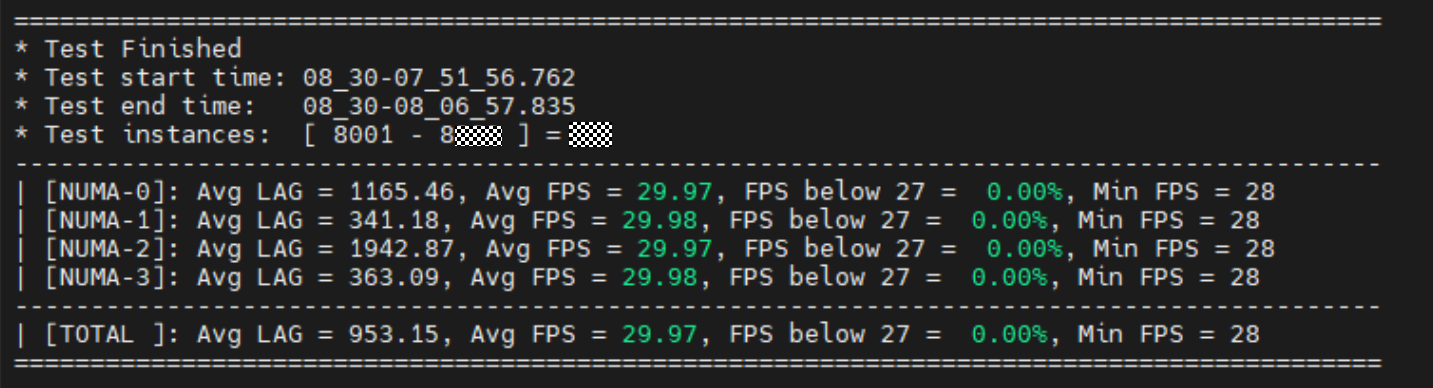
- 执行以下命令开始显示并收集帧率数据。
15分钟倒计时结束后会生成类似下图的帧率数据分析报告,并在测试目录下生成记录了单路数据的csv文件。
- 在本机或另一台服务器上解压压测工具VideoClientEmulator.tar.gz。
- 收集数据。
- 请参见视频流引擎获取native_perf_tools_quadra.tar.gz并解压,进入native_perf_tools文件夹。
- native_perf工具依赖nmon工具,如果没有安装需要进行安装。
- Ubuntu系统下可以使用apt命令安装。
1apt install nmon
- openEuler系统下可以使用yum命令安装。
1yum install nmon
- Ubuntu系统下可以使用apt命令安装。
- 依次执行以下命令,收集15min数据。“{prefix_number}”为存储采集数据文件夹的前缀,下图中以“60”为例。
1
2
source env.sh
./native_get_perf_data.sh all {prefix_number}

- 收集完成后,将以下几个数据文件下载至本地,解析后生成测试报告。
- 服务端“native_perf_tools”文件夹下的“log”文件夹,其中包含了服务端的性能数据,如CPU、GPU、编码卡等性能数据。
- 真机客户端的“/sdcard/log”目录下的client.log,是客户端的日志,包括解码帧率、网络Lag等数据。
- 将上述的文件和文件夹放到同一个路径下,此处以“D:\tmp”为例。下载ExtractingData_quadra.rar并解压,进入“ExtractingData”文件夹下,输入:
python parse.py D:\tmp
“D:\tmp”下会生成一个output文件夹,里面有相应的表格和图片。