开发程序
提供1个开发应用程序案例,基于机器学习算法加速库中的GBDT算法。
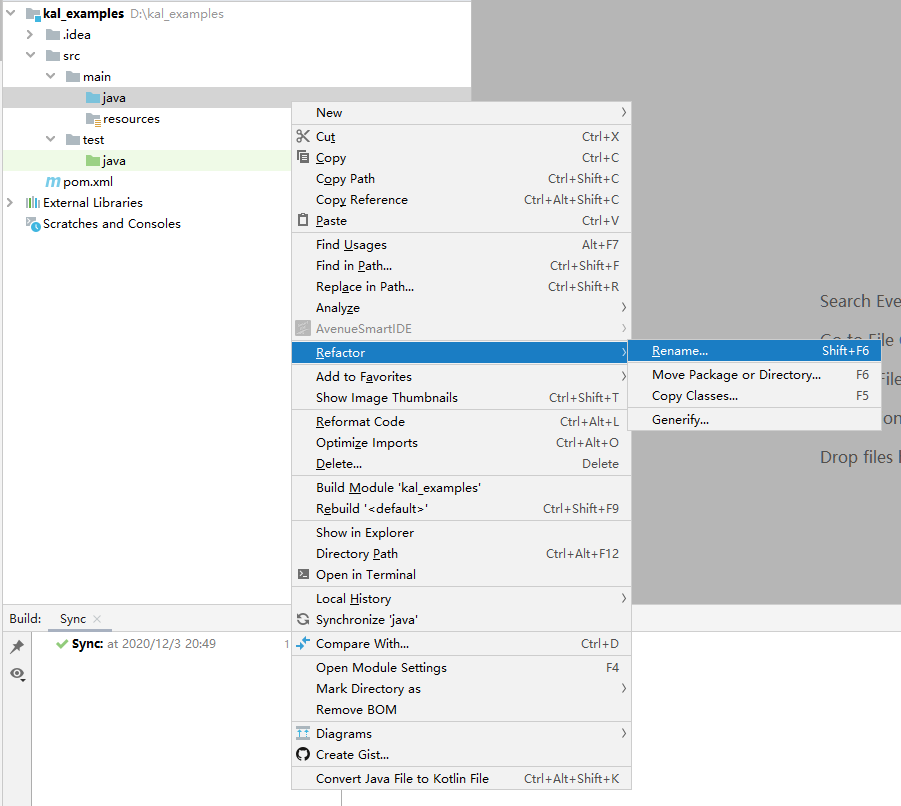
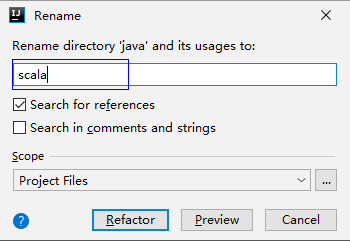
- 将工程中“src/main”和“src/test”目录下的“java”文件夹重命名为“scala”,“java”目录上右击,依次选择“Refactor”、“Rename”,然后输入“scala”。
- 在根目录下pom文件中添加依赖,将以下内容复制替换到pom.xml中。
 1
 2
 3
 4
 5
 6
 7
 8
 9
10
11
12
13
14
15
16
17
18
19
20
21
22
23
24
25
26
27
28
29
30
31
32
33
34
35
36
37
38
39
40
41
42
43
44
45
46
47
48
49
50
51
52
<project xmlns="http://maven.apache.org/POM/4.0.0" xmlns:xsi="http://www.w3.org/2001/XMLSchema-instance" xsi:schemaLocation="http://maven.apache.org/POM/4.0.0 http://maven.apache.org/maven-v4_0_0.xsd">
    <modelVersion>4.0.0</modelVersion>
    <groupId>com.bigdata</groupId>
    <artifactId>kal_examples_2.11</artifactId>
    <version>0.1</version>
    <name>${project.artifactId}</name>
    <inceptionYear>2020</inceptionYear>
    <packaging>jar</packaging>

    <properties>
        <maven.compiler.source>1.8</maven.compiler.source>
        <maven.compiler.target>1.8</maven.compiler.target>
        <encoding>UTF-8</encoding>
        <scala.version>2.11.8</scala.version>
    </properties>

    <dependencies>
        <dependency>
            <groupId>org.apache.spark</groupId>
            <artifactId>spark-mllib_2.11</artifactId>
            <version>2.3.2</version>
        </dependency>
        <dependency>
            <groupId>it.unimi.dsi</groupId>
            <artifactId>fastutil</artifactId>
            <version>8.3.1</version>
        </dependency>
    </dependencies>
    <build>
        <sourceDirectory>src/main/scala</sourceDirectory>
        <plugins>
            <plugin>
                <groupId>net.alchim31.maven</groupId>
                <artifactId>scala-maven-plugin</artifactId>
                <version>3.2.0</version>
                <executions>
                    <execution>
                        <goals>
                            <goal>compile</goal>
                        </goals>
                        <configuration>
                            <args>
                                <arg>-dependencyfile</arg>
                                <arg>${project.build.directory}/.scala_dependencies</arg>
                            </args>
                        </configuration>
                    </execution>
                </executions>
            </plugin>
        </plugins>
    </build>
</project>
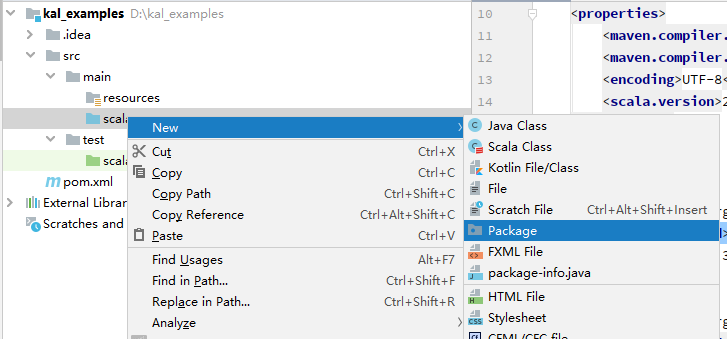
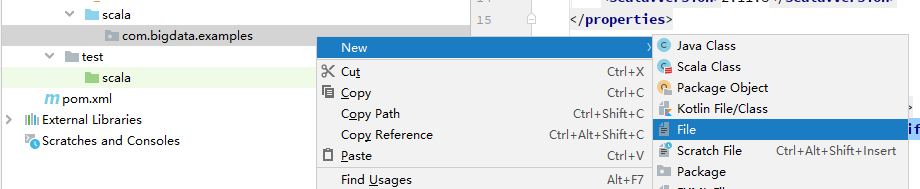
- 在新建工程中的新建工程中,在“src/main/scala/”目录下,新建package“com.bigdata.examples”,右键单击。
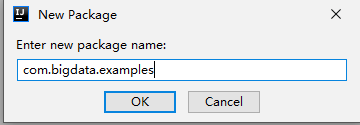
输入“com.bigdata.examples”,单击“OK”。
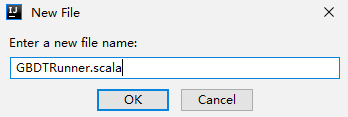
- 在“com.bigdata.examples”package中新建GBDTRunner.scala文件,右键单击“com.bigdata.examples”选择。
输入“GBDTRunner.scala”,单击“OK”。
将以下代码复制到GBDTRunner.scala文件中:
 1
 2
 3
 4
 5
 6
 7
 8
 9
10
11
12
13
14
15
16
17
18
19
20
21
22
23
24
25
26
27
28
29
30
31
32
33
34
35
36
37
38
39
40
41
42
43
44
45
46
47
48
49
50
51
52
53
54
55
56
57
58
59
60
61
62
63
64
65
66
67
68
69
70
71
72
73
package com.bigdata.examples

import org.apache.spark.SparkConf
import org.apache.spark.sql.SparkSession
import org.apache.spark.ml.Pipeline
import org.apache.spark.ml.classification.{GBTClassificationModel,  }
import org.apache.spark.ml.evaluation.MulticlassClassificationEvaluator
import org.apache.spark.ml.feature.{IndexToString, StringIndexer, VectorIndexer}

object GBDTRunner {
def main(args: Array[String]): Unit = {

val conf = new SparkConf().setAppName(s"gbdtEvaML")  //定义任务名称
val spark = SparkSession.builder.config(conf).getOrCreate() //创建任务session

val trainingData = spark.read.format("libsvm").load("hdfs:// /tmp/data/epsilon/epsilon_normalized") //读取训练集
.repartition(228)  //对数据进行分区
val testData = spark.read.format("libsvm").load("hdfs:// /tmp/data/epsilon/epsilon_normalized.t") //读取测试集
.repartition(228)  //对数据进行分区

val labelIndexer = new StringIndexer() //对标签进行索引
.setInputCol("label") //设置输入标签列
.setOutputCol("indexedLabel") //设置输出标签列
.fit(trainingData) //将以上操作应用到训练集

val labelIndexer = new StringIndexer() //对标签进行索引
.setInputCol("label") //设置输入标签列
.setOutputCol("indexedLabel") //设置输出标签列
.fit(testData) //将以上操作应用到测试集

val featureIndexer = new VectorIndexer()
.setInputCol("features") //设置输入特征列名称
.setOutputCol("indexedFeatures") //设置输出特征列名称
.setMaxCategories(4) //设置最大的索引编码数量,超过就不进行索引
.fit(trainingData) //将以上操作应用到训练集

val featureIndexer = new VectorIndexer()
.setInputCol("features") //设置输入特征列名称
.setOutputCol("indexedFeatures") //设置输出特征列名称
.setMaxCategories(4) //设置最大的索引编码数量,超过就不进行索引
.fit(testData) //将以上操作应用到测试集

val gbt = new GBTClassifier() //定义GBT分类模型
.setLabelCol("indexedLabel") //设置模型输入标签列
.setFeaturesCol("indexedFeatures") //设置模型输入特征列
.setMaxIter(100) //设置GBT最大迭代次数
.setMaxDepth(5) //设置每棵子树最大树深
.setMaxBins(20) //设置最大分桶数
.setStepSize(0.1) //设置学习率

val labelConverter = new IndexToString() //将索引标签转化成原始标签
.setInputCol("prediction") //设置输入标签列
.setOutputCol("predictedLabel") //设置输出预测标签列
.setLabels(labelIndexer.labels) //设置加载标签

val pipeline = new Pipeline() //定义pipeline任务流
.setStages(Array(labelIndexer, featureIndexer, gbt, labelConverter)) //定义pipeline任务流每个阶段任务

val model = pipeline.fit(trainingData) //调用fit接口,进行训练,执行pipeline

val predictions = model.transform(testData) //对testData进行预测

val evaluator = new MulticlassClassificationEvaluator() //定义评价指标
.setLabelCol("indexedLabel") //设置预期的正确结果(真值)输入列
.setPredictionCol("prediction") //设置模型预测结果(预测值)输入列
.setMetricName("accuracy") //对真值和预测值使用精度比较
val accuracy = evaluator.evaluate(predictions)  //执行评价指标,返回精度
println("Test Error = " + (1.0 - accuracy)) //打印测试分类误差

val gbtModel = model.stages(2).asInstanceOf[GBTClassificationModel]
println("Learned classification GBT model:\n" + gbtModel.toDebugString) //打印模型参数
}
}

对于维度高且样本量少的数据集,标签索引和特征索引起到的性能优化作用比较有限,有可能使整体耗时变长。
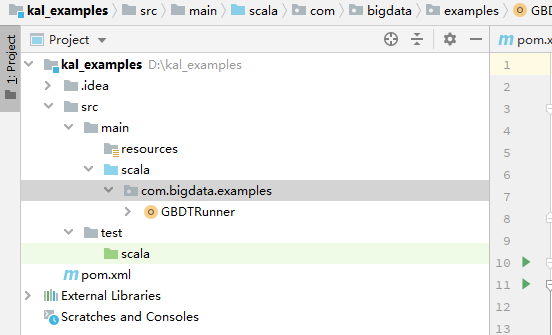
文件目录结构如图1所示。
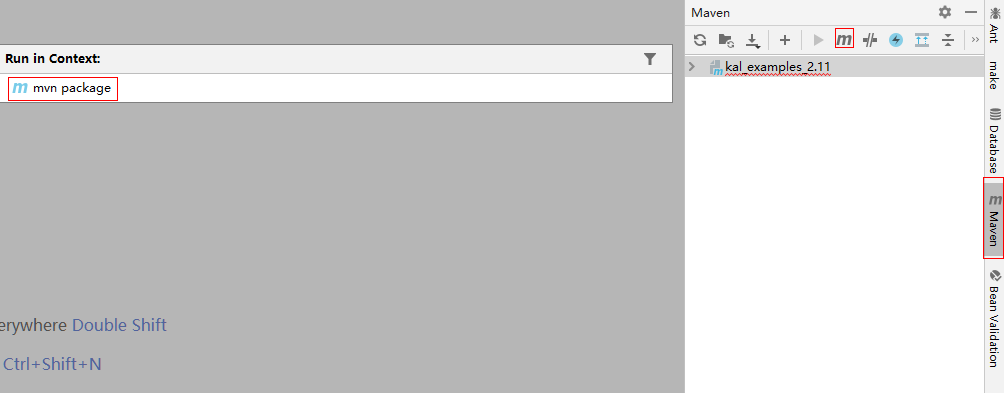
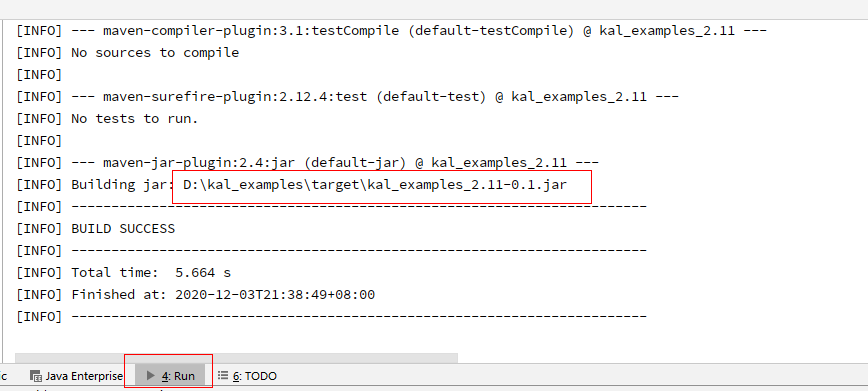
- 单击右侧边框,输入“package”,按回车,进行项目打包,在“target\”目录中生成kal_examples_2.11-0.1.jar。
KNN算法为机器学习算法加速库纯自研算法,使用KNN API时,需要将编译代码获得的boostkit-ml-kernel-client_2.11-1.3.0-spark2.3.2.jar或boostkit-ml-kernel-client_2.11-1.3.0-spark2.4.6.jar安装到Maven的本地仓,为了减少编译工作量,该包也可以直接获取适配Spark2.3.2版本的包和适配Spark2.4.6版本的包。在获取该包后,开发具体主要分为以下4个步骤(以下步骤基于spark2.3.2版本的Boostkit算法包为例,基于spark2.4.6版本的算法包的使用与之相同,可参考本指南)。
- 修改上文机器学习2中的pom文件,在“<dependencies>...</dependencies>”中增加boostkit-ml-kernel-client_2.11-1.3.0-spark2.3.2.jar的相关依赖。
1
2
3
4
5
6
<dependency>
   <groupId>org.apache.spark</groupId>
   <artifactId>boostkit-ml-kernel-client_2.11</artifactId>
   <version>1.3.0</version>
   <classifier>spark2.3.2</classifier>
</dependency>
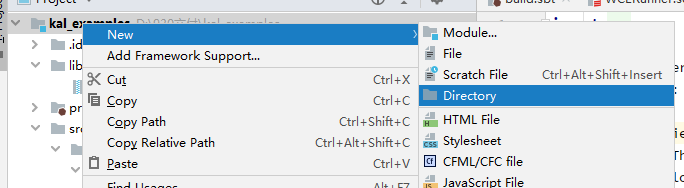
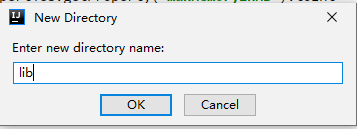
- 在根目录下新建lib文件夹,右键单击。
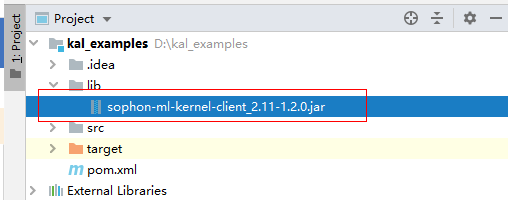
- 将软件编译获得的boostkit-ml-kernel-client_2.11-1.3.0-spark2.3.2.jar放入新建的lib文件中。
- 单击右侧边框,输入“install:install-file -DgroupId=org.apache.spark -DartifactId=boostkit-ml-kernel-client_2.11 -Dversion=1.3.0 -Dfile=lib/boostkit-ml-kernel-client_2.11-1.3.0-spark2.3.2.jar -Dpackaging=jar”,按回车完成安装。

父主题: 样例工程