编译和安装
操作步骤
- 使用PuTTY工具,以root用户登录服务器。
- 执行以下命令进入“SOAPDENOVO”目录。
cd /path/to/SOAPDENOVO
- 执行以下命令解压“SOAPdenovo2-r241.tar.gz”。
tar -xvf SOAPdenovo2-r241.tar.gz
- 执行以下命令进入解压后的目录。
cd SOAPdenovo2-r241
- 执行以下命令修改“standardPregraph/hashFunction.c”文件。
- 打开“standardPregraph/hashFunction.c”文件。
vi standardPregraph/hashFunction.c
- 按“i”进入编辑模式,修改如下内容。
static uint32_t cpuid ( uint32_t functionInput )
{
uint32_t eax;
uint32_t ebx;
uint32_t ecx;
uint32_t edx;
#ifdef __PIC__
asm ( "pushl %%ebx\n\t" /* save %ebx */
"cpuid\n\t"
"movl %%ebx, %[ebx]\n\t" /* save what cpuid just put in %ebx */
"popl %%ebx" : "=a" ( eax ), [ebx] "=r" ( ebx ), "=c" ( ecx ), "=d" ( edx ) : "a" ( functionInput )
: "cc" );
#else
asm ( "cpuid" : "=a" ( eax ), "=b" ( ebx ), "=c" ( ecx ), "=d" ( edx ) : "a" ( functionInput ) );
#endif
return ecx;
}
修改后:
static uint32_t cpuid ( uint32_t functionInput ) { uint32_t eax; uint32_t ebx; uint32_t ecx; uint32_t edx; #ifdef __aarch64__ ecx = 0x0; #else #ifdef __PIC__ asm ( "pushl %%ebx\n\t" /* save %ebx */ "cpuid\n\t" "movl %%ebx, %[ebx]\n\t" /* save what cpuid just put in %ebx */ "popl %%ebx" : "=a" ( eax ), [ebx] "=r" ( ebx ), "=c" ( ecx ), "=d" ( edx ) : "a" ( functionInput ) : "cc" ); #else asm ( "cpuid" : "=a" ( eax ), "=b" ( ebx ), "=c" ( ecx ), "=d" ( edx ) : "a" ( functionInput ) ); #endif #endif return ecx; } - 按“Esc”键,输入:wq!,按“Enter”保存并退出编辑。
- 打开“standardPregraph/hashFunction.c”文件。
- 执行以下命令安装samtools。
yum install samtools
- 执行以下命令开始编译。
make
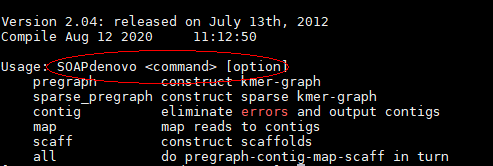
- 执行以下命令测试SOAPdenovo环境。
./SOAPdenovo-63mer
回显显示如下信息,表示环境正常。