文件存储扩容
扩容机器添加Monitor
如果需要添加Monitor,如图修改ceph1的“/etc/ceph/ceph.conf”,在“mon_initial_members”和“mon_host”中添加ceph4和ceph5的IP地址。
- 编辑ceph.conf。
1
2
3
cd
/etc/ceph/
vim ceph.conf
- 将“mon_initial_members=ceph1,ceph2,ceph3”修改为“mon_initial_members=ceph1,ceph2,ceph3,ceph4,ceph5”。
- 将“mon_host=192.168.3.156,192.168.3.157,192.168.3.158”修改为“mon_host=192.168.3.156,192.168.3.157,192.168.3.158,192.168.3.197,192.168.3.198”。

- 将ceph.conf从ceph1节点推送至各个节点。
1ceph-deploy --overwrite-conf admin ceph1 ceph2 ceph3 ceph4 ceph5
- 在ceph1创建monitor。
1ceph-deploy mon create ceph4 ceph5
- 查看mon状态。
1ceph mon stat
若“mon stat”中出现扩容机器的信息,说明扩容进来的服务器创建Monitor成功。

(可选)删除Monitor

删除Monitor对集群影响较大,一般需要提前规划好,如不需要,可以不用删除。
以删除monitor ceph2和ceph3为例,需修改ceph1的“/etc/ceph/ceph.conf”文件中的ceph2和ceph3的信息,并将ceph.conf推送至各节点。
- 编辑ceph.conf。
1
2
3
cd
/etc/ceph/
vim ceph.conf
将“mon_initial_members=ceph1,ceph2,ceph3,ceph4,ceph5”修改为“mon_initial_members=ceph1,ceph4,ceph5”。
将“mon_host=192.168.3.156,192.168.3.157,192.168.3.158,192.168.3.197,192.168.3.198”修改为“mon_host=192.168.3.156,192.168.3.197,192.168.3.198”。
- 将ceph.conf从ceph1节点推送至各个节点。
1ceph-deploy --overwrite-conf admin ceph1 ceph2 ceph3 ceph4 ceph5
- 删除monitor ceph2和ceph3。
1ceph-deploy mon destroy ceph2 ceph3
- 在客户端重新挂载,在client1节点执行下列命令,查看客户端访问ceph集群
密钥 。1cat /etc/ceph/ceph.client.admin.keyring
该命令执行一次即可,主机/客户机均已同步为一致。
- 在client1节点执行下列命令,将ceph1的根目录以Ceph为type挂载至client1的“/mnt/cephfs”。
1
2
umoun -t ceph /mnt/cephfs
mount -t ceph 192.168.3.156:6789:/  /mnt/cephfs -o name=admin,secret=上一步查看到的key,sync
部署MGR
为扩容的节点ceph4和ceph5创建MGR。
1 | ceph-deploy mgr create ceph4 ceph5 |
添加MDS服务器
如果需要添加MDS服务器,执行:
1 | ceph-deploy mds create ceph4 ceph5 |
部署OSD
给扩容进来的服务器创建OSD,由于每台服务器有12块硬盘,执行如下命令:
1 2 3 4 5 6 7 8 | for i in {a..l} do ceph-deploy osd create ceph4 --data /dev/sd${i} done for i in {a..l} do ceph-deploy osd create ceph5 --data /dev/sd${i} done |
配置存储池
- 查看存储池信息。
1ceph fs ls

- 修改相应的“pg pgpnum”和“pgnum”。
pg的计算规则如下:
Total PGs = (Total_number_of_OSD * 100 / max_replication_count) / pool_count
因此按照该环境修改“pgnum”和“pgpnum”如下:1 2 3 4
ceph osd pool set fs_metadata pg_num 256
ceph osd pool set fs_metadata pgp_num 256
ceph osd pool set fs_data pg_num 2048
ceph osd pool set fs_data pgp_num 2048
验证扩容
扩容后,Ceph会通过迁移来自其他OSD的一些pg到新添进的OSD,再次平衡数据。
- 确认数据迁移结束后集群是否恢复健康。
1ceph -s
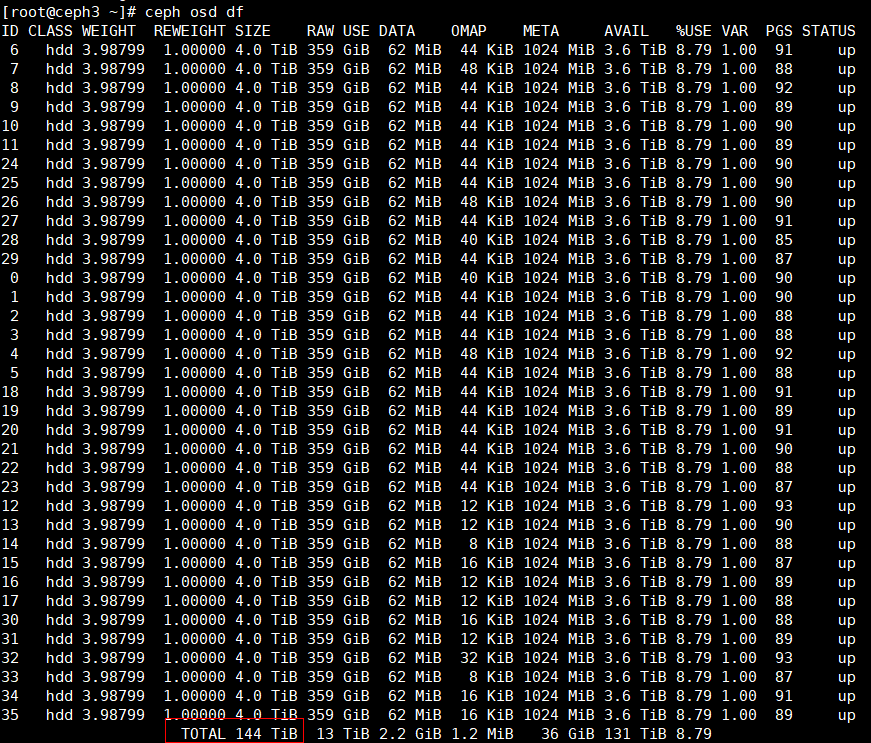
- 确定集群的存储容量是否增加。
1ceph osd df

父主题: Ceph扩容