编译安装
- 获取Spring-Boot源码。
- 解压缩源码。
1tar -zxvf vx.x.x.RELEASE.tar.gz
- 将解压后的源码包名称更换为spring-boot,并进入源码目录。
1mv spring-boot-x.x.x.RELEASE spring-boot && cd spring-boot
- 定位到“spring-project/spring-boot”目录。
1cd spring-boot-project/spring-boot
- 剔除netty-transport-native-epoll的x86-64版本的依赖,同时新增netty-transport-native-epoll的aarch64版本的依赖。
- 打开pom.xml文件。
1vim pom.xml - 按“i”进入编辑模式,修改如下内容。
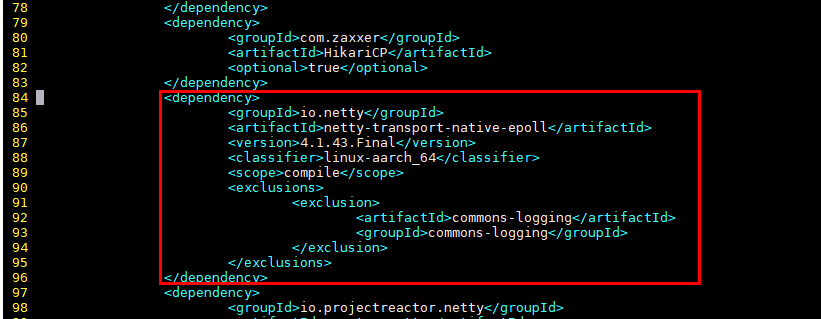
- 在第83行的下一行添加代码。
 1
 2
 3
 4
 5
 6
 7
 8
 9
10
11
12
13
                  <dependency>
                          <groupId>io.netty</groupId>
                          <artifactId>netty-transport-native-epoll</artifactId>
                          <version>4.1.43.Final</version>
                          <classifier>linux-aarch_64</classifier>
                          <scope>compile</scope>
                          <exclusions>
                                  <exclusion>
                                          <artifactId>commons-logging</artifactId>
                                          <groupId>commons-logging</groupId>
                                  </exclusion>
                          </exclusions>
                  </dependency>
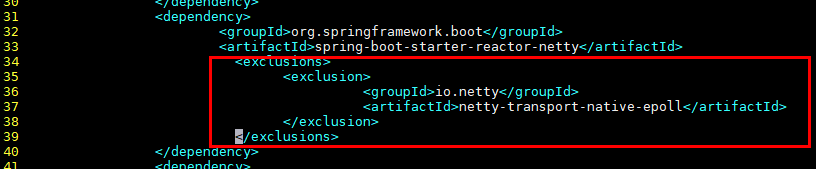
- 在第100行的下一行添加代码。
1
2
3
4
5
6
                         <exclusions>
                                 <exclusion>
                                         <groupId>io.netty</groupId>
                                         <artifactId>netty-transport-native-epoll</artifactId>
                                 </exclusion>
                         </exclusions>

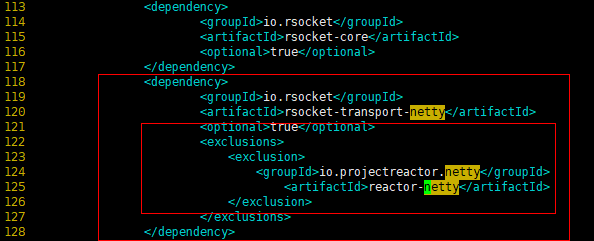
- 在第121行的下一行添加代码。
1
2
3
4
5
6
                         <exclusions>
                             <exclusion>
                                 <groupId>io.projectreactor.netty</groupId>
                                     <artifactId>reactor-netty</artifactId>
                             </exclusion>
                         </exclusions>
- 在第83行的下一行添加代码。
- 按“Esc”键,输入:wq!,按“Enter”保存并退出编辑。
- 打开pom.xml文件。
- 定位到“spring-boot-project/spring-boot-starters/spring-boot-starter-webflux”目录。
1cd ../spring-boot-starters/spring-boot-starter-webflux/
- 剔除netty-transport-native-epoll的x86-64版本的依赖。
- 打开pom.xml文件。
1vim pom.xml - 按“i”进入编辑模式,在第33行的下一行添加如下内容。
1
2
3
4
5
6
                          <exclusions>
                                <exclusion>
                                          <groupId>io.netty</groupId>
                                          <artifactId>netty-transport-native-epoll</artifactId>
                                </exclusion>
                          </exclusions>
- 按“Esc”键,输入:wq!,按“Enter”保存并退出编辑。
- 打开pom.xml文件。
- 定位到“spring-boot-starter-artemis”目录。
1cd ../spring-boot-starter-artemis
- 剔除netty-transport-native-epoll的x86-64版本的依赖。
- 打开pom.xml文件。
1vim pom.xml - 按“i”进入编辑模式,在第37行的下一行增加如下内容。
1
2
3
4
                                <exclusion>
                                        <groupId>io.netty</groupId>
                                        <artifactId>netty-transport-native-epoll</artifactId>
                                </exclusion>

- 按“Esc”键,输入:wq!,按“Enter”保存并退出编辑。
- 打开pom.xml文件。
- 定位到“spring-boot-starter-rsocket”目录
1cd ../spring-boot-starter-rsocket
- 剔除netty-transport-native-epoll的x86-64版本的依赖。
- 打开pom.xml文件。
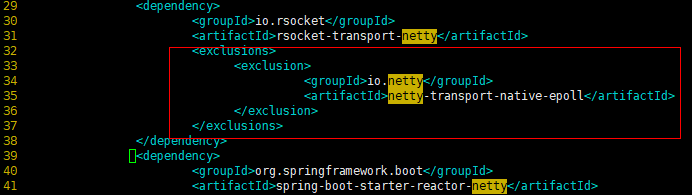
1vim pom.xml - 按“i”进入编辑模式,在第31行的下一行增加如下内容。
1
2
3
4
5
6
                        <exclusions>
                              <exclusion>
                                        <groupId>io.netty</groupId>
                                        <artifactId>netty-transport-native-epoll</artifactId>
                              </exclusion>
                        </exclusions>
- 按“Esc”键,输入:wq!,按“Enter”保存并退出编辑。
- 打开pom.xml文件。
- 配置Cntlm。
若机器需配置代理才可访问外网,则需要配置Cntlm,参考配置Cntlm。
- 将ARM 64架构版本的netty-transport-native-epoll-4.1.43.Final-linux-aarch_64.jar包和netty-transport-native-epoll-4.1.48.Final.jar包放入Maven本地仓库。
- CentOS 7.6/openEuler 20.03系统请参考netty-transport-native-epoll获取失败的解决方法。
- CentOS 8.1系统下参考步骤如下:
- 创建库目录(如果没有该目录)。
1
2
mkdir -p /root/.m2/repository/io/netty/netty-transport-native-epoll/4.1.43.Final
mkdir -p /root/.m2/repository/io/netty/netty-transport-native-epoll/4.1.48.Final
- 获取netty-transport-native-epoll-4.1.43.Final-linux-aarch_64.jar包和netty-transport-native-epoll-4.1.48.Final.jar包。
- 也可参考《netty-transport-native-epoll-4.1.43.Final-linux-aarch_64.jar移植指南》自行在CentOS 8.1上编译获取JAR包。
1
2
wget https://mirrors.huaweicloud.com/kunpeng/maven/io/netty/netty-transport-native-epoll/4.1.43.Final/netty-transport-native-epoll-4.1.43.Final-linux-aarch_64.jar --no-check-certificate
wget https://mirrors.huaweicloud.com/kunpeng/maven/io/netty/netty-transport-native-epoll/4.1.48.Final/netty-transport-native-epoll-4.1.48.Final.jar --no-check-certificate
- 将JAR包放入Maven本地仓库。
1
2
mv netty-transport-native-epoll-4.1.43.Final-linux-aarch_64.jar /root/.m2/repository/io/netty/netty-transport-native-epoll/4.1.43.Final
mv netty-transport-native-epoll-4.1.48.Final.jar /root/.m2/repository/io/netty/netty-transport-native-epoll/4.1.48.Final
- 创建库目录(如果没有该目录)。
- 编译安装。
1
2
cd /home/spring-boot
mvn clean install
若编译过程中产生报错,请根据报错信息并参考故障排除解决,解决完成后需重新如下执行编译安装命令。
1mvn spring-javaformat:apply clean install

如果Java文件(*.java)被修改过,则编译安装命令中需要增加编译参数:spring-javaformat:apply。
父主题: Spring Boot 移植指南