机密虚机需要在云上支持OVS+DPDK,以实现网络加速功能。该功能基于openEuler-24.03-LTS-SP1完成开发调测。当前支持的网卡类型为:板载网卡-NIC 1 (SF221Q) 和1822网卡-SP580。
约束和限制
由于openEuler 24.03暂未适配MLNX_OFED驱动,故当前暂不支持DPDK接管cx4、cx5和cx6等Mellanox系列网卡。
- 编译安装DPDK 23.11。
- 安装依赖的软件包。
yum install python3-pyelftools kernel-devel kernel-headers groff autoconf automake libtool -y
- 下载并解压DPDK软件包。
cd /home
wget http://fast.dpdk.org/rel/dpdk-23.11.1.tar.xz
tar -xvf dpdk-23.11.1.tar.xz
- 使用meson初始化构建配置。
cd /home/dpdk-stable-23.11.1
meson --prefix=/usr --libdir=/usr/lib64 --bindir=/usr/bin --sbindir=/usr/sbin --includedir=/usr/include/dpdk -Dc_args="-O0 -g -fstack-protector-strong" -Dc_link_args="-g -Wl,-z,relro,-z,now,-z,noexecstack"  -Denable_kmods=true -Dplatform=generic build
- 使用ninja构建并安装。
ninja -C build && ninja -C build install && ldconfig
- 查看安装的DPDK版本信息。
pkg-config --modversion libdpdk

- 安装依赖的软件包。
- 编译安装OVS 3.2.1。
- 下载并解压openvswitch软件包。
cd /home
wget https://www.openvswitch.org/releases/openvswitch-3.2.1.tar.gz
tar -zxvf openvswitch-3.2.1.tar.gz
- 生成编译配置。
cd /home/openvswitch-3.2.1
./boot.sh
./configure CFLAGS="-march=armv8-a+lse+crc -fstack-protector-all -fstack-protector-strong " --prefix=/usr --sysconfdir=/etc --localstatedir=/var --libdir=/lib64 --enable-ssl --enable-shared --with-dpdk=shared
- 编译。
make -j`nproc`
- 安装。
make -j`nproc` install
- 查看安装的openvswitch版本信息。
ovs-vswitchd --version
- 下载并解压openvswitch软件包。
- 配置OVS以服务化启动。
cd /home/openvswitch-3.2.1
ovsdb-tool create /etc/openvswitch/conf.db
cd rhel/
cp etc_init.d_openvswitch /etc/init.d/openvswitch
chmod 755 /etc/init.d/openvswitch
mkdir -p /var/log/openvswitch/
mkdir /var/run/openvswitch/
service openvswitch restart
OVS服务已启动。

- Host开启内存大页。
- 修改“/boot/efi/EFI/openEuler/grub.cfg”文件。
- 打开“/boot/efi/EFI/openEuler/grub.cfg”文件。
vim /boot/efi/EFI/openEuler/grub.cfg
- 按“i”进入编辑模式,在启动菜单的当前内核cmdline选项中添加内核启动项参数 “default_hugepagesz=1024M hugepagesz=1024M hugepages=64 iommu.passthrough=1”。

- 按“Esc”键退出编辑模式,输入:wq!,按“Enter”键保存退出文件。
- 打开“/boot/efi/EFI/openEuler/grub.cfg”文件。
- 重启服务器进入BIOS设置界面,具体可参见《TaiShan 服务器 BIOS 参数参考(鲲鹏920处理器)》中的“进入BIOS界面”相关内容。。
- 在BIOS中依次选择“Advanced”>“MISC Config”按“Enter”键进入。
- 将“Support Smmu”设置为“Enabled” 按“F10”保存退出。
- 查看Host内存大页设置。内存大页粒度为1GB,返回信息表示大页数量为64,大页数量用户可根据内存情况自行设置。
cat /proc/meminfo |grep -i huge

- 修改“/boot/efi/EFI/openEuler/grub.cfg”文件。
- DPDK+OVS网络设置。
- 加载网卡驱动模块。
modprobe uio_pci_generic
- 查看空闲网卡及其BDF号。
ip a

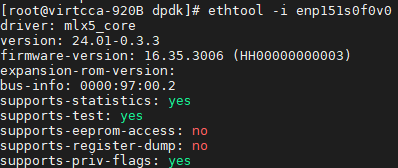
- 查询网卡参数。
ethtool -i enp151s0f0v0
- DPDK接管网卡(mlx5不需要接管)。
dpdk-devbind.py -b uio_pci_generic --force 0000:97:00.2
dpdk-devbind.py -s
网卡已接管成功。

- 查看Host上NUMA节点数量。
numactl -H

查询到Host上有4个NUMA节点。
- 修改OVS配置并重启。
service openvswitch start
ovs-vsctl --no-wait set Open_vSwitch . other_config:dpdk-init=true other_config:dpdk-socket-mem="4096,4096,4096,4096" other_config:dpdk-lcore-mask="0x1F" other_config:pmd-cpu-mask="0x1E" other_config:dpdk-pmd-driver=/lib64/librte_pmd_hinic.so other_config:vhost-iommu-support=true
service openvswitch restart

other_config:dpdk-socket-mem中4096的配置个数取决于Host上的NUMA节点数量。
- 添加配置OVS网络脚本。
cd /home
vi ife_topology.sh
新建脚本中添加以下内容,根据实际修改下述内容中的BDF号。
#!/bin/bash
tap_num=2
# 设置网络
set_normal(){
    ovs-vsctl add-br br-int -- set bridge br-int datapath_type=netdev
    ovs-vsctl add-port br-int p-tap-dpdk --  set Interface p-tap-dpdk type=patch options:peer=p-tap-dpdk-int

    for i in `seq 1 $tap_num`
    do
        ovs-vsctl add-br br-ply$i -- set bridge br-ply$i datapath_type=netdev
        ovs-vsctl add-port br-ply$i tap$i --  set Interface tap$i type=dpdkvhostuserclient options:vhost-server-path="/tmp/tap$i"
        ovs-vsctl add-port br-ply$i p-tap$i-int --  set Interface p-tap$i-int type=patch options:peer=p-tap$i
        ovs-vsctl add-port br-int p-tap$i --  set Interface p-tap$i type=patch options:peer=p-tap$i-int
    done

    ovs-vsctl add-br br-dpdk -- set bridge br-dpdk datapath_type=netdev
    # 0000:97:00.0 即当前的BDF号
    ovs-vsctl add-port br-dpdk p0 -- set Interface p0 type=dpdk options:dpdk-devargs=0000:97:00.0 options:n_rxq=10
    ovs-vsctl add-port br-dpdk p-tap-dpdk-int --  set Interface p-tap-dpdk-int type=patch options:peer=p-tap-dpdk
}
# 清除网络
clean(){
    for i in `ovs-vsctl list-br`
    do
        ovs-vsctl del-br $i
    done
}
case $1 in
clean)
    clean
    ;;
normal)
    set_normal
    ;;
esac
支持以下两种方式运行脚本。
sh ife_topology.sh normal   # 设置网络
sh ife_topology.sh clean    # 清除网络
- 执行sh ife_topology.sh clean清除网络后重新设置网络时,需要执行service openvswitch restart重启OVS服务。
- 若执行sh ife_topology.sh normal报错:"ovs-vsctl: Error detected while setting up 'p0': Error attaching device 'xxxx:xx:xx.x' to DPDK. See ovs-vswitchd log for details." 可参考如下方法解决:
- 查看系统日志,确认存在"dpdk|ERR|EAL: Expecting 'PA' IOVA mode but current mode is 'VA', not initializing"日志。
journalctl -xe
- 设置Open vSwitch的配置参数。
ovs-vsctl --no-wait set Open_vSwitch . other_config:iova-mode="PA"
- 清除网络、重启openvswitch服务、重新设置网络。
- 查看系统日志,确认存在"dpdk|ERR|EAL: Expecting 'PA' IOVA mode but current mode is 'VA', not initializing"日志。
- 设置OVS网络。
sh ife_topology.sh normal
- 加载网卡驱动模块。
- 机密虚机使能DPDK+OVS网络加速。
- 在2的虚机配置的基础上,CPU和内存之间的访问模式使用“shared”。
<cpu mode='host-passthrough'> <topology sockets='1' cores='2' threads='1'/> <numa> <cell id='0' cpus='0-1' memory='4' unit='GiB' memAccess='shared'/> </numa> </cpu> - 配置DPDK接管的网卡端口。
<interface type='vhostuser'> <driver name='vhost' queues='4' iommu='on'/> <source type='unix' path='/tmp/tap1' mode='server'/> <target dev='tap1'/> <model type='virtio'/> </interface> - 机密虚机使用源码编译的QEMU。
cd /home
git clone https://gitee.com/openeuler/qemu.git -b qemu-8.2.0
cd qemu
mkdir build && cd build
../configure --target-list=aarch64-softmmu
make -j`nproc`
虚拟机配置文件中配置QEMU的路径为:“/home/qemu/build/qemu-system-aarch64”。
- 启动机密虚机后可以看到新增的可用网卡。
ip a

- 网卡添加网络配置后,虚拟机和IP地址同网段的另一台服务器可互相连接,网卡可用。
- 在2的虚机配置的基础上,CPU和内存之间的访问模式使用“shared”。